
When your engine fails to turn over, the culprit may not always be the battery or starter motor. Often, the issue lies with a faulty starter relay — a small but critical component that acts as a switch, delivering power from the battery to the starter motor. Unlike larger parts, relays are easy to overlook, yet their failure can leave you stranded. Understanding how to test a starter relay properly ensures you diagnose problems accurately, avoid unnecessary replacements, and keep your vehicle running reliably.
Understanding the Starter Relay’s Role
The starter relay is an electromagnetic switch located in the fuse and relay box, typically under the hood. When you turn the ignition key, a small current activates the relay, which then closes a high-current circuit to engage the starter motor. This design protects the ignition switch from handling heavy electrical loads directly.
A failing relay may cause intermittent starting issues, a clicking sound without engine turnover, or complete no-start conditions. Because symptoms overlap with other components like the battery or solenoid, precise testing is essential before replacement.
“Never assume a no-start condition means a dead battery. A bad relay is one of the most commonly misdiagnosed issues in automotive electrical systems.” — Marcus Reed, ASE-Certified Master Technician
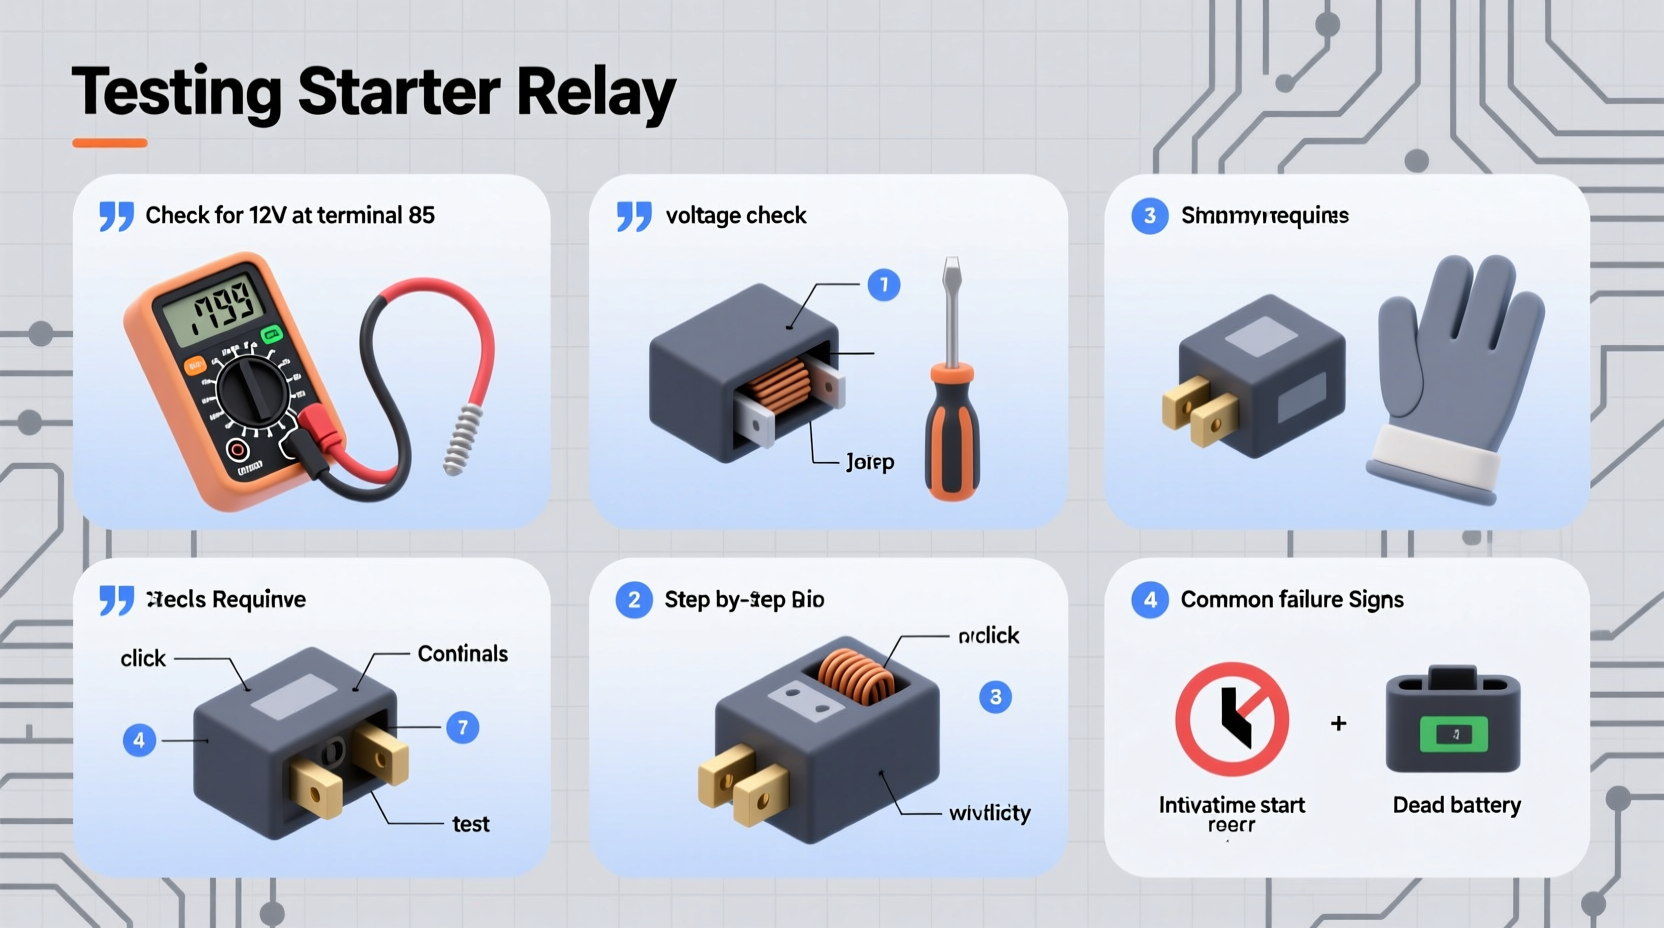
Essential Tools for Testing a Starter Relay
Accurate diagnosis requires the right tools. Using improper methods can lead to false readings or damage sensitive circuits. Below is a list of recommended equipment:
- Digital Multimeter (DMM): Measures voltage, resistance, and continuity with precision.
- Test Light: A quick way to verify power presence at terminals.
- Jumper Wires with Alligator Clips: Useful for bypassing the relay during testing.
- Relay Puller or Needle-Nose Pliers: Safely removes relays without damaging connectors.
- Vehicle Service Manual: Provides relay location, pinout diagrams, and expected values.
Step-by-Step Guide to Test a Starter Relay
Follow this systematic process to determine whether your starter relay is functioning correctly.
- Locate the Relay: Refer to your owner’s manual or fuse box diagram. The starter relay is usually labeled and found in the main engine compartment fuse panel.
- Inspect Visually: Look for signs of melting, corrosion, or cracked housing. Burn marks indicate overheating and potential internal failure.
- Listen for Clicks: Have an assistant turn the key to “start” while you listen near the relay. A healthy relay produces a distinct click. No sound suggests control circuit or coil issues.
- Check Power Supply: Set your multimeter to DC volts. With the ignition off, probe the relay’s power input terminal (usually marked 30). There should be ~12.6V from the battery. If not, trace back to fuses or wiring faults.
- Test Control Circuit: Turn the key to “start” and measure voltage at the trigger terminal (typically 85 or 86). You should see 10–12V. Absence here points to ignition switch, neutral safety switch, or PCM issues.
- Verify Ground Path: Use the multimeter in continuity mode between ground terminal (86 or 85) and chassis ground. There should be near-zero resistance when the start signal is active.
- Bench Test the Relay: Remove the relay. Apply 12V across the coil pins (85 & 86), and use a test light or multimeter to check continuity between 30 and 87. If no connection forms, the internal contacts are failed.
- Jump Test (Optional): Using jumper wires, connect terminal 30 directly to 87. If the starter engages, the relay is faulty. Caution: Only do this briefly and ensure the transmission is in park/neutral.
Common Relay Faults and Troubleshooting Tips
Even with proper testing, some failures are subtle. Here are frequent issues and how to address them:
| Fault Symptom | Possible Cause | Solution |
|---|---|---|
| Clicking sound but no start | Coil works but contacts burned or pitted | Replace relay; inspect for excessive current draw |
| No click, no power to starter | Open coil, blown control fuse, or broken wire | Check fuse #STRLY, test control circuit, verify ignition output |
| Intermittent starting | Loose socket, heat-induced failure, or degraded solder joints | Clean terminals, replace relay and inspect for overheating signs |
| Starter stays engaged after release | Welded contacts inside relay | Immediate replacement required; check for voltage spikes |
Real-World Example: Diagnosing a Morning No-Start
Consider Sarah, who drives a 2012 Honda Accord. One cold morning, her engine wouldn’t crank. The lights were bright, and she heard a single click from the fuse box. She called roadside assistance, but instead of towing, the technician pulled out a multimeter.
He tested battery voltage (12.4V), confirmed power at terminal 30, but found no voltage at terminal 85 when turning the key. Further inspection revealed a blown 7.5A fuse labeled \"IGN2,\" which supplied the relay’s control circuit. Replacing the fuse restored function — the root cause was a minor short in aged wiring near the steering column.
This case highlights why comprehensive testing matters: the relay wasn’t faulty, but without checking each circuit, it would have been replaced unnecessarily.
Troubleshooting Checklist
Use this checklist to methodically evaluate a suspect starter relay:
- ✅ Battery voltage above 12.4V
- ✅ Fuse for starter relay intact
- ✅ Power present at relay terminal 30
- ✅ Voltage at control terminal (85/86) during start attempt
- ✅ Solid ground on control side
- ✅ Audible click from relay when key turned
- ✅ Continuity between terminals 30 and 87 when activated
- ✅ No visible damage or overheating on relay or socket
Frequently Asked Questions
Can a starter relay fail intermittently?
Yes. Heat, vibration, and worn internal contacts can cause sporadic operation. Intermittent relays often work when cold but fail after driving and heating up. This makes them difficult to diagnose without repeated testing under load.
Is it safe to jump a starter relay?
Jumping between terminals 30 and 87 briefly is safe if done carefully and only when the vehicle is in park or neutral. However, never bypass the control circuit using permanent wires — this can cause the starter to engage unexpectedly and damage the flywheel or starter gear.
How long does a starter relay typically last?
Most relays last 80,000 to 150,000 miles under normal conditions. Frequent short trips, high underhood temperatures, or aftermarket modifications that increase load can shorten lifespan.
Final Thoughts and Action Steps
Testing a starter relay isn’t just about swapping parts until the car starts — it’s about understanding the electrical system and verifying each stage of the starting sequence. With basic tools and methodical checks, you can confidently isolate faults and avoid costly misdiagnoses.
Next time your engine refuses to turn over, resist the urge to replace the battery or starter immediately. Start with the relay. Check power, ground, and response. Document your findings. More often than not, you’ll save time, money, and frustration by focusing on the smallest link in the chain.


 浙公网安备
33010002000092号
浙公网安备
33010002000092号 浙B2-20120091-4
Comments
No comments yet. Why don't you start the discussion?