
Disconnecting a car battery may seem like a simple task—just loosen a couple of terminals and pull the cables off. But doing it incorrectly can lead to serious consequences: electrical shorts, fried electronics, accidental airbag deployment, or even battery explosions. Whether you're replacing the battery, storing your vehicle long-term, or performing electrical work, knowing the right way to disconnect your car battery is critical for safety and system integrity.
This guide walks through every step of the process with precision, backed by industry standards and real-world mechanics' insights. From preparation to reconnection, you’ll learn not just *how* to disconnect your battery—but how to do it safely, efficiently, and without triggering error codes or damaging sensitive components.
Why Proper Battery Disconnection Matters
A car battery isn’t just a power source—it’s part of an integrated electrical ecosystem. Modern vehicles rely on complex computer systems (ECUs) that store adaptive settings, security protocols, and sensor calibrations. An abrupt power loss due to improper disconnection can reset these systems, leading to drivability issues, radio lockouts, or even immobilizer activation.
Beyond electronics, safety risks include:
- Short circuits: If a wrench touches both terminals or grounds while loosening a cable, it can cause sparks or melt metal.
- Hydrogen gas ignition: Batteries emit flammable gas; a spark near the terminal can trigger an explosion.
- Reverse polarity damage: Reconnecting in the wrong order can destroy alternators, fuses, and control modules.
“More than 30% of DIY electrical repairs start with a mismanaged battery disconnect. One slip with a tool can cost hundreds in repairs.” — Carlos Mendez, ASE-Certified Master Technician
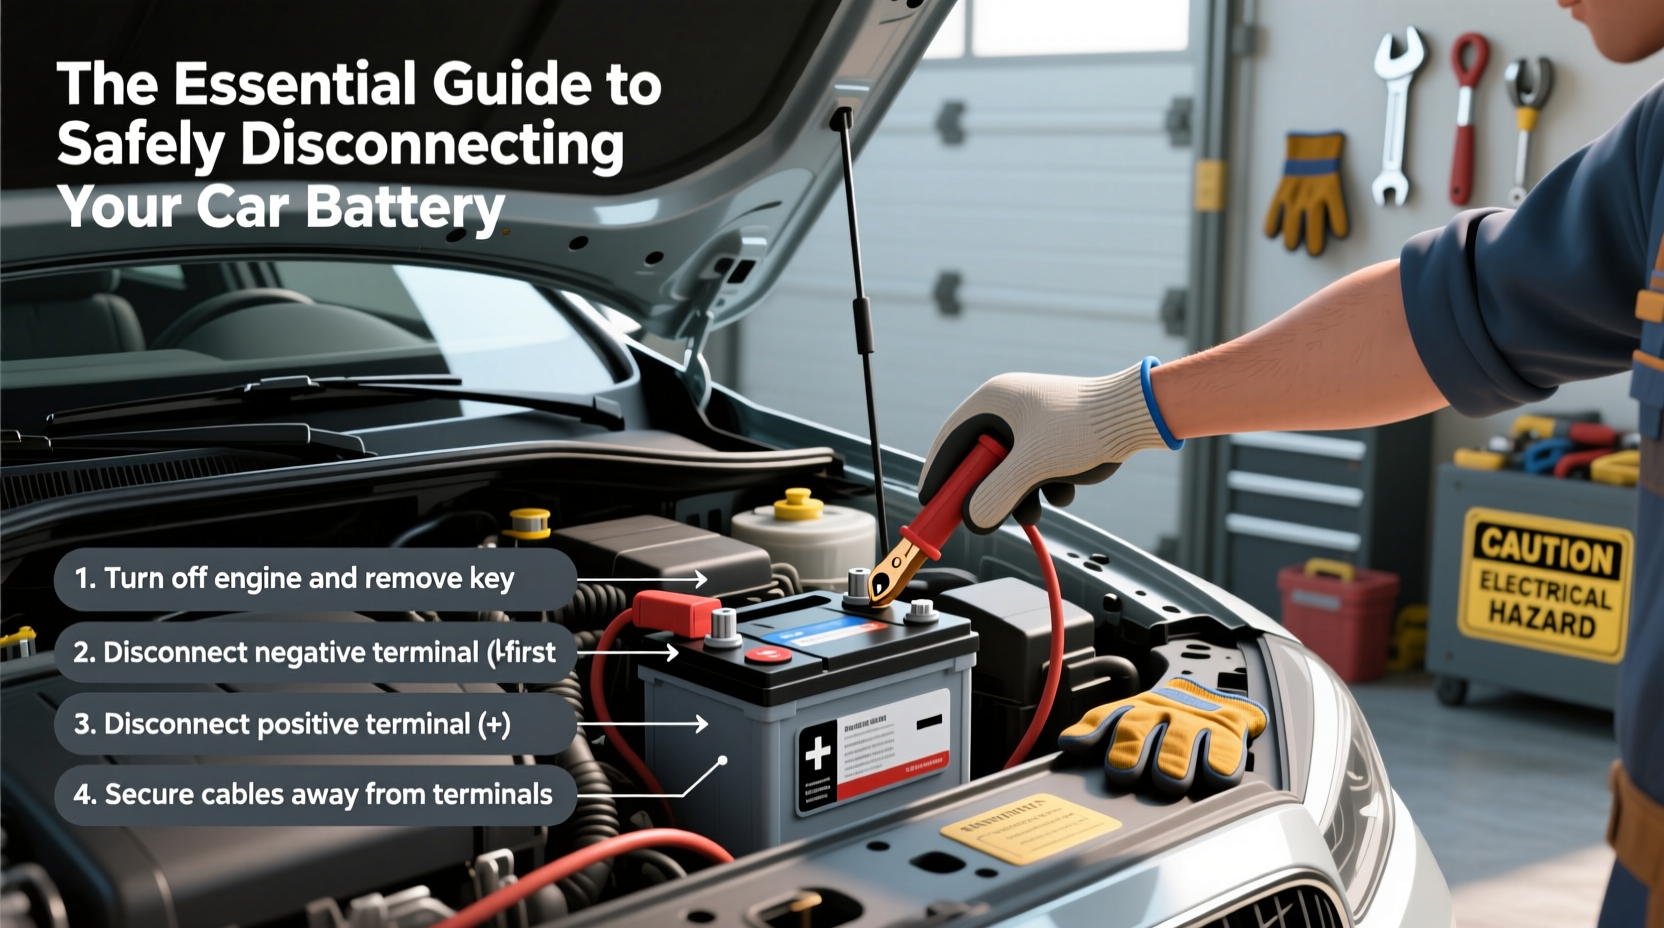
Step-by-Step Guide to Safely Disconnect Your Car Battery
Follow this sequence carefully. Each step minimizes risk and ensures system stability.
- Turn off the engine and remove the key. Wait at least 10 minutes to allow electronic systems to fully power down. Some modules remain active after shutdown.
- Gather tools: Insulated wrench or socket set (correct size for your terminals), gloves, eye protection, baking soda (for cleaning acid residue), and a memory saver (optional but recommended).
- Locate the battery. Most are under the hood, but some models place them in the trunk or under seats. Refer to your owner’s manual if unsure.
- Identify terminals: The positive (+) terminal is usually red and marked “POS” or “+”. The negative (–) is black and labeled “NEG” or “–”.
- Start with the negative terminal. Loosen the nut securing the black cable using an insulated wrench. Lift the cable away and secure it so it cannot contact the terminal.
- Move to the positive terminal. Repeat the process: loosen the nut, remove the red cable, and tuck it aside.
- Inspect the battery tray and terminals. Look for corrosion, cracks, or leaks. Clean any white/green buildup with a mixture of baking soda and water using a wire brush.
- Remove mounting hardware. Most batteries are held by a clamp or bracket. Remove it before lifting out the battery.
- Lift the battery straight out. Car batteries are heavy (30–50 lbs) and contain sulfuric acid. Use proper lifting technique—bend knees, keep back straight.
Do’s and Don’ts When Handling Car Batteries
| Do’s | Don’ts |
|---|---|
| Wear safety glasses and gloves | Work in wet or damp conditions |
| Use insulated tools | Allow metal tools to bridge terminals |
| Disconnect negative first, reconnect last | Drop or tip the battery (acid can leak) |
| Clean terminals with baking soda solution | Smoke or use open flames near the battery |
| Secure loose cables after removal | Reconnect in reverse order (risk of short) |
Real-World Example: A DIYer’s Costly Mistake
Mark, a weekend mechanic, decided to replace his SUV’s battery after noticing slow cranking. He turned off the engine, grabbed his wrench, and immediately went for the positive terminal. Midway through loosening the nut, the wrench slipped and touched the engine block—a direct ground. A bright spark flew, and the vehicle’s dash lights flickered.
After completing the swap, Mark found his radio was locked, the transmission shifted roughly, and the check engine light stayed on. A trip to the dealership revealed that the ECU had partially reset and needed reprogramming. The fix cost $180—more than the price of the new battery.
The root cause? He disconnected the positive first, creating a high-risk path for current flow. Had he followed the correct sequence—negative first—he would have avoided the short circuit entirely.
When to Use a Memory Saver
If your car has factory programming for windows, radio presets, clock, or adaptive ECU settings, consider using a memory saver. This small device plugs into the OBD2 port (under the dashboard) and maintains power during battery removal.
While not always necessary, it prevents frustration from resetting navigation, Bluetooth pairings, or seat positions. It also avoids triggering anti-theft locks on infotainment systems.
Essential Safety Checklist
Before touching any terminal, run through this checklist:
- ✅ Engine is off and keys are removed
- ✅ Work area is dry and well-lit
- ✅ You’re wearing safety glasses and gloves
- ✅ Tools are insulated and correct size
- ✅ Negative terminal will be disconnected first
- ✅ Cables will be secured after removal
- ✅ Battery is stable and not leaking
- ✅ Memory saver installed (if preserving settings)
Reconnecting the Battery Safely
Reconnection is just as important as disconnection. Follow the reverse order:
- Place the battery securely in the tray and fasten the hold-down clamp.
- Reattach the positive cable first. Tighten the nut firmly to prevent arcing.
- Reconnect the negative cable last. Ensure full contact and secure fit.
- Double-check all connections are tight and corrosion-free.
- If you used a memory saver, unplug it now.
- Start the engine and verify all systems function normally.
Note: Some vehicles may require a brief idle period (5–10 minutes) to relearn idle settings after power loss. If performance feels off, drive normally for a few cycles to allow recalibration.
Frequently Asked Questions
Can I disconnect only the negative terminal for storage?
Yes. For long-term storage (over 30 days), disconnecting just the negative terminal prevents parasitic drain while minimizing risks. This breaks the circuit without exposing the positive side.
Will disconnecting the battery reset my ECU?
It likely will. The ECU may lose adaptive fuel and timing maps, causing temporary rough idling or reduced fuel economy. These usually return to normal within a few driving cycles.
How often should I clean battery terminals?
Inspect every 6 months. Clean if you see white, blue, or green corrosion. A quick cleaning with baking soda and water improves conductivity and prevents voltage drops.
Final Thoughts
Safely disconnecting your car battery isn’t about complexity—it’s about discipline. Taking a few extra minutes to follow the correct procedure protects you, your vehicle, and your wallet. From avoiding explosive hydrogen gas to preserving expensive electronic configurations, each step serves a purpose grounded in automotive engineering.
Whether you're a seasoned DIYer or a first-time maintainer, treat the battery with respect. It's not just a component; it's the heart of your car’s electrical life. Do it right once, and you’ll avoid costly mistakes down the road.


 浙公网安备
33010002000092号
浙公网安备
33010002000092号 浙B2-20120091-4
Comments
No comments yet. Why don't you start the discussion?