
A lean-to attached to the side of your home is one of the most practical and cost-effective outdoor structures you can build. Whether used as a covered patio, tool storage, firewood shelter, or extension of your living space, a well-constructed lean-to adds both function and value. Unlike freestanding sheds or complex roof additions, a lean-to relies on your existing house wall for support, simplifying construction while maximizing durability when done correctly. This guide walks through every phase—from planning and materials to execution and maintenance—so you can build a structure that withstands weather, time, and heavy use.
Why Build a Lean-To? Practical Benefits
The appeal of a lean-to lies in its simplicity and versatility. By anchoring one side to your home’s exterior wall, you eliminate the need for full framing on that side, reducing material costs and labor. Common uses include:
- Outdoor cooking or dining area with overhead protection
- Sheltered workspace for gardening tools or lawn equipment
- Additional shade and rain cover for decks or patios
- Seasonal storage for firewood, bicycles, or outdoor furniture
Beyond utility, a properly integrated lean-to enhances curb appeal. When designed with matching materials and clean lines, it appears as a natural extension of your home rather than an afterthought.
Planning Your Lean-To: Key Design Considerations
Success begins long before the first post is set. Thoughtful planning ensures structural integrity, proper drainage, and aesthetic harmony with your home.
Roof Pitch and Water Runoff
A lean-to roof must slope adequately to shed water efficiently. A minimum pitch of 1/4 inch per foot is acceptable, but 3:12 (3 inches of drop per 12 inches of run) is recommended for reliability. Steeper pitches handle snow and heavy rain better, especially in northern climates.
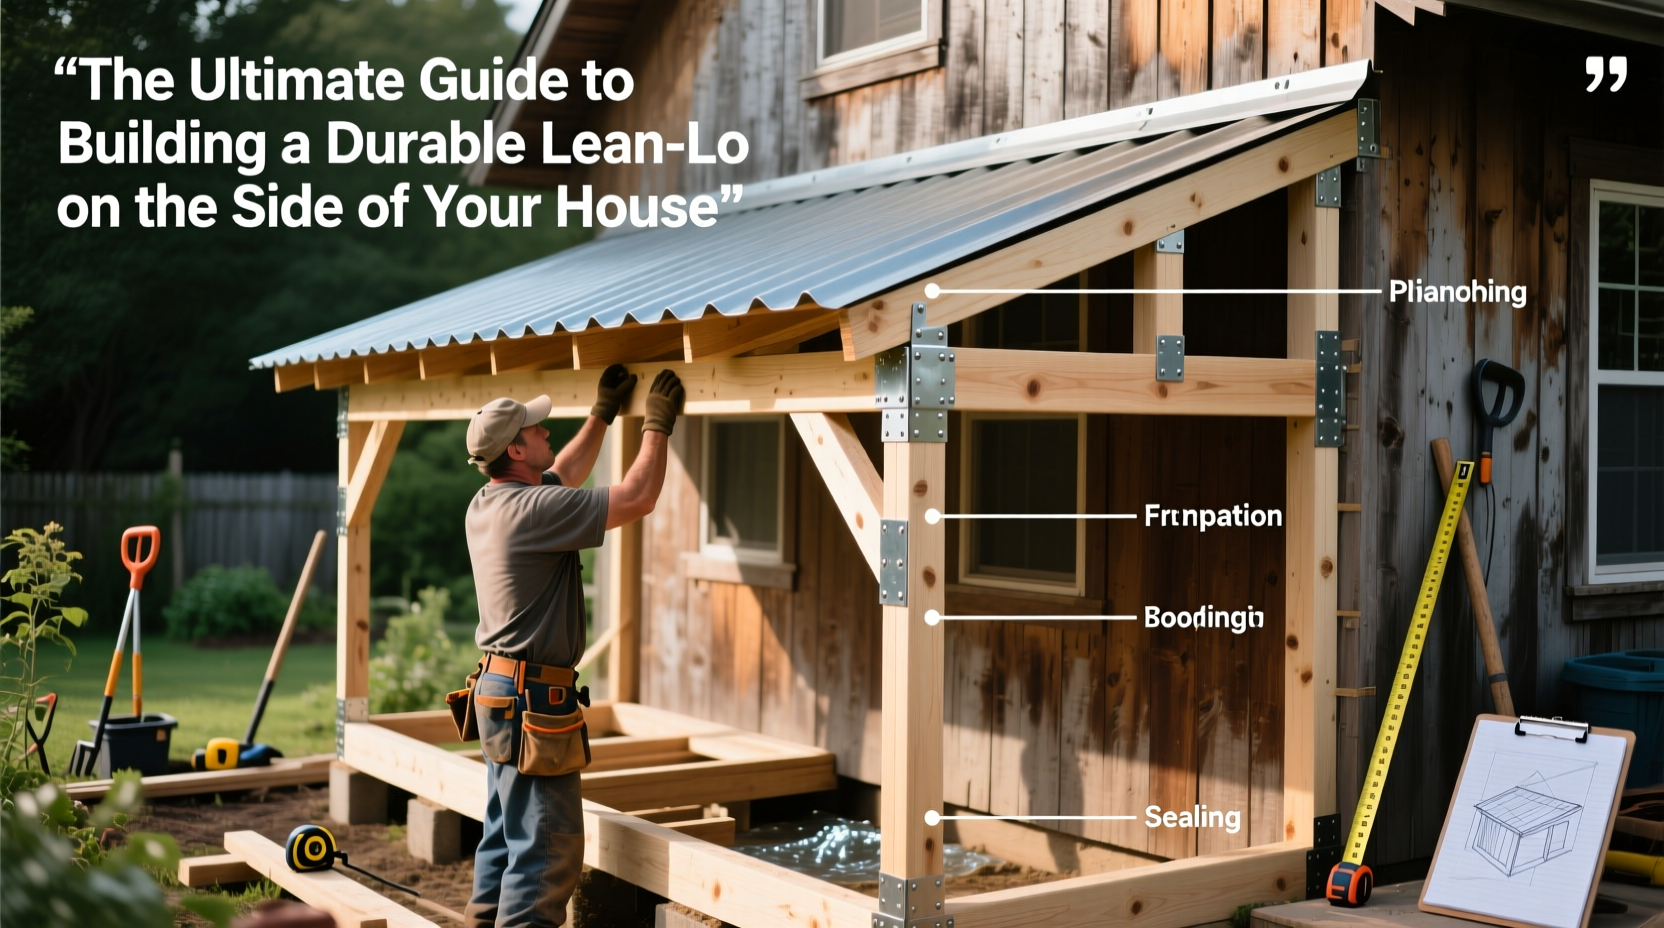
Attachment Point on House
The ledger board, which connects the roof to your house, must be secured to structural framing—not just siding or sheathing. Use corrosion-resistant lag bolts spaced every 16 inches into wall studs. Apply waterproof flashing tape behind the ledger to prevent moisture intrusion.
Size and Proportions
Keep the depth (distance from house to outer edge) under 12 feet for optimal stability without intermediate supports. Wider spans require ridge beams or additional posts, increasing complexity.
“Improper ledger attachment is the most common failure point in attached structures. Never skip structural fastening or flashing.” — Mark Reynolds, Residential Building Inspector, 18 years experience
Materials and Tools Checklist
Selecting the right materials ensures longevity and reduces maintenance. Below is a comprehensive checklist for a standard 10' x 12' lean-to.
📋 Building Materials Checklist
- Treated 4x4 or 6x6 posts (4–6 depending on span)
- Pressure-treated 2x6 or 2x8 for ledger and beam
- 2x6 rafters (spaced 16\" on center)
- ½” plywood or OSB for roof sheathing
- Asphalt shingles or metal roofing panels
- Galvanized joist hangers, hurricane ties, and rafter anchors
- Concrete mix (for post footings)
- Flashing tape and drip edge
- Exterior-grade screws and bolts
Essential Tools
- Circular saw or miter saw
- Drill/driver with bits
- Level and laser level
- Tape measure and framing square
- Post hole digger or auger
- Ladder and scaffolding (if working at height)
Step-by-Step Construction Process
Follow this logical sequence to ensure a safe, code-compliant build.
1. Prepare the Site
Clear vegetation and debris. Level the ground where posts will go. Use stakes and string to mark exact post locations. Ensure the layout is square using the 3-4-5 triangle method.
2. Install Post Footings
Dig holes at least 30 inches deep (below frost line in cold climates). Insert sonotubes, add rebar for reinforcement, and pour concrete. Set anchor brackets while wet. Allow 48 hours to cure.
3. Attach the Ledger Board
Remove siding where the ledger will sit. Locate wall studs using a stud finder. Cut a weep screed or install Z-flashing behind the ledger. Secure with ½” x 6” lag bolts into each stud. Seal all gaps with exterior-grade caulk.
4. Erect Support Posts
Once footings are cured, mount pressure-treated posts into brackets. Brace temporarily. Use a level and transit to ensure plumb. Trim tops to match the downward slope of the intended roof pitch.
5. Install Beam and Rafters
Attach a horizontal beam across the tops of the posts. Then, frame rafters from the ledger to the beam, securing with rafter-tail hangers. Check alignment and pitch consistency.
6. Sheath and Roof
Install roof sheathing perpendicular to rafters. Cover with underlayment, then apply chosen roofing material. Overlap seams correctly and secure edges with drip edge to direct water away from the structure.
Do’s and Don’ts: Avoiding Common Mistakes
| Do | Don't |
|---|---|
| Use pressure-treated or naturally rot-resistant wood for all ground-contact elements | Use untreated lumber for posts or beams |
| Flash the ledger thoroughly to prevent water damage to your home's wall | Assume housewrap or siding provides sufficient moisture protection |
| Anchor posts in concrete below the frost line | Set posts directly in soil or shallow gravel |
| Allow proper roof overhang (at least 6–8 inches) to protect walls and flooring | Build flush roofs that channel water onto the ground near the foundation |
| Slope the ground away from the structure to manage runoff | Ignore grading, leading to pooling water and erosion |
Real-World Example: The Portland Backyard Upgrade
In suburban Portland, Oregon, homeowner Lisa Tran wanted a dry place to store her gardening supplies and enjoy morning coffee during rainy seasons. She built a 10’ x 14’ cedar lean-to using a pre-existing garage wall as the anchor point. By choosing corrugated metal roofing and elevating the floor with gravel and decking tiles, she created a low-maintenance, weather-resistant space. After three Pacific Northwest winters, the structure remains leak-free and stable, thanks to meticulous flashing and a 4:12 roof pitch. “I spent extra time on the ledger seal,” she says, “and it’s made all the difference.”
Maintenance Tips for Longevity
A durable lean-to requires minimal upkeep, but regular attention prevents small issues from becoming major repairs.
- Inspect fasteners annually for rust or loosening
- Clean gutters or roof edges twice a year to prevent debris buildup
- Check for wood rot near post bases and reseal if necessary
- Reapply waterproof coating to exposed wood every 2–3 years
- Trim nearby trees to prevent branch damage and leaf accumulation
Frequently Asked Questions
Can I build a lean-to without a permit?
In many jurisdictions, structures under 120 square feet and not habitable spaces do not require permits. However, because this structure attaches to your home, most building departments require approval. Always consult your local code office before beginning.
How long does a lean-to last?
With quality materials and proper installation, a lean-to can last 20–30 years or more. Metal roofing and pressure-treated posts significantly extend service life compared to untreated wood and asphalt shingles.
Can I enclose my lean-to later with walls?
Yes, but plan for it early. If you anticipate adding walls, install posts deeper and consider wider spacing for future window or door openings. Also verify that your foundation and roof structure can support added wind load.
Final Thoughts: Build Smart, Build Once
A lean-to isn’t just a shelter—it’s a smart investment in your home’s functionality and comfort. When constructed with attention to detail, proper materials, and sound engineering principles, it becomes a seamless part of your living environment. From protecting outdoor gear to creating a cozy retreat, its benefits compound over time. Now that you have the complete blueprint, there’s no better time to start planning your own durable lean-to.


 浙公网安备
33010002000092号
浙公网安备
33010002000092号 浙B2-20120091-4
Comments
No comments yet. Why don't you start the discussion?