
As summer temperatures climb, many households face the dual challenge of staying cool while managing energy costs. Central air conditioning can be expensive to install and operate, especially in regions with mild but persistent heat. A growing number of people are turning to do-it-yourself solutions—specifically, homemade air conditioners—that offer immediate relief without the high price tag. With careful planning and basic materials, you can build an effective cooling unit that reduces room temperature by 10–15°F (5–8°C) using principles of evaporation and airflow. This guide walks through every step, from material selection to optimization, ensuring your DIY AC is not only functional but also safe and energy-efficient.
How Evaporative Cooling Works
The foundation of most DIY air conditioners lies in evaporative cooling—a natural process where water absorbs heat from the air as it transitions from liquid to vapor. When warm air passes over moist surfaces, such as wet fabric or ice, its temperature drops. This principle powers traditional swamp coolers and explains why a breeze feels cooler near a lake or after stepping out of a shower.
In a DIY context, this effect is amplified by combining ice (or chilled water) with forced airflow via a fan. As air moves across the cold surface, it loses thermal energy, resulting in a stream of cooled air directed into the room. While less powerful than compressor-based units, these systems use a fraction of the electricity and can be assembled for under $30.
“Evaporative cooling is one of the oldest and most energy-efficient methods of temperature reduction. In dry climates, it remains a viable alternative to refrigerant-based AC.” — Dr. Alan Reyes, HVAC Researcher, University of Arizona
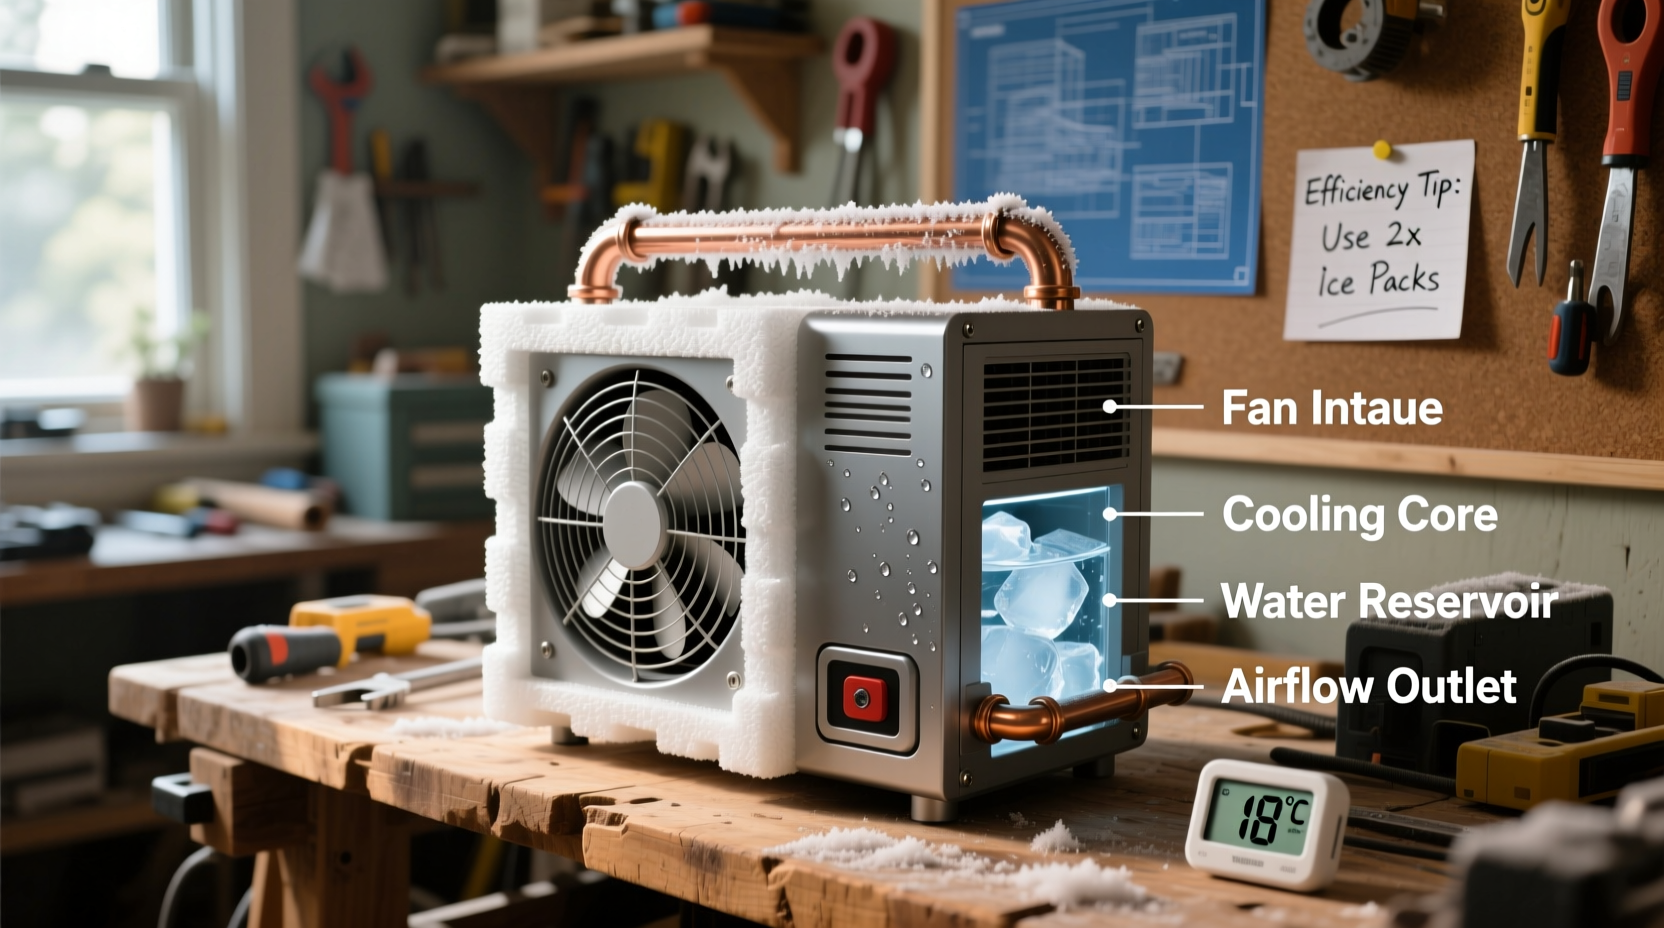
Step-by-Step Build: The Box Fan Cooler
One of the most effective and widely used DIY air conditioners uses a standard box fan, a plastic container, and frozen coolant packs. Here’s how to assemble it safely and efficiently.
- Gather Materials: 20-inch box fan, insulated cooler or large plastic storage bin, PVC pipe or flexible ducting (optional), 4–6 reusable ice packs or frozen water bottles, drill, scissors, duct tape.
- Modify the Cooler: Cut a hole in the lid slightly smaller than the fan’s front grille. This ensures the fan sits snugly and directs all airflow through the cooler interior.
- Prepare the Cooling Core: Fill the cooler with ice packs or frozen bottles. Do not add loose water—it can leak and damage electronics.
- Attach the Fan: Place the fan on top of the lid, over the hole, facing inward. Secure it with duct tape if needed, ensuring no air bypasses the cooling chamber.
- Power and Position: Plug the fan into a grounded outlet. Angle the unit so cooled air blows directly into your seating area. Avoid placing near moisture-sensitive electronics.
- Operate and Maintain: Replace ice every 3–5 hours depending on ambient temperature. Wipe condensation from the exterior daily.
This setup typically cools a small room (up to 150 sq ft) within 20–30 minutes. Efficiency increases when used in conjunction with cross-ventilation—open a window on the opposite side of the room to allow hot air to escape.
Optimizing Performance: Do’s and Don’ts
Not all DIY air conditioners perform equally. Small design choices significantly impact cooling power and longevity. The following table outlines key practices to follow—and avoid.
| Do’s | Don’ts |
|---|---|
| Use insulated containers to slow ice melt | Use metal containers that may conduct electricity if wet |
| Add a layer of damp cloth between ice and airflow for enhanced evaporation | Submerge electrical components in any liquid |
| Run the unit in short cycles (1–2 hours) to prevent motor overheating | Leave the fan running unattended overnight |
| Position the unit near the floor—cool air sinks | Block exhaust airflow; ensure room has ventilation |
| Pre-freeze bottles with a mix of water and rubbing alcohol (70/30) to create slush that lasts longer | Use dry ice—it releases carbon dioxide and poses inhalation risks indoors |
Real-World Example: Cooling a Studio Apartment
Jamal, a freelance graphic designer in Phoenix, struggled with afternoon heat in his third-floor studio. With rent-controlled housing, installing central AC wasn’t an option. He built a DIY cooler using a 24-inch box fan, a $12 plastic tote, and six gallon-sized water bottles frozen in advance. By placing the unit near a west-facing window and opening a small vent on the east side, he achieved consistent airflow.
Within 25 minutes, the room temperature dropped from 88°F to 76°F. He reported improved focus during work hours and reduced reliance on a space heater in winter by repurposing the fan for circulation. “It’s not Arctic-level cold,” he said, “but it takes the edge off. And I saved over $400 compared to buying a portable AC.”
Checklist: Building Your Own Efficient DIY AC
- ☐ Choose a fan with adjustable speeds and a sturdy build
- ☐ Select an insulated container with a tight-sealing lid
- ☐ Prepare at least four frozen coolant sources (bottles or packs)
- ☐ Drill or cut a precise hole for fan attachment
- ☐ Test the unit in a well-ventilated area before regular use
- ☐ Monitor for condensation and place a tray underneath if needed
- ☐ Schedule ice replacement every few hours during peak heat
- ☐ Keep electrical cords elevated and away from potential water exposure
Frequently Asked Questions
Can a DIY air conditioner replace a traditional AC?
No single DIY unit can match the cooling capacity of a full HVAC system, especially in large or humid spaces. However, in small rooms or dry climates, a well-built DIY cooler can provide meaningful comfort and reduce dependence on expensive cooling systems.
Is it safe to run a fan directly over ice?
Yes, as long as no water comes into contact with electrical components. Always seal coolant sources in leak-proof containers and position the fan above—not inside—the ice. Use ground-fault circuit interrupter (GFCI) outlets when possible for added protection.
Why isn’t my DIY AC cooling effectively?
Poor performance usually stems from inadequate insulation, insufficient ice volume, blocked airflow, or high humidity. In humid environments, evaporative cooling becomes less effective because the air is already saturated with moisture. Consider adding a dehumidifier nearby or switching to a phase-change gel pack system for better results.
Advanced Tips for Greater Efficiency
To push the limits of DIY cooling, consider integrating additional elements:
- Solar-Powered Fans: Pair your unit with a 12V DC solar fan to eliminate grid dependency, ideal for off-grid cabins or emergency preparedness.
- Ducting Extensions: Attach flexible dryer hose to direct cooled air farther into the room without repositioning the unit.
- Thermal Mass Boost: Add clay tiles or ceramic bricks inside the cooler. These absorb cold from the ice and radiate it slowly, extending cooling duration.
- Automated Ice Feed (Prototype Level): Advanced builders have experimented with gravity-fed chutes that release new ice packs as old ones melt—though this requires careful waterproofing.
Final Thoughts
Building a DIY air conditioner isn’t just a cost-saving hack—it’s a practical exercise in understanding thermodynamics, airflow, and sustainable living. With minimal investment and thoughtful design, you can create a cooling solution tailored to your environment and needs. Whether you’re beating the heat during a power outage, cooling a home office, or reducing your carbon footprint, this project delivers real benefits. Safety, maintenance, and climate awareness are key to long-term success. Now that you have the blueprint, gather your materials, test your design, and experience the satisfaction of engineering your own comfort.


 浙公网安备
33010002000092号
浙公网安备
33010002000092号 浙B2-20120091-4
Comments
No comments yet. Why don't you start the discussion?