
Keeping essential items within reach while driving enhances both comfort and safety. Among the most overlooked yet practical accessories is the car seat tissue holder. Whether you're dealing with sudden sneezes, wiping smudges off screens, or cleaning up minor spills, having tissues readily available can make a noticeable difference. However, improper installation can lead to distractions, damage to upholstery, or even safety hazards during sudden stops. This guide walks through everything you need to know—from choosing the right model to secure installation and long-term maintenance.
Why a Car Seat Tissue Holder Matters
A well-placed tissue holder eliminates the need to fumble through glove compartments or center consoles while driving. It promotes safer habits by reducing distractions and ensures hygiene supplies are accessible to all passengers. Modern holders are designed to fit seamlessly into headrest posts, seatbacks, or door pockets without altering vehicle aesthetics.
Studies show that drivers who keep frequently used items in designated, easy-to-reach locations spend less time searching and more time focused on the road. According to the National Highway Traffic Safety Administration (NHTSA), even two seconds of distraction significantly increases crash risk. A thoughtfully installed tissue holder supports this principle of minimizing driver disruption.
Types of Car Seat Tissue Holders
Not all tissue holders are created equal. Understanding the differences helps ensure compatibility with your vehicle and lifestyle needs.
| Type | Installation Method | Pros | Cons |
|---|---|---|---|
| Headrest Strap Mount | Attaches via adjustable straps around headrest poles | Easy to install/remove; fits most vehicles | May loosen over bumps; limited capacity |
| Seatback Pocket Clip | Clips onto top edge of rear seatback | Stable; allows larger tissue packs | May not fit thicker seats; visible when empty |
| Adhesive Door Panel Mount | Uses strong adhesive pad on door trim | Sleek look; permanent placement | Hard to reposition; may damage trim upon removal |
| Universal Hanging Pouch | Hooks over headrest or seat rail | Holds multiple items beyond tissues | Bulkier; can sway while driving |
“Accessibility doesn’t have to compromise safety. A properly mounted tissue holder should require only a glance and one hand to use.” — Dr. Lena Patel, Automotive Ergonomics Researcher at MIT Transportation Lab
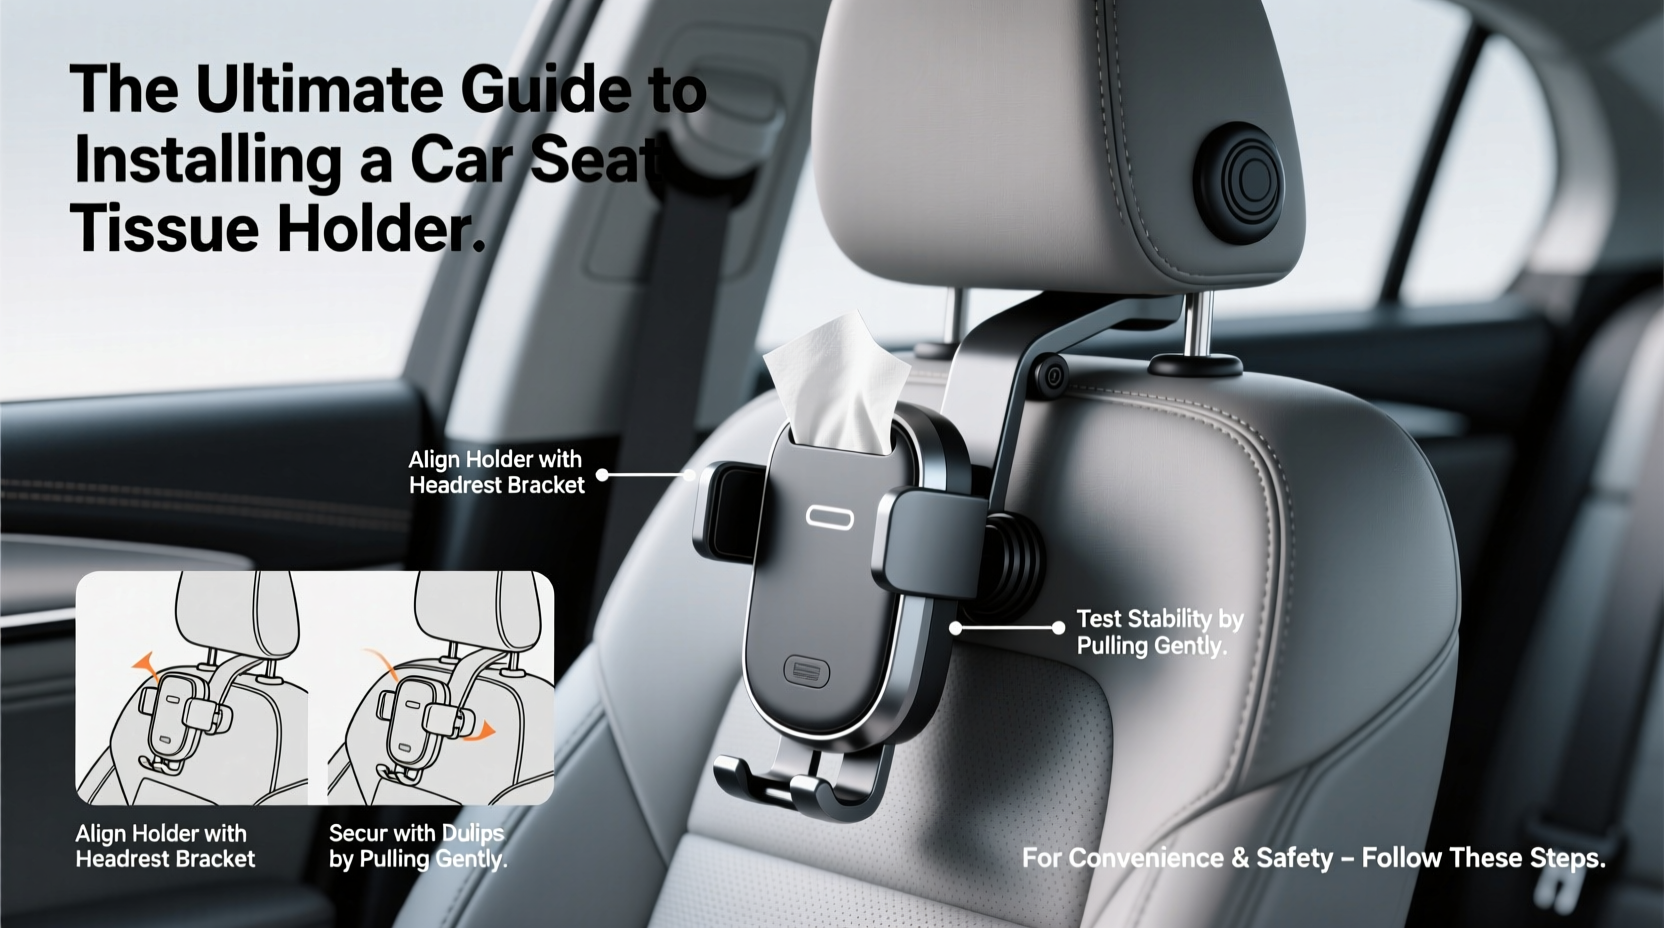
Step-by-Step Installation Guide
Follow these steps to securely install a headrest-mounted tissue holder—the most common and universally compatible type.
- Gather materials: Tissue holder, replacement tissues (preferably travel-sized packs), scissors (if trimming excess strap).
- Locate the headrest posts: Identify the two metal rods supporting the front passenger or rear headrest. These must be exposed (not covered by a plastic shroud).
- Position the holder: Slide the fabric loops or plastic clips of the holder over the left and right posts. Ensure the opening faces forward and is upright.
- Adjust tension: Pull the adjustable strap tight so the holder sits snugly against the top of the seatback. There should be no wobbling.
- Test stability: Gently tug the holder from different angles. If it shifts more than half an inch, retighten the strap or reposition.
- Insert tissues: Load a sealed pack of facial tissues or disinfectant wipes. Avoid overfilling, which can cause jams or accidental dispensing.
- Final check: Sit in the driver’s seat and reach back to retrieve a tissue. Confirm it requires minimal movement and doesn’t obstruct rear visibility.
Common Mistakes to Avoid
- Installing on swiveling headrests: Some SUVs and minivans have rotating headrests for easier access. Mounting a holder here risks detachment when adjusted.
- Blocking airbag zones: Never place adhesive-mounted units near labeled airbag deployment areas, typically found on side panels or upper seatbacks.
- Using oversized tissue boxes: Standard Kleenex boxes are too large and create a projectile hazard in collisions. Stick to compact, sealed refills.
- Ignoring child safety: In backseats used by young passengers, position the holder above their reach to prevent choking hazards from loose tissues.
Real-World Example: The Commuter’s Fix
Sarah, a nurse and daily commuter in Chicago, struggled with cold-season congestion during her 45-minute drive. She kept tissues in her purse, but retrieving them at red lights was messy and distracting. After installing a strap-mounted holder on her passenger seat, she reduced retrieval time from six seconds to under two. Over three months, she estimated avoiding at least 15 instances of fumbling while driving. “It sounds small,” she said, “but now I don’t dread my morning drive when I’m feeling under the weather.”
Maintenance and Longevity Tips
A tissue holder isn’t “install and forget.” Regular upkeep ensures continued functionality and cleanliness.
- Replace tissues every 4–6 weeks to prevent moisture buildup and bacterial growth.
- Clean the holder monthly with a damp cloth and mild soap—especially if storing disinfectant wipes that may leak residue.
- Inspect straps or clips quarterly for wear. UV exposure and temperature swings can degrade elastic and plastic components.
- Rotate locations seasonally; switch to a door-mounted unit in winter if gloves make rear-reaching difficult.
Checklist: Installing Your Tissue Holder Safely
- ☐ Choose a holder compatible with your vehicle’s headrest design
- ☐ Verify there’s no interference with seat adjustments or airbags
- ☐ Test fit before final tightening
- ☐ Confirm one-handed access without leaning excessively
- ☐ Secure all straps and inspect for sharp edges
- ☐ Load with appropriate-sized tissue pack
- ☐ Perform a real-world test during a short trip
Frequently Asked Questions
Can a tissue holder become a safety hazard in an accident?
Yes—if improperly installed or overloaded. Loose objects in the cabin can become projectiles. Always use compact tissues and ensure the holder is tightly secured. Avoid rigid plastic models that could impact passengers during sudden stops.
Are there legal restrictions on where I can install accessories like this?
While no federal law specifically bans tissue holders, many states prohibit any item that obstructs the driver’s view or interferes with airbag deployment. As long as the holder is low-profile and not in the windshield area, it generally complies with regulations.
What’s the best way to clean a fabric tissue holder?
Remove it from the seat and hand-wash with lukewarm water and gentle detergent. Air dry completely before reinstalling. For spot stains, use a soft brush and a mixture of baking soda and water.
Final Thoughts
A car seat tissue holder is more than a convenience—it's a small upgrade with outsized benefits for hygiene, focus, and passenger comfort. When installed correctly, it integrates smoothly into your vehicle’s ecosystem without compromising safety or aesthetics. The key lies in thoughtful placement, routine maintenance, and adherence to ergonomic principles.


 浙公网安备
33010002000092号
浙公网安备
33010002000092号 浙B2-20120091-4
Comments
No comments yet. Why don't you start the discussion?