
The I-shaped Apple Watch strap—commonly known as the Milanese Loop or certain metal mesh bands—features a sleek, magnetic clasp design that slides through a looped end, forming an “I” when fastened. While elegant and adjustable, its unique mechanism can confuse first-time users. Incorrect installation may lead to discomfort, poor fit, or even accidental detachment. This guide breaks down every aspect of installing and securing your I-shaped strap with precision, comfort, and confidence.
Understanding the I-Shaped Strap Design
The I-shaped strap is distinguished by its minimalist, seamless closure system. One end has a magnetic or pin-based sliding mechanism, while the other features a loop or track through which the end passes. Unlike traditional buckle straps, it relies on tension and alignment rather than mechanical clasps. This design allows for infinite adjustability and a clean aesthetic but demands proper handling during installation.
These straps are typically made from stainless steel, titanium, or woven alloys, offering durability and a premium feel. However, their functionality hinges on correct alignment and insertion. Misalignment not only compromises security but can also scratch the watch casing or damage the band’s internal rails.
“Precision in strap installation isn’t just about aesthetics—it directly impacts safety and long-term wearability.” — Jordan Lin, Wearable Tech Specialist at GadgetFit Labs
Step-by-Step Installation Process
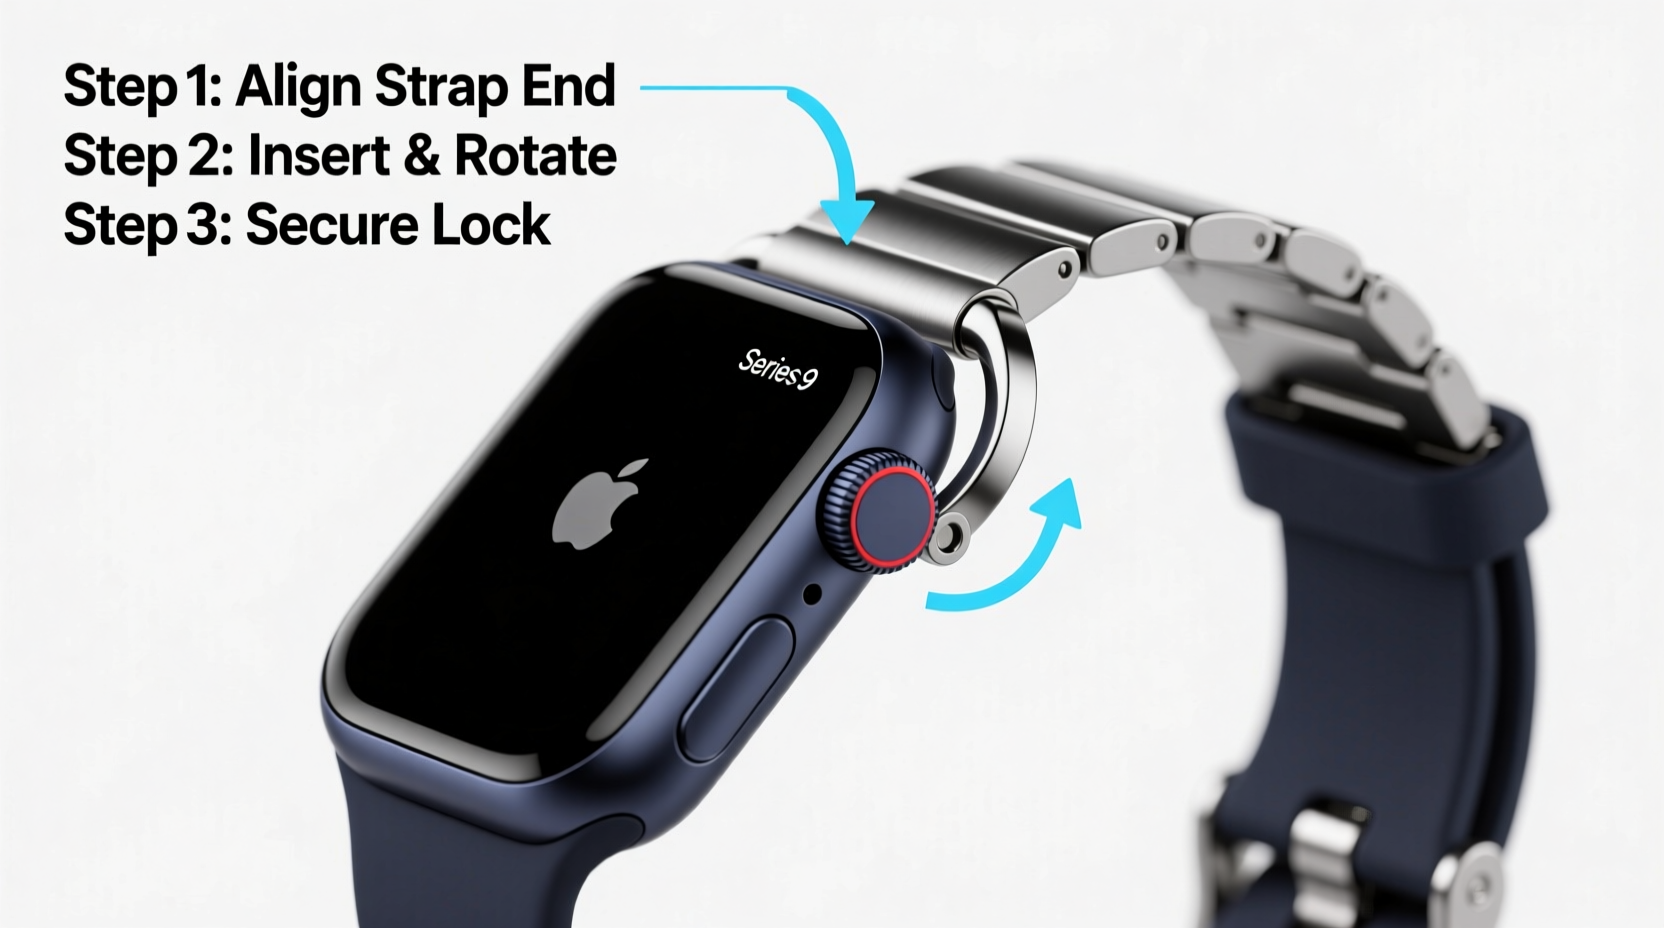
Installing an I-shaped strap correctly ensures a secure hold and prevents unexpected slippage. Follow these steps carefully:
- Power down your Apple Watch (optional but recommended): While not required, turning off your device minimizes the risk of accidental screen activation during handling.
- Position the watch face-down on a soft surface: Use a microfiber cloth to protect the display from scratches.
- Locate the release buttons on the current strap: Press the quick-release pins on the underside of the existing band and slide it out horizontally.
- Align the new I-shaped strap’s connector: Match the raised ridge on the band’s attachment end with the groove inside the watch case slot.
- Insert one side firmly until it clicks: Hold the strap at a slight upward angle and push gently until you hear a soft snap.
- Attach the second side with equal pressure: Ensure the band sits flush without twisting.
- Test stability: Gently tug on both ends to confirm secure attachment.
- Adjust the band length: Slide the magnetic or pin end through the loop until snug against your wrist, allowing space for one finger beneath.
Common Mistakes and How to Avoid Them
Even experienced users occasionally make errors when switching straps. The following table outlines frequent issues and their solutions:
| Mistake | Consequence | Solution |
|---|---|---|
| Forcing the connector at an angle | Damaged pins or housing | Align flat and push straight in |
| Not fully seating the band | Loose fit, potential disconnection | Press until a distinct click is felt |
| Over-tightening the I-slide | Reduced circulation, skin irritation | Allow room for airflow and movement |
| Using excessive force to remove | Scratched casing or bent connectors | Always depress release button fully before sliding |
One often-overlooked detail is cleanliness. Dust or lint trapped in the watch’s band slots can prevent full engagement. Use a dry toothbrush or compressed air to clean the grooves monthly.
Real-World Example: Sarah’s Secure Fit Fix
Sarah, a fitness instructor in Portland, purchased a stainless steel I-shaped strap for her Apple Watch Series 9. After two weeks, she noticed the band would occasionally loosen during high-intensity workouts. Assuming the magnet had weakened, she considered returning it. Instead, she reviewed the installation process and realized she hadn’t fully seated the right-side connector. Upon reattaching it with deliberate pressure, the band stayed secure—even through spin classes and outdoor runs. She now checks her strap weekly and adjusts the slide position based on wrist swelling during heat exposure.
This scenario underscores how minor oversights can mimic product failure. A proper install resolves most perceived flaws.
Pro Tips for Long-Term Security and Comfort
- Check alignment daily: Before starting your day, ensure the band is centered and both ends are equally engaged.
- Rotate straps regularly: Alternating between different styles reduces wear concentration and extends lifespan.
- Avoid moisture buildup: If you sweat heavily, wipe the band and watch case weekly to prevent corrosion, especially with metal variants.
- Store properly: Keep the watch flat or upright in a ventilated area; never leave it banded tightly in a humid environment like a gym bag.
Essential Checklist: Installing Your I-Shaped Strap Safely
- Turn off Apple Watch (recommended)
- Clean band slots with dry brush or air
- Remove old strap using release buttons
- Align new strap ridge with watch groove
- Insert left connector straight until clicked
- Repeat for right side
- Test stability with gentle pull
- Adjust slide for snug, breathable fit
- Inspect alignment and symmetry
- Wipe down strap and case after first use
Frequently Asked Questions
Can I wear my I-shaped strap while swimming?
Most stainless steel and titanium I-shaped straps are water-resistant but not waterproof. While brief exposure to sweat or rain is fine, prolonged submersion—especially in chlorinated or saltwater—can corrode metal components over time. Rinse with fresh water afterward and dry thoroughly.
Why does my strap feel loose after a few hours?
Wrist size fluctuates due to temperature, hydration, and activity. Blood flow increases during the day, causing slight swelling. Re-adjust the I-slide midday if needed. If the band detaches frequently, double-check that both connectors are fully seated.
Are all I-shaped straps compatible with every Apple Watch model?
No. Compatibility depends on case size (e.g., 41mm vs. 45mm). Apple’s official Milanese Loop, for instance, comes in specific sizes. Third-party brands may offer universal designs, but verify measurements before purchase. The attachment mechanism is standardized across modern models, but physical fit varies.
Final Thoughts: Confidence Starts with a Secure Strap
An I-shaped Apple Watch strap combines elegance with innovation, but its performance depends on precise installation. Taking a few extra moments to align, click, and test each connection safeguards your investment and enhances daily comfort. Whether you're wearing it to the office, the gym, or a weekend hike, a properly secured strap stays put without compromise.
Don’t assume a loose fit means a faulty product—often, it’s a simple fix rooted in correct setup. By following this guide, you ensure your Apple Watch remains not only functional but also a seamless extension of your lifestyle.


 浙公网安备
33010002000092号
浙公网安备
33010002000092号 浙B2-20120091-4
Comments
No comments yet. Why don't you start the discussion?