
Drying clothes outdoors isn’t just economical—it’s eco-friendly, gentle on fabrics, and imparts a fresh, sun-kissed scent that no dryer can replicate. Yet, many homeowners install clotheslines as an afterthought, leading to sagging lines, rusted hardware, or even structural damage. A well-installed clothesline is a long-term investment in sustainability and laundry efficiency. This guide walks you through every critical phase of installation, from planning to maintenance, ensuring your setup remains durable, functional, and weather-resistant for years.
Choosing the Right Type of Clothesline
The first decision determines the entire project: what kind of clothesline suits your space and lifestyle? The three most common types are fixed-line systems, retractable reels, and folding frames.
| Type | Best For | Lifespan | Maintenance Level |
|---|---|---|---|
| Fixed Steel Cable | Large yards, heavy loads | 10–15 years | Low |
| Retractable Reel | Small backyards, patios | 5–8 years | Medium |
| Folding Wall Frame | Apartments, balconies | 7–10 years | Low |
Fixed steel cables offer maximum durability and load capacity but require solid anchor points. Retractable models save space and look tidy when not in use, though their springs and housing may degrade in humid climates. Folding frames are ideal for renters or compact spaces, providing ample drying area without permanent fixtures.
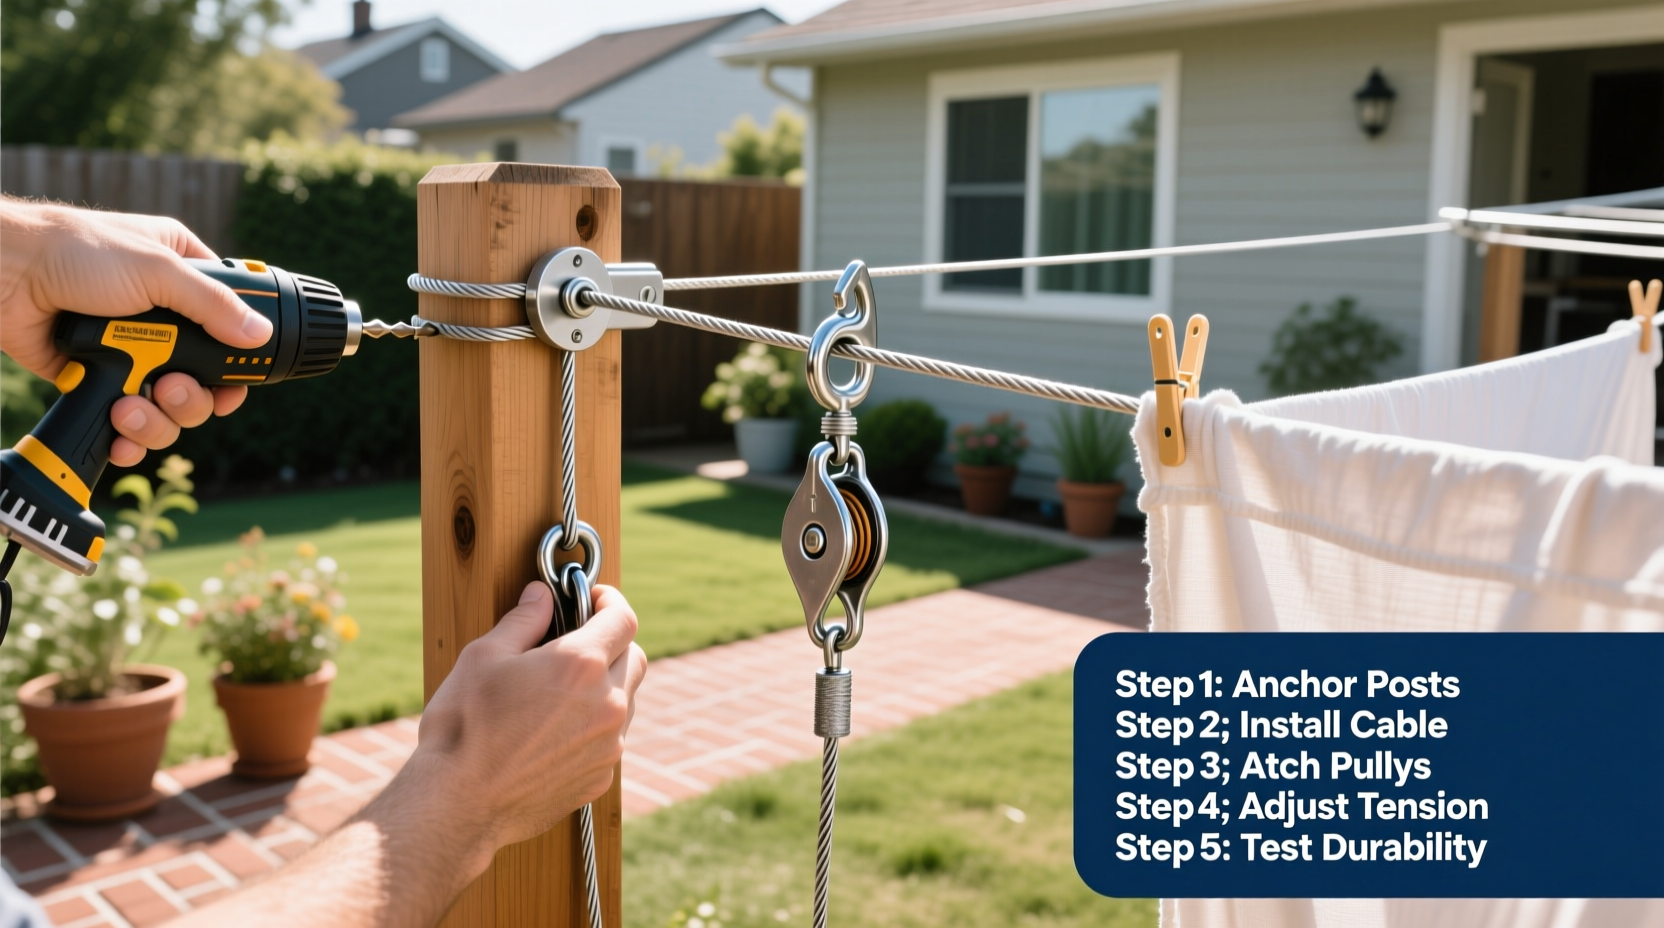
Step-by-Step Installation Guide
Whether you're mounting a single line between two posts or installing a wall-mounted reel, follow this universal six-step process for a secure, level, and long-lasting installation.
- Measure and Plan Layout: Determine the optimal distance (ideally 20–30 feet) and height (at least 5 feet from ground). Avoid proximity to trees, power lines, or damp walls.
- Select Anchor Points: Use wooden posts, brick walls, or concrete pillars. For wood, ensure posts are pressure-treated and set at least 2 feet into the ground with concrete footing.
- Mark Mounting Positions: Use a laser level or string line to mark exact screw or bolt locations. Both ends must be perfectly level to prevent sagging.
- Install Brackets or Reels: Drill pilot holes and secure with lag bolts (for wood) or masonry anchors (for brick/concrete). Double-check alignment after tightening.
- Thread the Cable: Run stainless steel cable through tensioners and secure with wire clamps. Apply at least two clamps per end, spaced ½ inch apart.
- Test Tension and Stability: Pull firmly on the line. It should deflect no more than 1 inch under pressure. Adjust turnbuckles if included.
For retractable reels, follow manufacturer instructions closely—some models require specific wall thicknesses or reinforcement behind drywall.
Durability Tips for Long-Term Performance
A poorly maintained clothesline deteriorates quickly. Salt air, moisture, and constant tension accelerate wear. Prevent premature failure with these expert-backed strategies.
- Use turnbuckle tensioners to re-tighten lines every 3–6 months.
- Inspect wire clamps and brackets annually for rust or loosening.
- Apply silicone lubricant to retractable reels every spring to prevent jamming.
- Remove the line during winter storms or high-wind seasons if unattended.
- Paint wooden posts every two years with exterior-grade sealant.
“Most clothesline failures happen at the connection points, not the line itself. Invest in quality hardware—it’s cheaper than replacing the whole system.” — Derek Langston, Residential Outdoor Systems Installer
Real-World Example: Installing a Line in a Coastal Climate
Sarah M., a homeowner in coastal Maine, installed a standard galvanized steel clothesline five years ago. By year three, both ends had corroded due to salt spray, and the line snapped during a nor’easter. She replaced it with a marine-grade stainless steel cable, used polymer-coated turnbuckles, and mounted brackets on sealed cedar posts. Now, two years later, the system shows no signs of wear—even after multiple harsh winters.
Her key insight: “I underestimated how much the ocean air would eat away at metal. Upgrading to marine-spec materials was worth every penny.”
This case underscores a broader principle: environmental conditions dictate material choices. In humid or salty regions, standard hardware won’t suffice. Opt for 316-grade stainless steel and UV-resistant plastics.
Indoor and Apartment-Friendly Alternatives
Not everyone has access to a backyard. Renters and urban dwellers can still enjoy line-drying with smart adaptations.
Folding wall-mounted racks take up minimal space and can be painted to match décor. Ceiling-mounted pulley systems utilize vertical space efficiently—ideal for high-ceiling laundries. Retractable clotheslines screwed into ceiling joists or side walls offer discreet functionality.
When installing indoors, ensure adequate ventilation to prevent moisture buildup. Use a hygrometer to monitor humidity; levels above 60% encourage mold growth. Run an exhaust fan or dehumidifier during drying cycles.
📋 **Installation Checklist**- ☐ Measure available space and clearance
- ☐ Choose appropriate clothesline type
- ☐ Verify structural integrity of anchor points
- ☐ Gather tools: drill, level, wrench, cable cutters
- ☐ Install brackets with proper fasteners
- ☐ Thread and tension cable correctly
- ☐ Test load capacity with wet towels
- ☐ Schedule biannual maintenance checks
Frequently Asked Questions
How much weight can a typical clothesline hold?
A properly installed stainless steel clothesline can support 30–50 pounds, depending on span and tension. Avoid overloading—wet bedding and jeans are heavy. Distribute weight evenly and avoid clustering items.
Can I install a clothesline on a vinyl or composite fence?
No. These materials lack the structural strength to handle constant tension and may crack or pull away. Instead, install freestanding posts or anchor to a house wall with proper backing.
Is it safe to dry clothes outdoors in rainy climates?
Yes, as long as you use quick-dry techniques and bring clothes in before rain. Position the line under a covered patio or use a retractable model you can pull in. Pre-spin laundry in the washer to reduce drying time.
Maximize Efficiency with Smart Drying Practices
The line is only half the equation. How you hang clothes affects drying speed and fabric care. Shake out garments before hanging to reduce wrinkles. Hang shirts by the hem to prevent shoulder bumps. Use non-rusting clips for delicate items.
Position the line perpendicular to prevailing winds to enhance airflow. In sunny areas, hang dark clothes inside-out to prevent fading. Rotate bulky items like towels to the outer edges where airflow is strongest.
For faster results, combine solar drying with mechanical aids: run a portable fan nearby or install the line in a greenhouse-style enclosure.
Final Thoughts and Next Steps
A thoughtfully installed clothesline enhances your home’s functionality while reducing energy consumption and extending garment life. Durability begins with proper planning, quality materials, and attention to detail during installation. Whether you’re setting up a simple reel on a balcony or anchoring a dual-line system across your yard, the principles remain the same: stability, tension, and weather resistance.


 浙公网安备
33010002000092号
浙公网安备
33010002000092号 浙B2-20120091-4
Comments
No comments yet. Why don't you start the discussion?