
Seitan, often called \"wheat meat,\" is a high-protein, plant-based food made from gluten—the main protein in wheat. Unlike store-bought versions that can be rubbery or overly processed, homemade seitan crafted through the flour-washing method delivers a naturally chewy yet tender texture, rich flavor, and complete control over ingredients. This guide walks you through every stage of creating exceptional seitan entirely from scratch, ensuring a satisfying result every time.
The Science Behind Seitan: Why Washing Flour Works
When whole wheat flour mixes with water, it forms a dough where gluten proteins—gliadin and glutenin—begin to link into a stretchy network. The washing process removes starch, bran, and other non-gluten components, leaving behind concentrated gluten. This pure gluten mass becomes seitan when cooked, absorbing flavors while maintaining its signature meat-like bite.
Commercial seitan often uses vital wheat gluten powder for speed, but starting with plain flour allows deeper flavor development and a more authentic texture. Whole wheat or bread flour works best due to higher protein content (typically 11–13%). All-purpose flour can be used, though results may be slightly less elastic.
“Hand-washed seitan has a depth of texture you simply can’t replicate with pre-made gluten flour. It’s denser, juicier, and responds better to seasoning.” — Maya Tran, Plant-Based Chef & Fermentation Specialist
Step-by-Step Guide to Washing Flour for Seitan
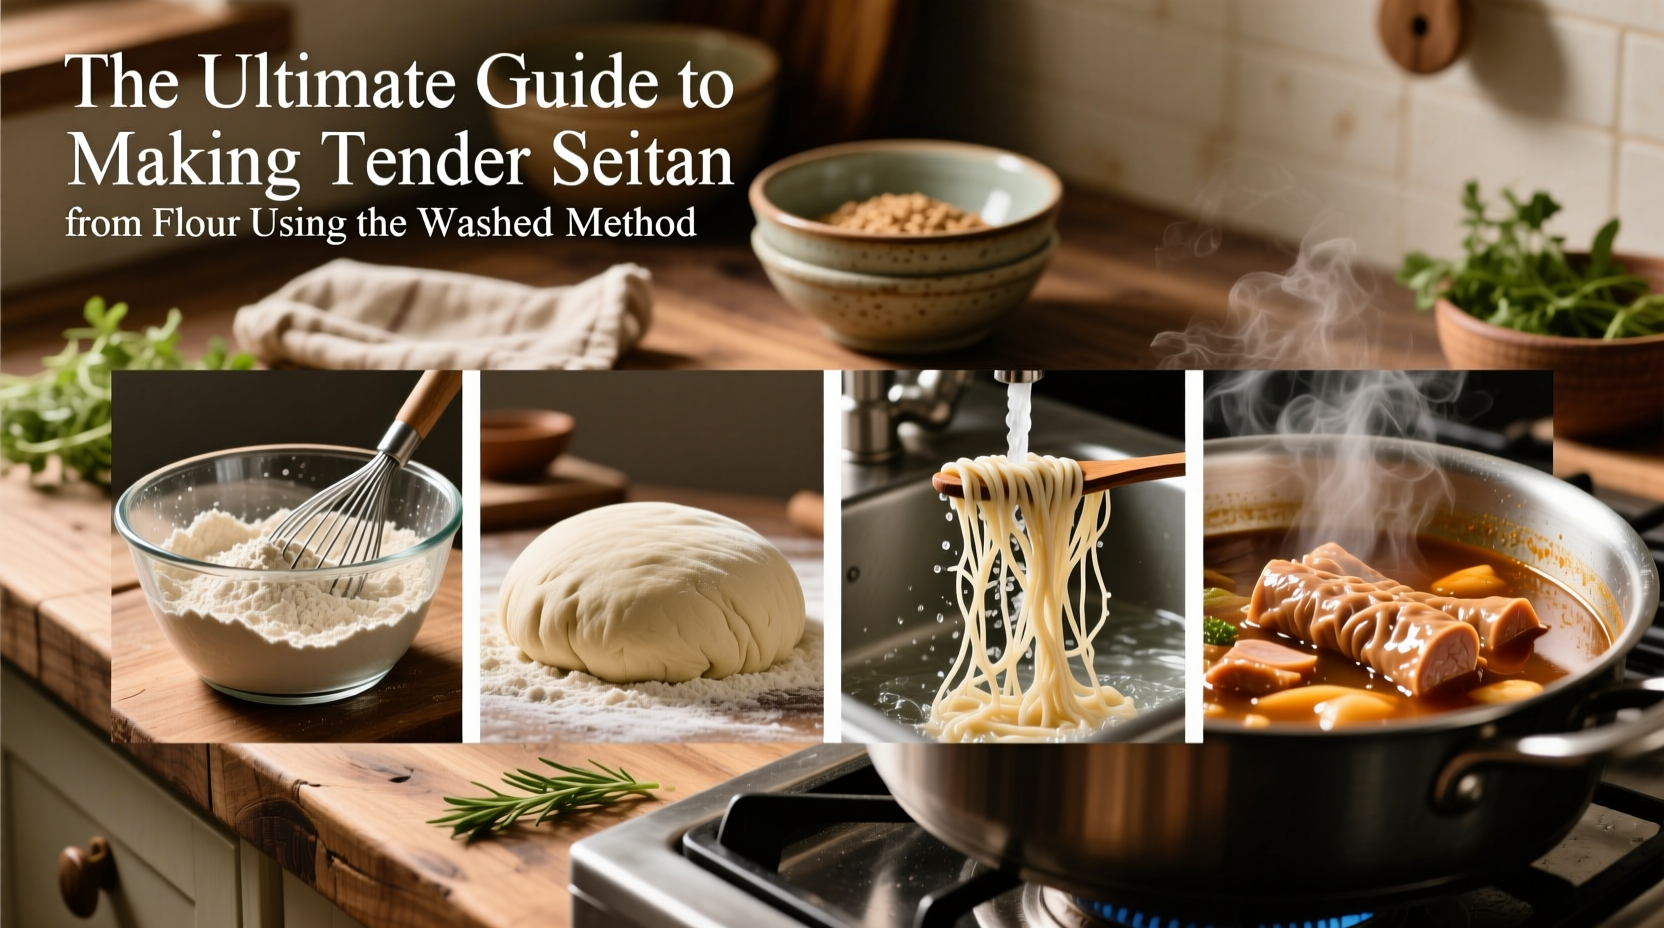
Creating seitan from flour involves four phases: mixing, resting, washing, and cooking. Each plays a crucial role in final texture and tenderness.
- Mix the Dough: Combine 2 cups (250g) of bread flour with ¾ cup (180ml) cold water. Knead by hand or mixer for 8–10 minutes until smooth and elastic. Cover and rest for 30 minutes at room temperature.
- Begin Washing: Place dough in a large bowl of cold water. Gently knead underwater, pressing and folding. Cloudy water indicates starch release. Drain and refill every 1–2 minutes.
- Repeat Until Clear: Continue changing water and kneading for 8–12 cycles. When the runoff water stays mostly clear and the remaining mass is firm and stringy, washing is complete.
- Squeeze Out Excess Water: Hold the gluten ball under running water, squeezing firmly to remove trapped starch. Final weight should be roughly 30–40% of original flour weight.
- Rough Chop and Marinate (Optional): For enhanced tenderness, chop the gluten into small pieces and soak in a seasoned broth (soy sauce, garlic, kombu, liquid smoke) for 30 minutes before cooking.
- Cook the Seitan: Simmer in flavorful broth for 60–90 minutes. Avoid boiling—gentle simmering prevents toughness. Let cool in liquid for best moisture retention.
How to Achieve Maximum Tenderness
Tenderness in seitan isn’t just about cooking—it starts with technique and ingredient balance. Here are key factors:
- Kneading Duration: Under-kneaded dough yields weak gluten; over-kneaded dough becomes too dense. Aim for 8–10 minutes post-mixing.
- Simmer, Don’t Boil: Temperatures above 200°F (93°C) cause proteins to contract aggressively, resulting in a tough product. Keep broth at a gentle bubble.
- Acid & Fat in Broth: A splash of apple cider vinegar (1 tbsp per quart) helps relax gluten. Adding a tablespoon of oil enriches mouthfeel and softness.
- Cooling in Liquid: Allowing seitan to cool fully in broth lets fibers reabsorb moisture, preventing dryness when sliced.
- Slicing Technique: Cut against the grain after cooking to shorten muscle-like fibers, improving chewability.
Do’s and Don’ts of Homemade Seitan
| Do’s | Don’ts |
|---|---|
| Use bread or whole wheat flour for strong gluten formation | Use cake or pastry flour—too low in protein |
| Change water frequently during washing | Let cloudy water sit—starch reabsorbs and weakens purity |
| Add kombu or mushrooms to broth for umami depth | Over-salt the cooking liquid—it draws out moisture |
| Cook for at least 60 minutes for full texture development | Steam instead of simmer—results in spongy, bland seitan |
| Store cooked seitan in broth for up to 2 weeks refrigerated | Freeze unmarinated seitan—it becomes crumbly |
Real Example: From Rubbery Fail to Perfect Pull-Apart Texture
Jess, a home cook in Portland, initially struggled with chewy, dense seitan. Her first batches used all-purpose flour and were boiled rapidly for 40 minutes. After switching to bread flour, extending simmer time to 75 minutes, and adding 1 tbsp of olive oil and 1 tsp of vinegar to her broth, she noticed dramatic improvement. “It went from feeling like erasers to actually shredding like pulled pork,” she said. By cooling the seitan overnight in the broth, slicing thinly, and pan-searing with tamari, she now serves it regularly to skeptical carnivorous friends who can’t believe it’s wheat-based.
Essential Tips for Success
Storage and Usage Ideas
Once cooled, store seitan submerged in its broth in an airtight container. It keeps for 10–14 days refrigerated. For longer storage, slice and freeze in portions with a bit of broth—thaw in the fridge before use.
Versatile and neutral in base flavor, homemade seitan adapts beautifully:
- Pan-fry slices for sandwiches or breakfast scrambles
- Shred and toss with BBQ sauce for plant-based pulled “pork”
- Cube and add to stir-fries, curries, or stews
- Marinate, skewer, and grill for kebabs
- Slice thin and braise in teriyaki or mushroom gravy
Frequently Asked Questions
Can I make seitan without washing flour?
Yes, but texture differs. Using vital wheat gluten skips washing and speeds production, but lacks the nuanced chew and density of washed-flour seitan. For authenticity and superior mouthfeel, washing is worth the effort.
Why did my seitan turn out mushy?
Mushiness usually stems from incomplete washing—residual starch gelatinizes during cooking, weakening structure. Ensure water runs nearly clear before cooking. Also, avoid steaming unless aiming for a sponge-like texture.
Is homemade seitan healthier than store-bought?
Generally, yes. You control sodium, avoid preservatives, and eliminate unnecessary additives. Plus, no texturized vegetable protein or artificial flavors. Just wheat, water, and seasonings.
Final Checklist: Your Path to Perfect Seitan
- Choose high-protein flour (bread or whole wheat)
- Knead thoroughly and rest dough 30 minutes
- Wash in cold water until runoff is clear
- Squeeze out excess liquid completely
- Simmer gently in flavorful broth for 60–90 minutes
- Cool fully in liquid before storing or slicing
- Store in broth, refrigerate, or freeze for later use
Make It Yours—and Share the Results
Perfecting seitan takes practice, but each batch brings you closer to mastering a cornerstone of plant-based cuisine. With patience and attention to detail, you’ll create a protein-rich staple that rivals meat in satisfaction and versatility. Try different broths, experiment with textures, and adapt techniques to your kitchen rhythm. Once you taste truly tender, homemade seitan, there’s no going back.


 浙公网安备
33010002000092号
浙公网安备
33010002000092号 浙B2-20120091-4
Comments
No comments yet. Why don't you start the discussion?