
Large dog crates are essential for pet owners who prioritize safety, training, and travel convenience. However, their size often makes storage and transportation a challenge—especially in small homes, vehicles, or when preparing for relocation. The solution lies not in replacing the crate, but in mastering the art of safe disassembly. When done correctly, breaking down a large dog crate reduces its footprint by up to 70%, simplifies moving, and extends the life of the equipment. This guide walks through every critical step, tool requirement, and common mistake to avoid, ensuring your crate remains functional, secure, and undamaged after repeated breakdowns.
Why Disassembling a Large Dog Crate Matters
Unlike folding crates designed for portability, many heavy-duty wire or plastic crates built for large breeds like German Shepherds, Labradors, or Great Danes are modular by design. They're engineered to be taken apart—not just for logistics, but also for cleaning, inspection, and long-term maintenance. Failing to disassemble properly can lead to bent bars, stripped connectors, or misaligned panels that compromise structural integrity.
Proper disassembly isn’t just about saving space—it’s about preserving safety. A well-maintained crate ensures your dog remains protected during travel and at home. According to Dr. Lena Torres, a certified pet behaviorist and animal safety consultant:
“Crate stability directly impacts a dog’s sense of security. A wobbly or damaged structure can increase anxiety and even lead to escape attempts.” — Dr. Lena Torres, DVM, Pet Safety Advisor
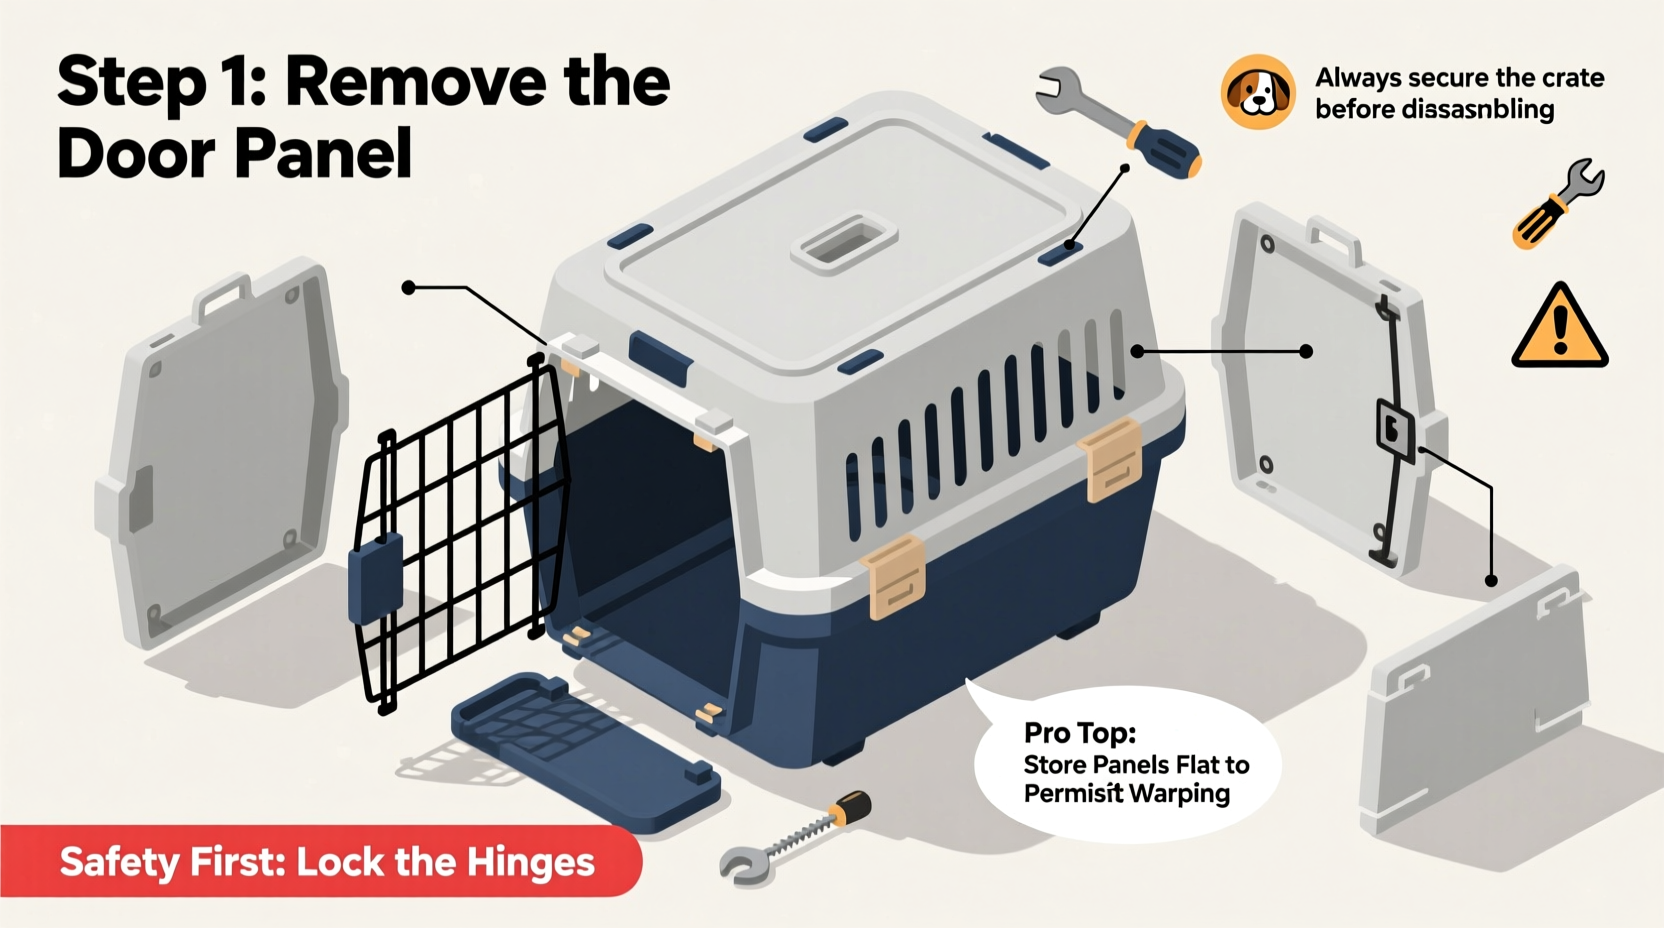
Essential Tools and Preparation Steps
Before touching any latch or bolt, gather the right tools. Most large crates use simple hardware, but having the correct equipment prevents unnecessary force and component damage.
- Adjustable wrench or socket set – For tightening or loosening bolts and wingnuts.
- Screwdriver (Phillips and flathead) – Needed for certain latch mechanisms or panel screws.
- Soft mallet or rubber hammer – Gently taps stuck joints without damaging metal or plastic.
- Small container or magnetic tray – Keeps screws, pins, and washers organized.
- Gloves – Protects hands from sharp edges, especially on older wire crates.
Clean the crate thoroughly using mild pet-safe disinfectant. Remove bedding, trays, and bowls. Work in a clear, open area with enough floor space to lay out components systematically. Labeling each part with masking tape (e.g., “Front Panel,” “Left Side”) helps during reassembly.
Step-by-Step Guide to Safe Disassembly
Follow this sequence to dismantle your crate efficiently and safely. While designs vary slightly between brands like MidWest, AmazonBasics, or Vari Kennels, most large crates share a similar modular framework.
- Remove all accessories: Take out food bowls, dividers, floor trays, and fabric covers. Set aside for separate cleaning.
- Open all doors and latches: Fully unlatch both side and top doors. This relieves tension on hinges and frame connections.
- Detach door panels: Use a screwdriver or wrench to remove hinge pins or mounting bolts. Keep hardware grouped by door type.
- Separate side panels from base: If your crate has a removable plastic or metal base, unscrew or unclip it first. Some models lock into grooves—lift straight up to avoid bending.
- Disconnect front and back panels: These usually connect via corner brackets or snap-in fasteners. Loosen bolts or press release tabs evenly on both sides.
- Fold or stack side panels: Once detached, lay flat. Avoid leaning them against walls where they might fall and warp.
- Store hardware securely: Place all screws, bolts, and pins in a labeled ziplock bag taped to the largest panel.
Do’s and Don’ts of Crate Breakdown
| Do’s | Don’ts |
|---|---|
| Label each panel and bag hardware separately | Leave screws loose in drawers or bags |
| Use a soft mat or towel under metal parts | Drag panels across concrete or hardwood |
| Inspect welds and joints for wear during disassembly | Force stuck parts without checking for hidden clips |
| Store panels vertically to prevent warping | Stack heavy items on top of disassembled crate parts |
| Apply light lubricant to hinges and bolts before storage | Store outdoors or in damp basements |
Real-World Example: Moving Across State Lines
Consider Sarah from Denver, who recently relocated with her two-year-old Rottweiler, Bruno. Her Midwest iCrate Model 1050 measured 48” x 30” x 34”—too large to fit in her SUV even with folded seats. Attempting to force it caused a bent support bar, making the crate unstable.
After consulting a pet transport specialist, she learned the proper disassembly method. By removing the doors, detaching side panels, and securing hardware in a labeled pouch, she reduced the crate’s volume to three flat sections totaling just 6 inches in height when stacked. The entire process took 12 minutes, and reassembly at her new home took less than 10. More importantly, Bruno had a stable, familiar space waiting for him—a crucial factor in reducing relocation stress.
Storage and Transport Best Practices
Once disassembled, smart storage preserves both functionality and longevity. Follow these guidelines:
- Use breathable covers: Wrap panels in cotton sheets or mesh bags to allow airflow and prevent rust.
- Elevate off the floor: Place on wooden pallets or shelves in garages or basements to avoid moisture absorption.
- Avoid extreme temperatures: Plastic bases can warp in heat; metal frames may corrode in humidity.
- Keep away from chemicals: Store separately from lawn fertilizers, antifreeze, or cleaning agents that emit corrosive fumes.
For transport, stack panels tightly and secure with ratchet straps. Never allow loose crate parts to shift in a vehicle—this poses a danger in sudden stops.
Frequently Asked Questions
Can I disassemble a dog crate without tools?
Some lightweight or travel crates feature tool-free quick-release latches. However, most large crates require basic tools to safely loosen bolts and pins. Attempting to force them apart by hand risks injury and damage.
How often should I fully disassemble my crate?
At minimum, disassemble once every six months for deep cleaning and inspection. Frequent travelers may do so before and after each trip to check for structural fatigue.
Will disassembling my crate void the warranty?
No—unless you modify or permanently alter components. Routine disassembly for cleaning or transport is expected and covered under standard warranties from reputable brands.
Final Checklist Before Storage
- All hardware accounted for and stored in labeled bag
- Panels cleaned, dried, and free of debris
- No visible cracks, rust, or bent joints
- Crate components wrapped or covered for protection
- Stored upright in dry, climate-controlled area
- Photos or notes saved for future reassembly reference
Conclusion: Smart Care Starts with Smart Breakdown
Disassembling a large dog crate isn’t just a logistical necessity—it’s an act of responsible pet ownership. Taking the time to break down your crate correctly protects your investment, ensures your dog’s ongoing safety, and simplifies life whether you’re moving homes, traveling, or simply reclaiming garage space. With the right tools, technique, and attention to detail, the process becomes quick, repeatable, and stress-free.


 浙公网安备
33010002000092号
浙公网安备
33010002000092号 浙B2-20120091-4
Comments
No comments yet. Why don't you start the discussion?