
Window screens play a vital role in keeping insects out while allowing fresh air to circulate through your home. But over time, they require cleaning, repair, or replacement. Whether you're preparing for seasonal maintenance or upgrading to new screens, removing them improperly can lead to bent frames, torn mesh, or damaged tracks. Knowing the correct method ensures both your safety and the longevity of your windows and screens.
This comprehensive guide walks you through every step of removing common types of window screens with precision and care. From identifying screen types to storing them properly after removal, this article equips homeowners with practical knowledge that prevents costly mistakes.
Understanding Your Window Screen Type
Not all window screens are installed the same way. The removal process varies significantly depending on the type of screen and window system. Identifying your screen type is the first critical step before attempting removal.
The most common types include:
- Retainer Clip Screens: Held in place by small plastic or metal clips along the top or sides. Common in double-hung and sliding windows.
- Bottom-Lift Screens: Designed to be lifted from the bottom track, then tilted inward at the top for removal.
- Side-Load Screens: Found in sliding patio doors; inserted from one side into grooves within the frame.
- Magnetic or Snap-In Screens: Modern designs that use magnets or snap fittings for easy access—common in newer homes and high-efficiency windows.
Before proceeding, inspect your screen closely. Look for visible clips, tabs, or release mechanisms. If you’re unsure, consult your window manufacturer’s documentation or examine multiple windows in your home to identify patterns.
Step-by-Step Guide to Removing Common Window Screens
Once you’ve identified your screen type, follow these detailed steps tailored to each design. Always work slowly and apply minimal pressure to avoid bending aluminum frames or cracking fiberglass mesh.
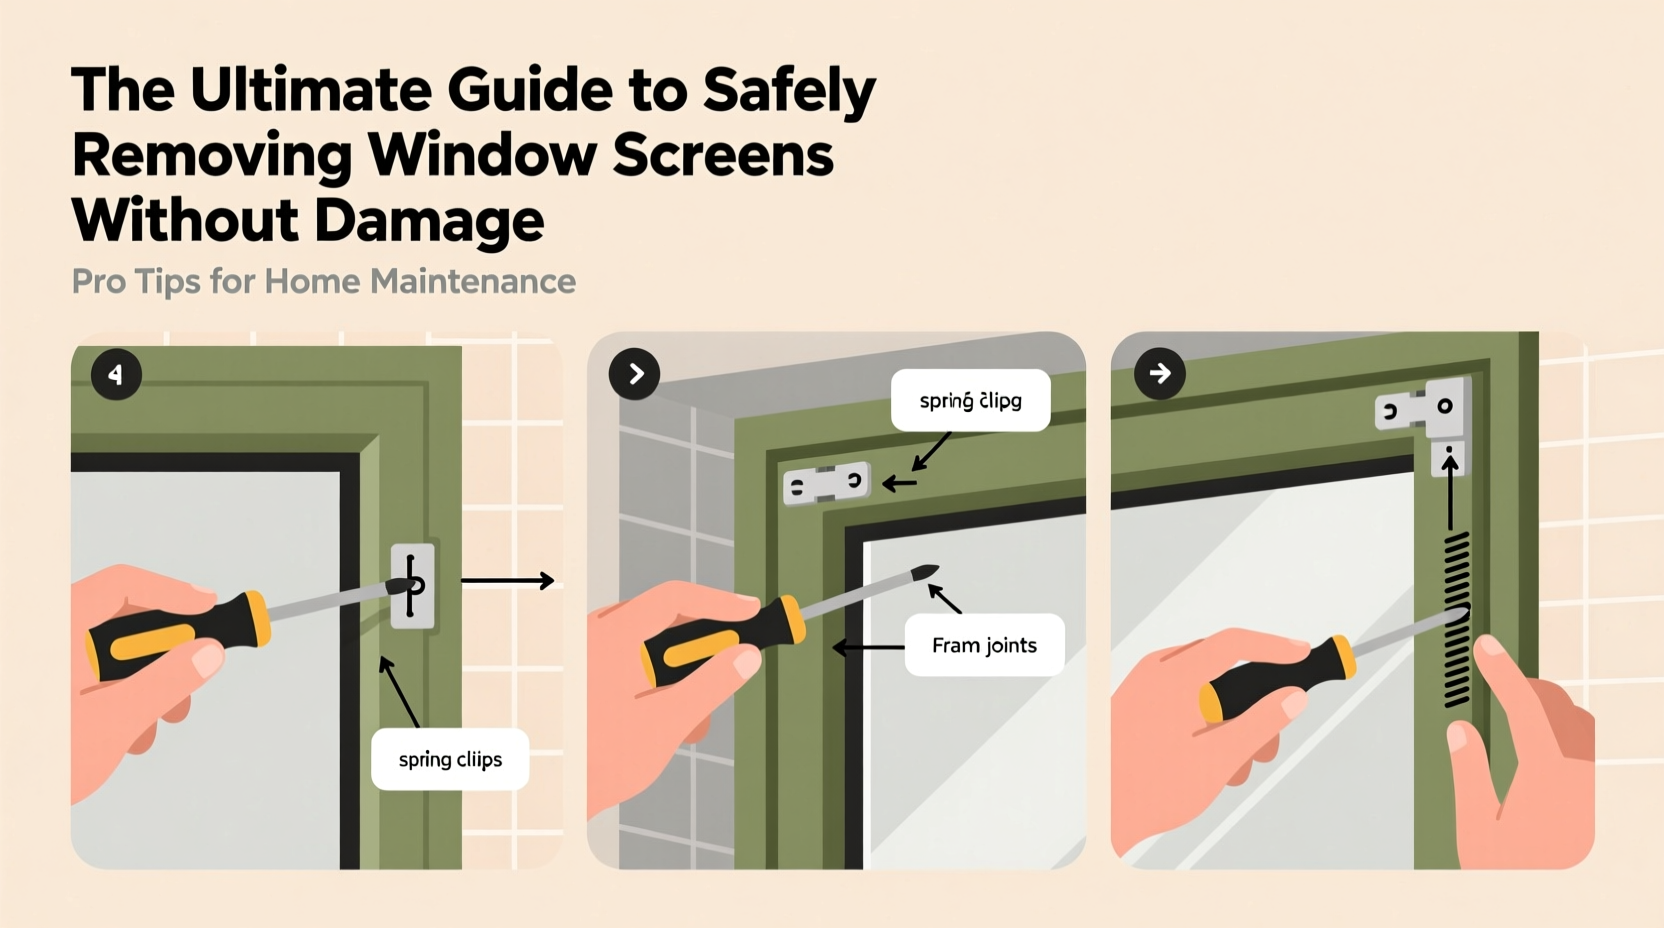
Removing Retainer Clip Screens
- Inspect the top edge of the screen for small plastic or metal retainer clips.
- Use a flat-head screwdriver or your fingers to gently push each clip outward, away from the screen frame.
- Once all clips are released, grasp the screen firmly by the sides.
- Tilt the bottom of the screen toward the inside of the room.
- Slide the top of the screen up and out of the track.
- Remove the screen completely and set it aside on a soft surface.
Removing Bottom-Lift (Tilt-Out) Screens
- Lift the screen slightly from the bottom track—just enough to clear the sill.
- Tilt the top of the screen inward toward the room.
- With the top tilted, pull the entire screen straight into the room.
- Place it flat on a towel or carpeted area to prevent scratches.
Removing Side-Load Patio Door Screens
- Open the sliding glass door fully to expose the screen track.
- Locate the release tab or pin typically found at the top or bottom corner.
- Depress the tab using your finger or a small tool.
- Gently slide the screen toward the center or opposite side, depending on the model.
- Lift the screen upward once disengaged from the track to remove it.
“Many homeowners force screens out when they encounter resistance. In nearly all cases, there's a release mechanism being overlooked. Patience prevents $75 replacements.” — Carlos Mendez, Residential Window Technician with 18 years of experience
Do’s and Don’ts When Handling Window Screens
To maintain screen integrity and ensure smooth reinstallation, follow best practices. A few simple precautions go a long way in preventing avoidable damage.
| Do’s | Don’ts |
|---|---|
| Wear gloves to protect hands and improve grip | Use excessive force when lifting or tilting |
| Clean tracks before reinstalling screens | Bend or lean heavily on the screen frame |
| Label screens if removing multiple units | Stack screens directly on top of each other |
| Store screens vertically in a dry space | Leave screens exposed to rain or direct sun |
| Check for warped edges or loose corners pre-removal | Ignore broken clips or worn rollers |
Real Example: A Homeowner’s Mistake and Recovery
Jamie R., a homeowner in Portland, Oregon, attempted to remove her second-floor bedroom screen during spring cleaning. She assumed it was a standard lift-out model but encountered resistance. Instead of investigating further, she pulled harder—bending the aluminum frame and cracking the fiberglass mesh near the upper corner.
After calling a local window service technician, she learned her windows used concealed retainer clips hidden beneath rubber gaskets. The technician showed her how to gently peel back the gasket, release the clips, and remove the screen without strain. Jamie now labels each screen with masking tape indicating the room and installation direction. She also keeps spare retainer clips on hand for future maintenance.
Her total repair cost: $48 for a partial screen recanvas. Her lesson? “Just because it doesn’t look complicated doesn’t mean it isn’t designed with hidden mechanisms.”
Essential Tools and Preparation Checklist
Having the right tools and environment ready streamlines the process and reduces risk. Use this checklist before starting:
- ✔ Gloves (lightweight work or gardening)
- ✔ Flat-head screwdriver (non-metallic tip preferred)
- ✔ Soft towel or blanket (for placing removed screens)
- ✔ Flashlight (to inspect tight spaces and tracks)
- ✔ Label maker or painter’s tape and pen
- ✔ Vacuum with brush attachment (for cleaning tracks afterward)
- ✔ Replacement parts (clips, rollers, tension pins) if needed
- ✔ Clean workspace indoors (garage or spare room)
Work during daylight hours whenever possible. Natural light helps spot subtle indicators like recessed tabs or worn components. If working indoors, open adjacent doors to improve lighting and airflow.
Frequently Asked Questions
Can I remove a window screen from the outside?
In most residential installations, screens are designed to be removed from the inside for safety reasons. Exterior removal risks dropping tools or screens from height and may violate manufacturer guidelines. Only consider outside removal if specifically approved by the window maker and with proper fall protection.
What should I do if a retainer clip breaks during removal?
If a clip snaps, don’t panic. Most are standardized and available at hardware stores or directly from the manufacturer. Note the brand and model number of your window, take the broken piece with you, and purchase replacements. Some models use universal clips compatible across brands.
How often should window screens be removed and cleaned?
Experts recommend removing and cleaning screens at least twice a year—once in spring before heavy use and again in fall before winterizing. Homes near dusty roads, forests, or coastal areas may benefit from quarterly cleaning to prevent clogging and corrosion.
Final Tips for Safe Reinstallation
Removal is only half the process. To complete the job correctly, plan for reinstallation from the start. Always clean the track groove with a damp cloth and vacuum out debris before putting the screen back. Align the screen precisely—especially on tilt-out models—to avoid binding or misalignment.
For screens with spring-loaded arms or tension bars, compress them gently as you guide the screen into position. Listen for a soft click or feel for resistance releasing—that usually indicates proper seating.
Conclusion
Removing window screens doesn’t have to be a frustrating or destructive task. With the right knowledge, tools, and patience, it becomes a manageable part of routine home maintenance. Understanding your screen type, respecting the engineering behind retention systems, and handling frames with care preserves both function and appearance.


 浙公网安备
33010002000092号
浙公网安备
33010002000092号 浙B2-20120091-4
Comments
No comments yet. Why don't you start the discussion?