
Carrying a handbag, tote, or purse while also wearing a backpack can be awkward and impractical. Whether you're commuting through crowded city streets, hiking a trail, or navigating an airport, having both hands free is essential. A bag hanger offers a smart solution—allowing you to suspend your secondary bag from your backpack without sacrificing stability or security. But not all attachments are created equal. Done poorly, a dangling bag can swing loose, damage zippers, or even fall off entirely. This guide walks through the most reliable methods, materials, and techniques to attach a bag hanger securely, ensuring your belongings stay safe and within reach.
Why Use a Bag Hanger on Your Backpack?
Bag hangers eliminate the need to carry multiple items by hand, especially when one already has a backpack on. They’re particularly useful in situations where placing a bag on the ground isn’t hygienic or practical—restrooms, public transit, café floors, or muddy trails. By elevating your bag, you avoid contamination and reduce wear from surface contact.
Beyond hygiene, using a hanger improves ergonomics. It balances weight distribution and prevents you from overloading one shoulder. When properly secured, it becomes a seamless extension of your everyday carry system.
Selecting the Right Bag Hanger and Attachment Method
Not every hanger works with every backpack. Compatibility depends on the hanger design, backpack material, and how it will be used. Consider three primary attachment types:
- Clip-on hangers: Use spring-loaded or locking carabiner-style clips that attach to backpack straps, D-rings, or frame rails.
- Loop-and-hook hangers: Feature elastic cords or silicone bands that wrap around straps and secure via hook mechanisms.
- Sewn-integrated hangers: Built directly into premium backpacks, often hidden in side pockets or zipper pulls.
For most users, clip-on models provide the best combination of adjustability and reliability. Look for rubberized grip pads inside the clamp to prevent slippage on slick nylon or polyester fabrics.
Key Features to Look For
| Feature | Recommended | Avoid |
|---|---|---|
| Material | Anodized aluminum, reinforced nylon | Thin plastic, brittle metal alloys |
| Grip Surface | Rubber padding, textured interior | Smooth metal or plastic |
| Weight Capacity | 5–10 lbs (2.3–4.5 kg) | Under 3 lbs (1.4 kg) |
| Portability | Folds flat, under 4 oz | Bulky, rigid arms |
“Secure attachment isn’t just about strength—it’s about friction, positioning, and load dynamics. A well-placed hanger reduces strain on both gear and user.” — Dr. Lena Torres, Industrial Design Specialist at Urban Gear Labs
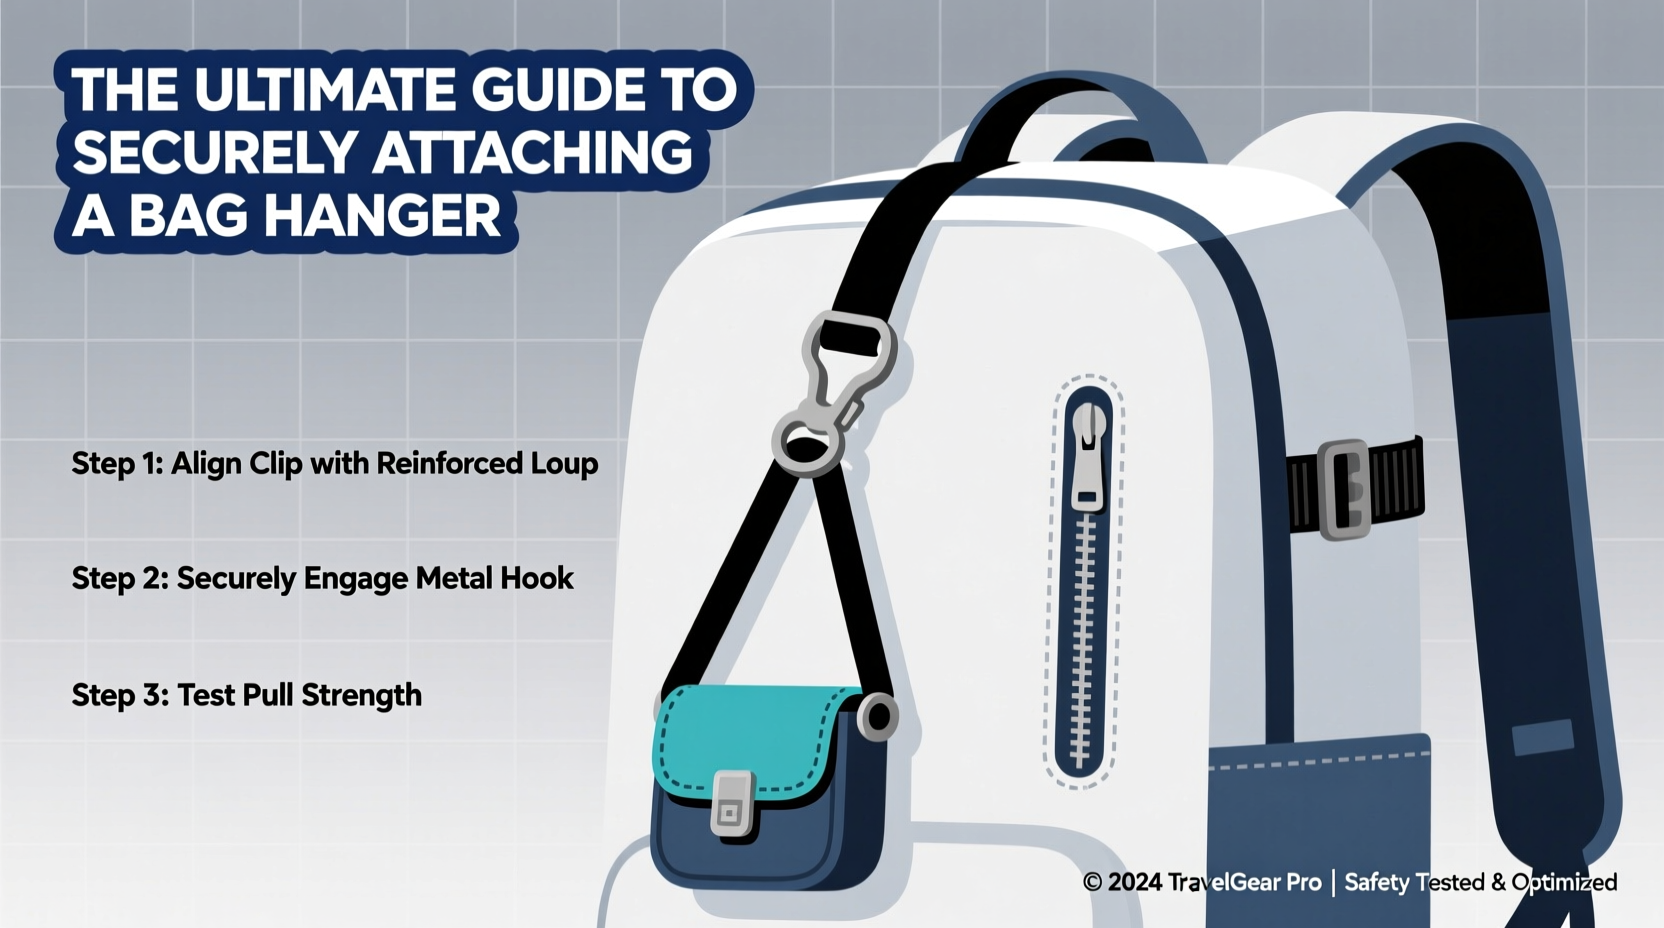
Step-by-Step: How to Attach a Bag Hanger Securely
Follow this sequence to ensure maximum safety and functionality:
- Choose the optimal anchor point: Identify a sturdy part of your backpack—such as a padded shoulder strap, sternum strap connector, or dedicated D-ring. Avoid thin mesh pockets or flimsy fabric loops.
- Position the hanger correctly: Orient the hanger so the clamping mechanism faces inward toward the backpack body. This minimizes snagging and keeps the suspended bag close to your center of gravity.
- Open the clamp and attach: Squeeze the release lever and place the clamp around the chosen strap. Ensure at least ¾ inch (2 cm) of strap is fully seated in the jaw.
- Test the grip: Gently tug downward and sideways to confirm no slipping. If the clamp rotates or slides, reposition or tighten.
- Hang your bag: Slide the top handle or strap of your handbag onto the hanger’s support arm. Make sure it cannot slip off laterally—some hangers include side retainers for this purpose.
- Double-check balance: Put on the backpack and walk naturally. The hanging bag should remain stable, not swinging excessively or pulling the backpack off-center.
Common Mistakes and How to Avoid Them
Even experienced travelers make errors when attaching bag hangers. These missteps compromise safety and comfort:
- Using weak attachment points: Attaching to water bottle pockets or drawstrings may seem convenient but lacks structural integrity.
- Overloading beyond capacity: Exceeding the hanger’s rated weight leads to deformation or failure. Always check manufacturer specs.
- Poor alignment: Hanging a bag too far outward increases torque, causing the backpack to tilt or the hanger to twist free.
- Ignoring environmental factors: Wet or icy conditions reduce grip. In such cases, use a loop-based backup tether or carry the bag instead.
Do’s and Don’ts Summary
| Action | Do | Don’t |
|---|---|---|
| Attachment Point | Shoulder strap, D-ring, frame rail | Mesh pocket, drawstring, loose flap |
| Hanging Orientation | Bag centered behind wearer | Bag swinging to the side |
| Maintenance | Clean grip pads monthly | Ignore dirt buildup on clamps |
| Load Management | Stay under 70% of max capacity | Hang full laptop bags or grocery totes |
Real-World Example: Commuter Tested in NYC
Sophia, a UX designer in Brooklyn, uses her 22L commuter backpack daily alongside a leather crossbody tote. She previously carried the tote by hand, leading to shoulder fatigue and frequent put-downs on dirty subway floors. After researching options, she purchased a titanium-reinforced clip hanger and attached it to her backpack’s right shoulder strap.
Within a week, she adjusted the position slightly higher to reduce sway during rush hour. She now hangs her tote confidently—even during packed train rides. “It stays put even when I’m jostled,” she said. “And I don’t have to worry about germs from the floor anymore.”
She emphasizes checking the clamp weekly for wear and occasionally replacing the rubber inserts when they lose elasticity. Her routine has become part of her Sunday evening prep—ensuring reliability every Monday morning.
Frequently Asked Questions
Can I attach a bag hanger to any backpack?
Most backpacks with structured straps or hardware loops can support a hanger. However, ultra-light packs, children’s backpacks, or those made entirely of soft mesh may lack sufficient anchor points. Always verify the structural integrity before relying on it in high-traffic environments.
Will a hanger damage my backpack over time?
If used correctly, minimal wear occurs. However, constant friction from a poorly padded clamp can abrade fabric. To prevent this, choose hangers with wide, rubber-lined jaws and inspect attachment zones monthly for fraying or stitching stress.
Are there alternatives if I don’t want a permanent clip?
Yes. Elastic loop hangers that wrap around straps offer temporary solutions without leaving marks. Some users prefer magnetic hangers integrated into custom backpack mods, though these are less common and require DIY installation.
Final Thoughts and Next Steps
Attaching a bag hanger to your backpack is more than a convenience—it’s a functional upgrade that enhances mobility, cleanliness, and load management. With the right equipment and proper technique, you gain freedom without compromising security. The key lies in thoughtful selection, correct placement, and regular maintenance.
Take a moment today to evaluate your current setup. Does your backpack have a viable attachment point? Is your hanger rated for your typical load? Small adjustments now can lead to significant improvements in comfort and confidence on the go.


 浙公网安备
33010002000092号
浙公网安备
33010002000092号 浙B2-20120091-4
Comments
No comments yet. Why don't you start the discussion?