
Carrying a shoulder bag is a daily ritual for many—whether commuting to work, running errands, or traveling. Yet one small frustration persists: digging through compartments to find your keys. Attaching a keychain directly to your bag offers instant access, but only if done correctly. A poorly secured keychain can dangle loosely, scratch surfaces, or even detach entirely. The solution lies in a balance of security, accessibility, and aesthetics. This guide walks you through proven methods, best practices, and real-life insights to ensure your keys are always within reach—and never at risk.
Why Proper Keychain Attachment Matters
It’s easy to underestimate the importance of how you attach your keychain. However, an insecure connection leads to more than just inconvenience. Lost keys mean missed appointments, replacement costs, and potential security risks if spare house or car keys fall into the wrong hands. Additionally, flailing metal rings can damage delicate bag materials like leather or fabric linings over time.
A well-attached keychain should be:
- Firmly anchored to prevent accidental detachment
- Positioned for quick, intuitive access
- Designed to minimize wear on both the keyring and the bag
- Visually unobtrusive or stylishly integrated
The goal isn’t just convenience—it’s creating a seamless extension of your carry system that works reliably every day.
Step-by-Step Guide to Secure Attachment
Follow this five-step process to ensure your keychain stays put while remaining effortlessly accessible.
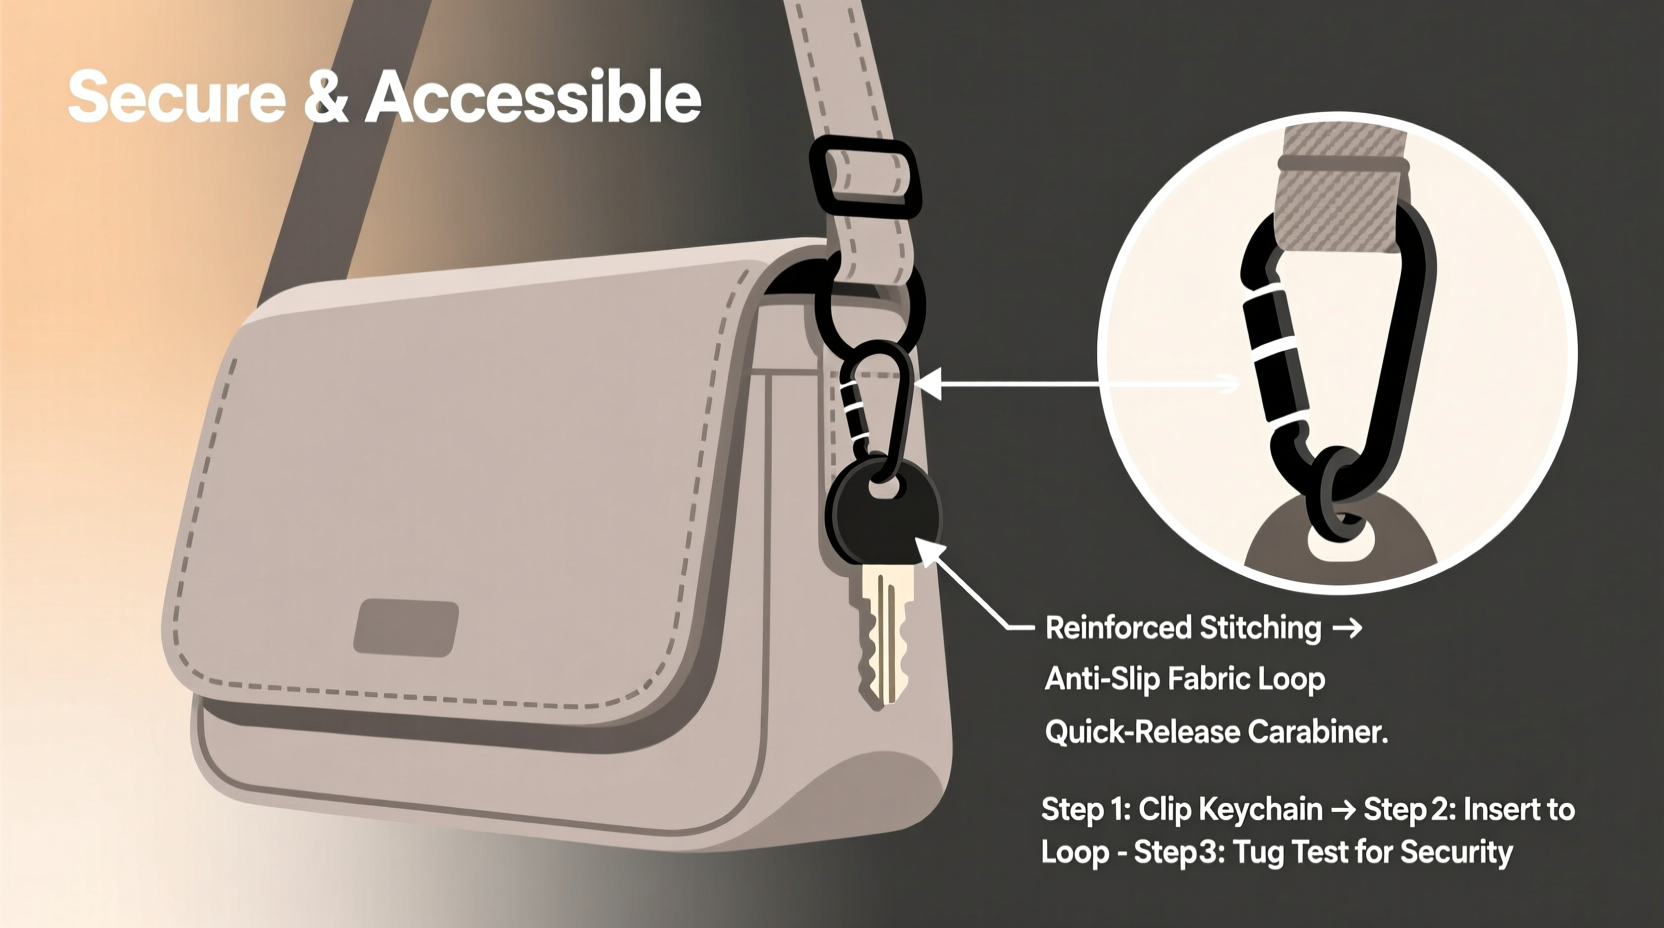
- Evaluate attachment points on your bag. Look for sturdy loops, D-rings, zipper pulls, or reinforced stitching near the top edge. Avoid fragile straps or decorative elements that aren’t load-rated.
- Select the right connector. Options include split rings, lobster clasps, swivel hooks, or paracord lanyards. Match the connector strength to your key weight and usage frequency.
- Minimize dangling length. Attach the keychain so it rests flush against the bag when not in use. Excess chain or cord increases snag risk and reduces control.
- Test under movement. Simulate walking, sitting, and reaching motions to check for unwanted swinging or loosening. Adjust position or hardware if needed.
- Inspect monthly. Check for signs of wear on the ring, clasp, or bag loop. Replace components before failure occurs.
This method ensures durability without sacrificing usability. Over time, consistent checks will prevent sudden losses and extend the life of both your keys and your bag.
Best Tools and Hardware for Reliable Connection
Not all keychains are created equal. The weakest link in your setup often determines overall reliability. Below is a comparison of common attachment solutions based on strength, ease of use, and compatibility with shoulder bags.
| Hardware Type | Strength Rating | Access Speed | Ideal For | Limits |
|---|---|---|---|---|
| Split Ring (standard) | Moderate | Slow | Bulkier key sets | Hard to open; scratches finish |
| Lobster Clasp + Chain | High | Fast | Leather bags, frequent access | May catch on clothing |
| Swivel Hook (snap-on) | Moderate-High | Very Fast | Daily commuters | Can loosen if overloaded |
| Paracord Lanyard w/ Toggle | High | Medium | Outdoor use, rugged bags | Bulky appearance |
| Key leash with magnetic lock | Good | Instant | Minimalist setups | Less secure under heavy strain |
For most urban users, a lobster clasp paired with a short stainless steel chain offers the ideal mix of speed and dependability. It attaches cleanly to existing D-rings and withstands repeated use far better than basic split rings.
“Most key loss incidents stem from using undersized connectors on high-stress carry points. Upgrade your hardware—it’s cheaper than replacing locks.” — Daniel Reyes, Urban Gear Engineer at Carryology Labs
Real-World Example: How One Traveler Fixed Her Key Problem
Sarah, a freelance photographer based in Portland, carried her vintage leather shoulder bag everywhere. She loved its look but constantly struggled with lost time searching for her keys inside. After misplacing them twice during airport transfers, she decided to make a change.
She added a 3-inch nickel-free steel chain with a lobster clasp, attaching it to the bag’s internal zipper pull—a strong, central point hidden from view. The keys now hang just below the flap, peeking out slightly when she opens the bag. With a single flick, she grabs them. No more fumbling, no more panic.
More importantly, after six months of daily use—including hikes, subway rides, and café visits—the hardware shows no signs of wear. Sarah reports that the fix took less than ten minutes and cost under $8, yet improved her daily routine significantly.
Checklist: Secure Keychain Setup in 5 Minutes
Use this quick-reference checklist whenever installing or reevaluating your keychain setup:
- ☐ Identify a strong anchor point (D-ring, strap base, or reinforced loop)
- ☐ Remove old, worn rings or frayed cords
- ☐ Choose a corrosion-resistant metal connector (stainless steel or brass preferred)
- ☐ Limit exposed length to under 4 inches to prevent snags
- ☐ Test by gently tugging and simulating motion (e.g., swinging bag)
Completing this routine takes less than five minutes but pays dividends in long-term reliability.
Frequently Asked Questions
Can I attach a keychain to any type of shoulder bag?
Most shoulder bags have at least one viable attachment point—either a zipper pull, handle seam, or external loop. If none exist, you can add a small metal ring via stitching or use a clamp-style key holder designed for strap attachment. Always assess material strength first, especially with thin fabrics or delicate leathers.
Will a metal keychain scratch my bag?
Possibly, if left loose and allowed to rub repeatedly. To prevent this, use coated chains, silicone sleeves on rings, or position the keychain so it rests flat against non-sensitive areas. Regular inspection helps catch early signs of abrasion.
What’s the safest way to carry keys if I don’t want them visible?
Use a retractable key reel mounted inside the main compartment near the opening. These allow you to pull keys out and snap them back in, keeping them secure and hidden. Alternatively, integrate a slim magnetic key holder along the inner wall for silent, smooth access.
Final Thoughts: Small Change, Big Impact
Attaching a keychain may seem trivial, but done right, it transforms how you interact with your everyday carry. Security, speed, and simplicity converge when your keys are exactly where you expect them—without compromising your bag’s integrity. By selecting durable hardware, anchoring it wisely, and maintaining it regularly, you eliminate a persistent source of friction in your routine.
Don’t wait until you’ve lost your keys—or worse, locked yourself out—to act. Take five minutes today to evaluate your current setup. Upgrade the weak links, refine the placement, and test the result. That small investment could save you hours of stress down the road.


 浙公网安备
33010002000092号
浙公网安备
33010002000092号 浙B2-20120091-4
Comments
No comments yet. Why don't you start the discussion?