
Maintaining clean clippers is not just about appearance—it’s essential for performance, hygiene, and longevity. Whether you're a barber, groomer, or at-home user, hair, skin oils, and debris accumulate quickly between the blades, leading to friction, overheating, and inconsistent cuts. A neglected clipper works harder, wears out faster, and risks spreading bacteria. Regular, thorough cleaning prevents these issues and ensures smooth, precise results every time. This comprehensive guide breaks down best practices, tools, and routines that professionals rely on to keep their clippers in peak condition.
Why Cleaning Clippers Matters Beyond Surface-Level Hygiene
Most users think of cleaning clippers as removing visible hair buildup. But the real damage happens beneath the surface. Hair fragments trap moisture, promoting rust on metal components. Skin cells and sebum create a breeding ground for bacteria and fungi, especially when clippers are shared. Over time, accumulated grime increases blade friction, forcing the motor to work harder and shortening its lifespan. According to the National Barber Board Standards, poorly maintained clippers account for over 40% of early equipment failure in salons.
“Clean clippers aren’t just professional—they’re safer and more efficient. A well-maintained tool can last three times longer than one that’s neglected.” — Marcus Reed, Master Barber & Equipment Technician
Regular cleaning reduces heat buildup, preserves blade sharpness, and maintains consistent cutting speed. It also minimizes vibration and noise, enhancing comfort during use. For professionals, this translates to smoother client experiences and fewer service interruptions.
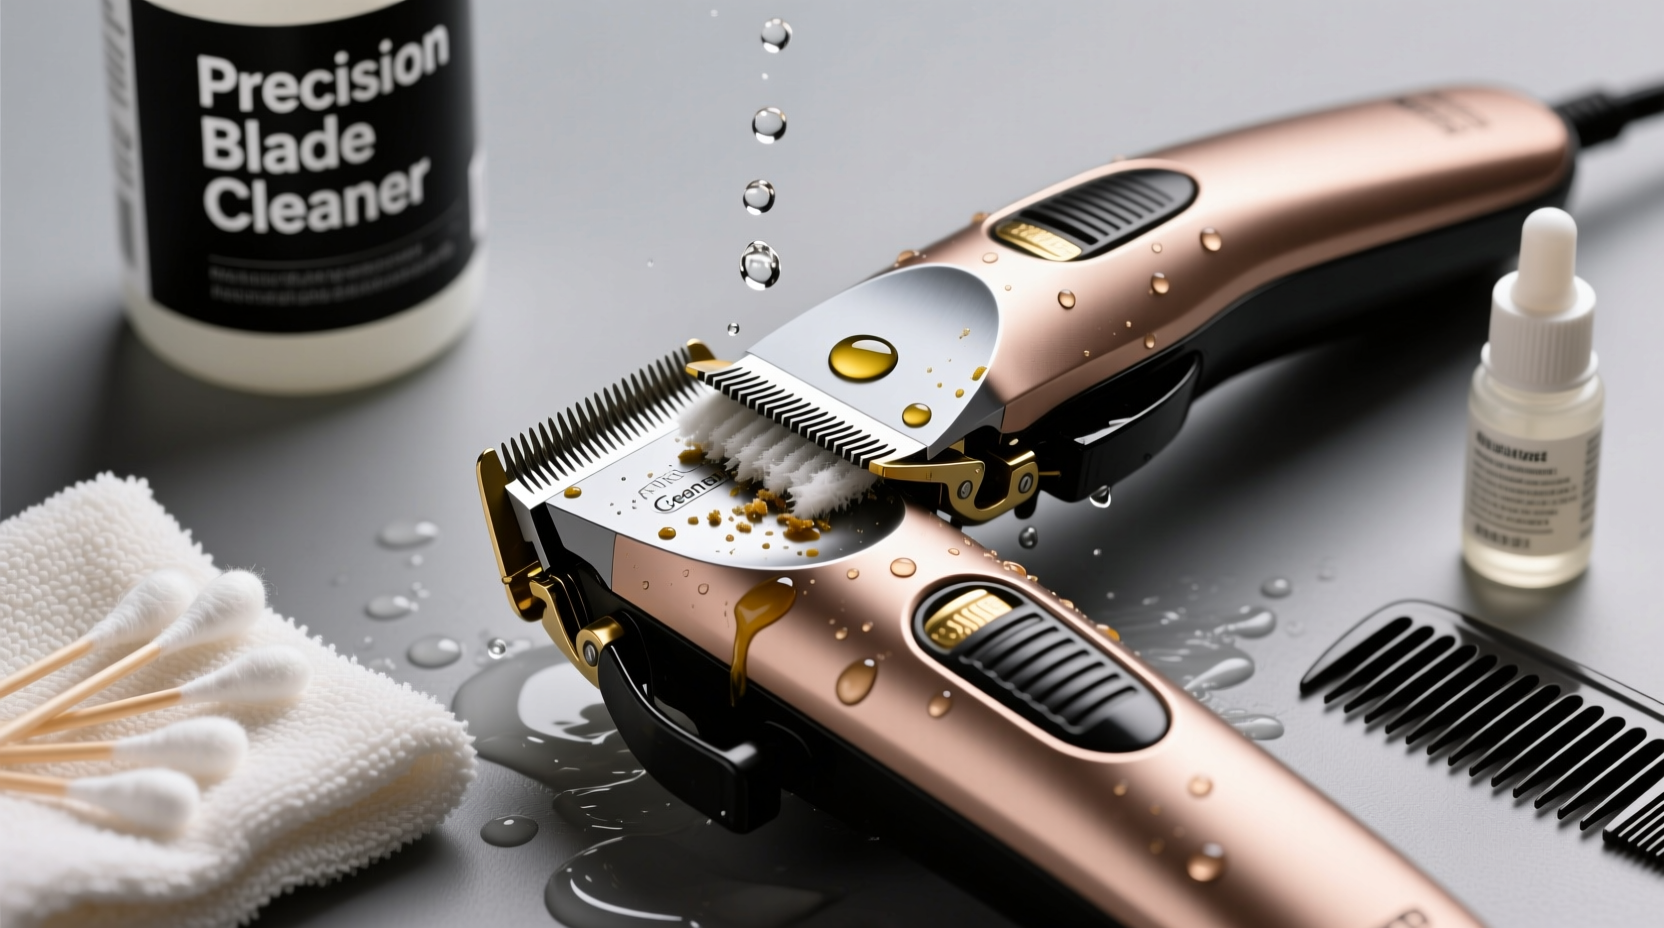
Essential Tools and Supplies for Effective Clipper Maintenance
Effective cleaning starts with the right materials. Using improper tools—like water, household cleaners, or stiff brushes—can damage sensitive motors and electronics. Here’s what every clipper owner should have:
- Clipper brush: A stiff-bristled, narrow brush designed to dislodge hair from tight spaces.
- Cleaning spray or solution: Specially formulated lubricant-cleaning agents (e.g., Andis Cool Care Plus, Oster Blade Wash) that dissolve residue without harming metal or plastic.
- Blade oil: Lightweight mineral oil that reduces friction and prevents corrosion.
- Soft lint-free cloth: For wiping blades and housing after cleaning.
- Screwdriver (if applicable): For models that allow blade removal.
- Compressed air (optional): Useful for blowing out dust from motor vents.
Step-by-Step Guide to Deep Cleaning Your Clippers
A full cleaning routine should be performed after every 3–5 uses, or daily for professional environments. Follow this proven sequence:
- Power off and unplug the clipper. If battery-powered, remove the battery or ensure it’s switched off.
- Remove loose hair using the clipper brush. Brush in the direction of the blade teeth to avoid damaging edges.
- Spray cleaning solution directly onto the blades, focusing on the gap between moving and stationary blades. Let sit for 30 seconds to break down oils and debris.
- Wipe thoroughly with a dry cloth. Repeat spraying and wiping until no residue appears on the cloth.
- Disassemble if possible. Many models allow blade removal via a release lever or screw. Take care not to lose small parts.
- Clean individual blade components with the brush and additional spray. Inspect for nicks or dullness.
- Reassemble blades precisely, ensuring alignment. Misalignment causes pulling and uneven cuts.
- Apply 2–3 drops of blade oil along the length of the blade, especially where the blades meet.
- Run the clipper for 10–15 seconds to distribute oil evenly. Wipe away excess with a cloth.
- Clean the exterior with a damp cloth and mild disinfectant (70% isopropyl alcohol). Avoid getting moisture into vents or switches.
Do’s and Don’ts of Clipper Maintenance
| Do’s | Don’ts |
|---|---|
| Use manufacturer-recommended cleaning solutions | Use water or household cleaners on internal parts |
| Brush clippers after each use | Ignore signs of blade chatter or overheating |
| Oil blades regularly—even if not used frequently | Store clippers in humid or dusty environments |
| Inspect blades monthly for dullness or damage | Force blades back on if they don’t align smoothly |
| Replace blades every 6–12 months with regular use | Use compressed air excessively, which can push debris deeper |
Real-World Example: How a Barbershop Reduced Downtime by 60%
In downtown Chicago, “Edge & Comb Barbershop” faced recurring issues with clipper malfunctions. Two of their five high-end clippers required servicing every six weeks, disrupting appointments and increasing costs. After consulting an equipment specialist, they implemented a strict cleaning protocol: all clippers were brushed, sprayed, and oiled after every client, with deep cleans at the end of each shift.
Within two months, motor failures dropped to zero. Blade replacements extended from every 4 months to over 10 months. The shop estimated saving $1,200 annually in repair and replacement costs. More importantly, clients noticed smoother, quieter cuts, improving satisfaction scores by 35%. This case underscores how simple maintenance habits yield significant operational benefits.
When and How to Replace Blades and Sharpen Components
No amount of cleaning can restore a worn blade. Signs it’s time for replacement include:
- Pulling or tugging on hair instead of cutting cleanly
- Uneven cutting lines or skipping
- Excessive heat after short use
- Visible nicks, cracks, or rust spots
Some high-end clippers allow professional sharpening, typically costing $15–$30 per session. However, many modern blades are made from hardened steel that isn’t cost-effective to sharpen. Replacement is often the better option. Always match OEM (original equipment manufacturer) specifications when buying new blades to ensure compatibility and performance.
Frequently Asked Questions
How often should I clean my clippers?
After every use for professionals; at least once a week for home users. A quick brush and oil application take less than two minutes and prevent long-term damage.
Can I use WD-40 instead of clipper oil?
No. WD-40 is a degreaser and solvent, not a lubricant. It removes existing oil, dries quickly, and can damage plastic components. Use only clipper-specific oil to protect your investment.
Why do my clippers still overheat after cleaning?
Overheating may indicate internal motor dust buildup, worn bearings, or insufficient lubrication. If cleaning and oiling don’t resolve it, have the unit inspected by a technician. Continuing to use an overheating clipper risks permanent motor burnout.
Checklist: Weekly Clipper Maintenance Routine
- ✅ Brush out hair after each use
- ✅ Spray with cleaning solution 2–3 times per week
- ✅ Apply fresh oil daily or before each use
- ✅ Inspect blade alignment and sharpness weekly
- ✅ Wipe down housing with alcohol wipe
- ✅ Store in a dry, covered case away from moisture
- ✅ Schedule blade replacement every 6–12 months
Conclusion: Make Cleanliness a Seamless Part of Your Routine
Thoroughly cleaning your clippers isn’t a chore—it’s an investment in performance, safety, and durability. Just a few minutes of disciplined care can extend your clipper’s life by years and ensure every cut is precise and comfortable. Whether you’re shaping fades or trimming pets, the difference between average and exceptional results often comes down to maintenance. Start today: gather your tools, follow the steps outlined here, and make clipper hygiene a non-negotiable part of your routine.


 浙公网安备
33010002000092号
浙公网安备
33010002000092号 浙B2-20120091-4
Comments
No comments yet. Why don't you start the discussion?