
Ill-fitting clothes can undermine even the most thoughtfully curated wardrobe. No matter how stylish a garment is, if it doesn’t fit properly, it won’t look or feel right. Whether you're ordering custom tailoring, shopping online, or sewing your own clothes, precise body measurements are non-negotiable. Unlike standard sizing charts—which often vary between brands and regions—your actual measurements provide a reliable foundation for a flawless fit.
Taking accurate body measurements isn’t difficult, but it does require attention to detail, the right tools, and a consistent method. A difference of just half an inch in key areas like the chest, waist, or hips can result in clothing that’s too tight, too loose, or unflattering in silhouette. This guide walks you through every essential step, common pitfalls, and professional techniques used by tailors and designers to ensure precision.
Why Accurate Measurements Matter
Clothing is designed to conform to the human form, yet mass-produced garments rely on generalized size ranges that rarely account for individual proportions. A person may wear a size 8 in one brand and a size 12 in another—not because their body changed, but because measurement standards differ.
Custom-tailored clothing, whether handmade or ordered from made-to-measure services, depends entirely on accurate input. Even minor errors compound when translated into fabric patterns. For example, a jacket with a chest measurement that’s 1 inch too small will restrict movement and create unsightly pulling across the buttons.
“Precision in measurement is the first stitch in the seam of a perfect fit.” — Daniel Reyes, Master Tailor, Savile Row Atelier
Beyond aesthetics, proper fit affects comfort and longevity. Clothes that fit well experience less strain at stress points like shoulders and seams, reducing wear and tear over time.
What You’ll Need: Tools and Preparation
Before taking any measurements, gather the right tools and prepare your environment for consistency.
- Flexible measuring tape: A cloth or fiberglass tape (not metal) that won’t stretch or bend under pressure.
- Mirror: To check posture and alignment during measurement.
- Fitted clothing: Wear snug, thin layers—like a sports bra and leggings or slim-fit underwear—to avoid bulk distorting results.
- Assistant (optional but recommended): While self-measurement is possible, having someone help ensures accuracy, especially for back measurements.
- Notebook or digital device: Record each measurement immediately to prevent confusion.
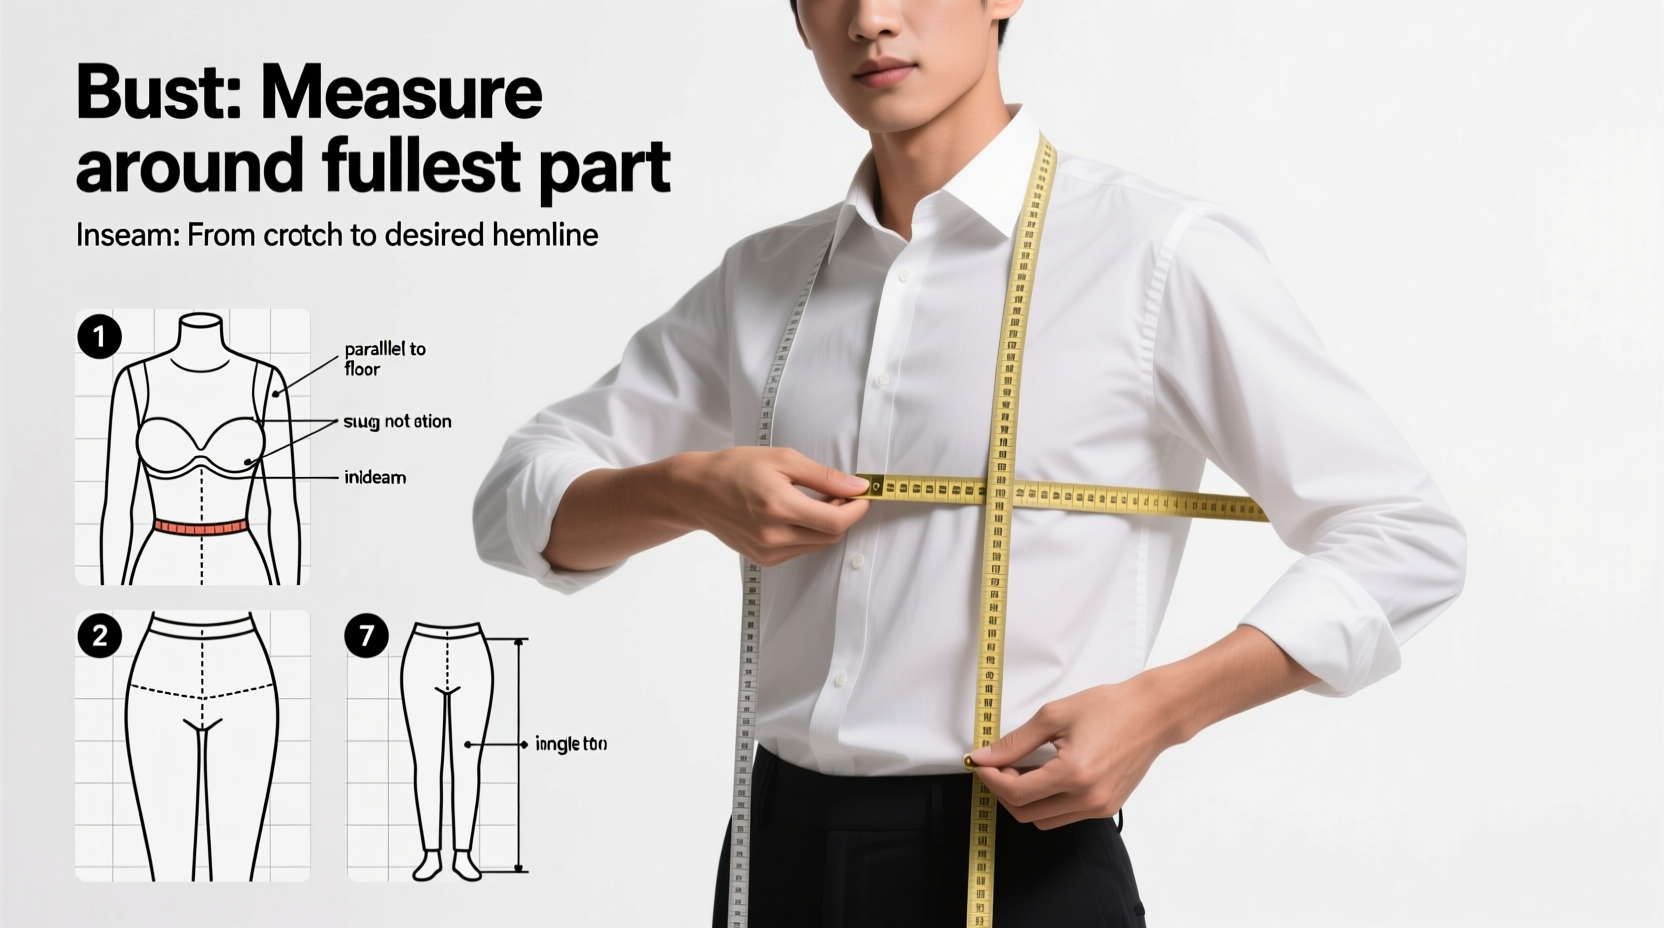
Step-by-Step Guide to Key Body Measurements
Follow this sequence to capture all critical dimensions. Measure in inches or centimeters, but stay consistent throughout. Take each measurement twice to confirm accuracy.
- Chest/Bust: Wrap the tape around the fullest part of the chest (for men) or bust (for women), keeping it horizontal under the arms. Breathe normally; do not puff out your chest.
- Waist: Locate your natural waist—the narrowest part of your torso, usually just above the navel. Keep the tape snug but not constricting.
- Hips: Measure around the fullest part of the hips and buttocks, typically 7–9 inches below the waist. Stand with feet together.
- Inseam: From a standing position, measure from the crotch down to the desired pant length (e.g., ankle or floor). Use a pair of well-fitting pants to trace the inner leg seam if needed.
- Outseam: Start at the waistband and run the tape down the outer leg to the heel. This determines overall pant length.
- Shoulders: Measure from the edge of one shoulder bone (acromion) to the other. Do not round over the curve of the shoulders—measure straight across.
- Sleeve Length: Bend your arm slightly. Measure from the shoulder point (not neck) down through the elbow to the wrist bone.
- Back Length: From the base of the neck (C7 vertebra) down to the natural waist. Useful for jackets and dresses.
- Front Rise: From the crotch up through the front to the waistband. Critical for trousers and jeans.
- Neck: Measure around the base of the neck where a collar would sit. Leave room for one finger underneath.
| Measurement | Common Error | How to Avoid It |
|---|---|---|
| Waist | Measuring at belly button instead of natural waist | Pinch the side waist to find the narrowest point |
| Hips | Tape too high or tilted | Keep tape parallel to floor, use mirror to verify |
| Sleeve Length | Starting from neck instead of shoulder point | Identify the shoulder bone edge as starting point |
| Inseam | Standing with legs apart | Feet together, weight evenly distributed |
Real Example: Sarah’s Custom Suit Experience
Sarah ordered a made-to-measure suit online for her sister’s wedding. She skipped professional measurement and estimated her size using a previous suit’s label. The jacket arrived too tight across the shoulders, and the trousers gapped at the waist.
She returned the suit and visited a tailor who re-measured her. The results showed her shoulder width was 1.5 inches broader than she had reported, and her waist was smaller due to recent fitness changes. With corrected measurements, the second suit fit impeccably—structured yet comfortable, with clean lines and no pulling.
This case underscores that assumptions—even based on past data—are unreliable. Bodies change, and garments demand exactness.
Do’s and Don’ts of Taking Body Measurements
| Do’s | Don’ts |
|---|---|
| Stand on a hard, level surface | Measure over bulky clothing |
| Use a full-length mirror | Pull the tape too tightly |
| Take measurements at the end of the day (when body is most expanded) | Rely solely on mirror reflection without turning |
| Record each number immediately | Estimate measurements from old clothes |
FAQ: Common Questions About Body Measurements
How often should I re-measure my body?
Every 3–6 months, or whenever you notice changes in how your clothes fit. Weight fluctuations, muscle gain, or lifestyle shifts can alter your dimensions significantly.
Can I measure myself alone?
Yes, but with limitations. Self-measurement works well for chest, waist, hips, and inseam using a mirror. However, back length, shoulder width, and neck measurements are more accurate with assistance.
What if my measurements fall between sizes?
Always size up for comfort, especially in tailored garments. A skilled tailor can always take in excess fabric, but adding material is far more complex. For off-the-rack clothing, prioritize the largest measurement (e.g., hips) and adjust the rest accordingly.
Final Checklist for Perfect Measurement Accuracy
- ☑ Wear form-fitting, non-bulky clothing
- ☑ Use a flexible, non-stretch measuring tape
- ☑ Stand naturally with feet together
- ☑ Keep the tape parallel to the ground
- ☑ Measure twice, record once
- ☑ Have someone assist for back and shoulder measurements
- ☑ Update measurements quarterly
Conclusion: Fit Starts with Precision
Perfectly fitted clothing isn’t a luxury—it’s a reflection of respect for your body and personal style. By mastering the art of accurate measurement, you unlock access to better-fitting garments, whether buying online, working with a tailor, or creating your own designs. The few minutes spent measuring today save hours of returns, alterations, and disappointment tomorrow.


 浙公网安备
33010002000092号
浙公网安备
33010002000092号 浙B2-20120091-4
Comments
No comments yet. Why don't you start the discussion?