
A dog crate is more than just a sleeping space—it’s a sanctuary, a training tool, and a safe haven during travel. But even the best-designed crate won’t serve its purpose if it’s poorly assembled. A loose latch, wobbly frame, or misaligned panel can compromise your dog’s safety and comfort. Whether you’ve just unboxed a wire crate, plastic airline carrier, or soft-sided model, proper assembly is essential. This guide walks you through every phase with precision, helping you build a secure, stable, and stress-free environment for your canine companion.
Understanding Your Crate Type and Components
Dog crates come in three primary styles: wire, plastic (often called “airline” or “travel” crates), and soft-sided fabric models. Each has distinct parts and assembly requirements. Before you begin, identify your crate type and lay out all components.
- Wire Crates: Typically include a metal frame, pan base, removable tray, door panel, and locking mechanisms.
- Plastic Crates: Composed of a molded shell, front door, ventilation holes, and sometimes bolt-together panels.
- Soft-Sided Crates: Made of fabric walls supported by a collapsible metal or fiberglass frame, often used for indoor or travel use.
Check your instruction manual—but don’t rely on it entirely. Some manufacturers provide unclear diagrams or omit critical details. Always verify that all pieces are present before starting. Missing a single clip or hinge pin can delay the process or create instability later.
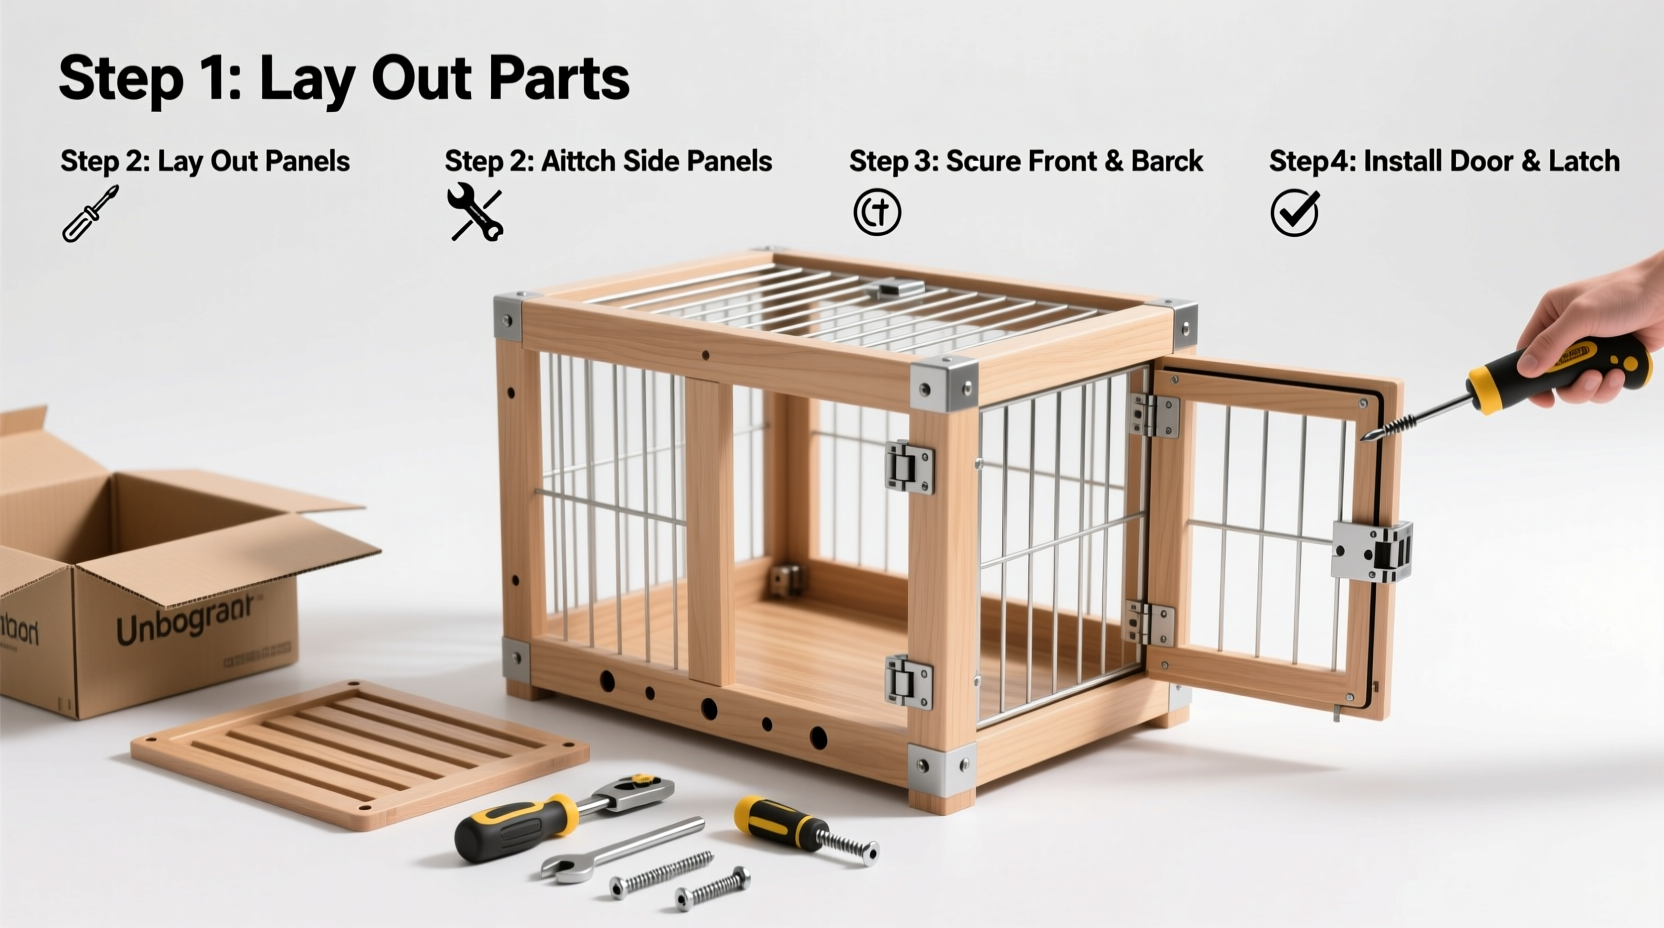
Step-by-Step Assembly Process for Wire Crates
Wire crates are the most common choice for home use due to their durability, visibility, and ventilation. Follow this timeline to assemble one correctly and efficiently.
- Unpack and inventory: Lay out all panels, the floor pan, door, hinges, latches, and any included tools.
- Connect side panels: Most wire crates have two long side panels connected via interlocking tabs. Align them carefully and press down until they snap into place.
- Attach end panels: Slide the front and rear panels into the grooves of the side frames. Ensure they sit flush and do not wobble.
- Secure the base: Insert the metal or plastic floor pan from underneath. It should slide into channels or rest on support rails.
- Install the door: Attach hinges to the front panel using provided pins or screws. Test the swing—door should open smoothly without catching.
- Lock the latch: Engage the sliding or twist-style latch. Verify it holds firmly and cannot be accidentally triggered by your dog.
- Stabilize the structure: Gently shake the crate. If there’s movement, recheck connections and tighten any loose joints.
For larger crates (typically 42” and above), consider anchoring them to a wall or using anti-tip brackets—especially in homes with active dogs or during vehicle transport.
Assembly Tips for Plastic and Soft-Sided Crates
While less complex than wire models, plastic and soft-sided crates require attention to detail to ensure safety.
Plastic Crate Assembly
- Align the base and top shell carefully—many models have interlocking ridges.
- Secure the front door using bolts or clips; over-tightening can crack the plastic.
- Check that ventilation holes are unobstructed and that the door closes tightly.
- Ensure the crate meets IATA (International Air Transport Association) standards if used for air travel.
Soft-Sided Crate Setup
- Extend the frame fully—usually made of flexible rods that slide into fabric sleeves.
- Insert vertical supports at corners and along the top to maintain shape.
- Zip all panels securely and check mesh windows for tears.
- Note: These are not suitable for chewers or unsupervised use.
“Improperly assembled crates are among the top reasons pets escape or injure themselves during transit.” — Dr. Laura Simmons, DVM, Canine Behavior & Safety Consultant
Common Mistakes to Avoid During Assembly
Even experienced pet owners make errors when rushing through setup. The following table outlines frequent pitfalls and how to prevent them.
| Mistake | Why It’s Risky | How to Avoid |
|---|---|---|
| Skipping hardware checks | Missing screws weaken structural integrity | Count all parts against the manual’s list before starting |
| Forcing misaligned panels | Can bend metal or crack plastic | Double-check orientation; panels only fit one way |
| Ignoring floor stability | Dogs may injure paws on uneven surfaces | Ensure pan sits flat and doesn’t shift when stepped on |
| Loose door latches | Risk of accidental escape | Test latch repeatedly; choose dual-lock systems when possible |
Real-World Example: Assembling a Crate for a High-Energy Breed
Mark adopted a 2-year-old Australian Shepherd named Luna who was anxious and prone to jumping. He purchased a 42-inch wire crate but didn’t follow the full assembly steps—skipping the latch test and not securing the base. On the second night, Luna pawed at the door, dislodging the latch, and escaped. She knocked over a lamp and injured her paw on broken glass.
After consulting a trainer, Mark reassembled the crate, this time checking each connection, testing the latch under pressure, and anchoring the crate to a nearby bookshelf. He also added rubber feet to prevent sliding. Since then, Luna uses the crate willingly and remains calm during storms and visitors.
This case illustrates that correct assembly isn’t optional—it’s foundational to your dog’s safety and behavioral success.
Essential Checklist for Secure Crate Assembly
Use this checklist before and after building your crate to ensure nothing is overlooked.
- ✅ All parts accounted for and undamaged
- ✅ Panels properly aligned and locked in place
- ✅ Floor pan securely seated and level
- ✅ Door opens and closes smoothly
- ✅ Latch engages firmly and resists moderate pressure
- ✅ No sharp edges or protruding wires
- ✅ Crate stable when gently shaken
- ✅ Proper size: Dog can stand, turn, and lie down comfortably
- ✅ Positioned in a quiet, draft-free area of the home
- ✅ Anchored if used in a vehicle or with large/active dogs
Frequently Asked Questions
How long does it take to assemble a dog crate?
Most wire and plastic crates take between 10 and 25 minutes for a first-time user. Soft-sided models can be set up in under 5 minutes. Experience and clear instructions reduce time significantly.
Can I assemble a dog crate without tools?
Yes—most modern crates are designed for tool-free assembly using snap-in joints, push pins, and folding mechanisms. However, some heavy-duty or modular crates may require a screwdriver or Allen wrench for latches or stabilizers.
What should I do if my crate wobbles after assembly?
First, recheck all panel connections and ensure the floor pan is fully seated. If instability persists, place non-slip pads under the corners or consider anchoring the crate to a wall stud using manufacturer-recommended hardware.
Final Steps: Making the Crate Inviting and Functional
Once assembled, the crate should feel like a den, not a cage. Add a washable pad or bed, a favorite toy, and perhaps a light blanket. Avoid overcrowding with items that could obstruct airflow or become chew hazards.
Introduce your dog gradually. Never force entry. Use treats and praise to build positive associations. Monitor behavior—whining or scratching may indicate discomfort with the space, not poor assembly, but a well-built crate ensures that physical safety isn’t part of the problem.
Conclusion: Build Confidence Alongside the Crate
Assembling a dog crate correctly isn’t just about following directions—it’s about creating a reliable, safe space where your dog can relax, recover, and thrive. When done right, the crate becomes a cornerstone of training, travel, and daily routine. Take the time to build it securely, test every component, and personalize it for comfort. Your dog depends on it.


 浙公网安备
33010002000092号
浙公网安备
33010002000092号 浙B2-20120091-4
Comments
No comments yet. Why don't you start the discussion?