
Installing a dog door in your home’s exterior wall can offer your pet independence, reduce accidents, and simplify your daily routine. But cutting into a wall isn’t like drilling into drywall—it requires precision, structural awareness, and weatherproofing. Done incorrectly, it can lead to air leaks, moisture damage, or even compromise insulation and framing integrity. This comprehensive guide walks you through every phase of the installation process with safety, durability, and long-term performance in mind.
Assess Your Wall Type and Location
Before reaching for tools, determine what kind of wall you’re working with. The most common exterior walls are framed with wood studs and covered with siding (vinyl, fiber cement, brick, etc.) on the outside and drywall or paneling inside. Some homes have concrete or masonry walls, which require different tools and techniques.
- Wood-framed walls: Most compatible with standard dog door kits; easier to cut and reframe.
- Concrete or block walls: Require masonry drills and core bits; not ideal for DIY unless experienced.
- Insulated or energy-efficient walls: Need special attention to maintain R-value and prevent thermal bridging.
Choose a location that avoids electrical wiring, plumbing, gas lines, and structural beams. Use a stud finder and check both interior and exterior sides. Ideally, install the dog door where your pet naturally exits—near a backyard gate or patio door—and ensure the outdoor area is secure.
Tools and Materials Checklist
Gather everything before starting. A rushed trip to the hardware store mid-project can delay progress and increase risk of error.
- Essential Tools:
- - Stud finder
- - Tape measure
- - Level
- - Pencil or marker
- - Keyhole or reciprocating saw
- - Drill with spade bits
- - Screwdriver or impact driver
- - Caulking gun
- - Utility knife
- - Safety goggles and gloves
- Materials:
- - Dog door unit (with mounting frame and flaps)
- - Exterior-grade screws
- - Weather-resistant sealant (silicone or polyurethane)
- - Insulating foam or rigid board (optional)
- - Flashing kit (for shingle or sloped siding)
- - Patching compound (for interior drywall)
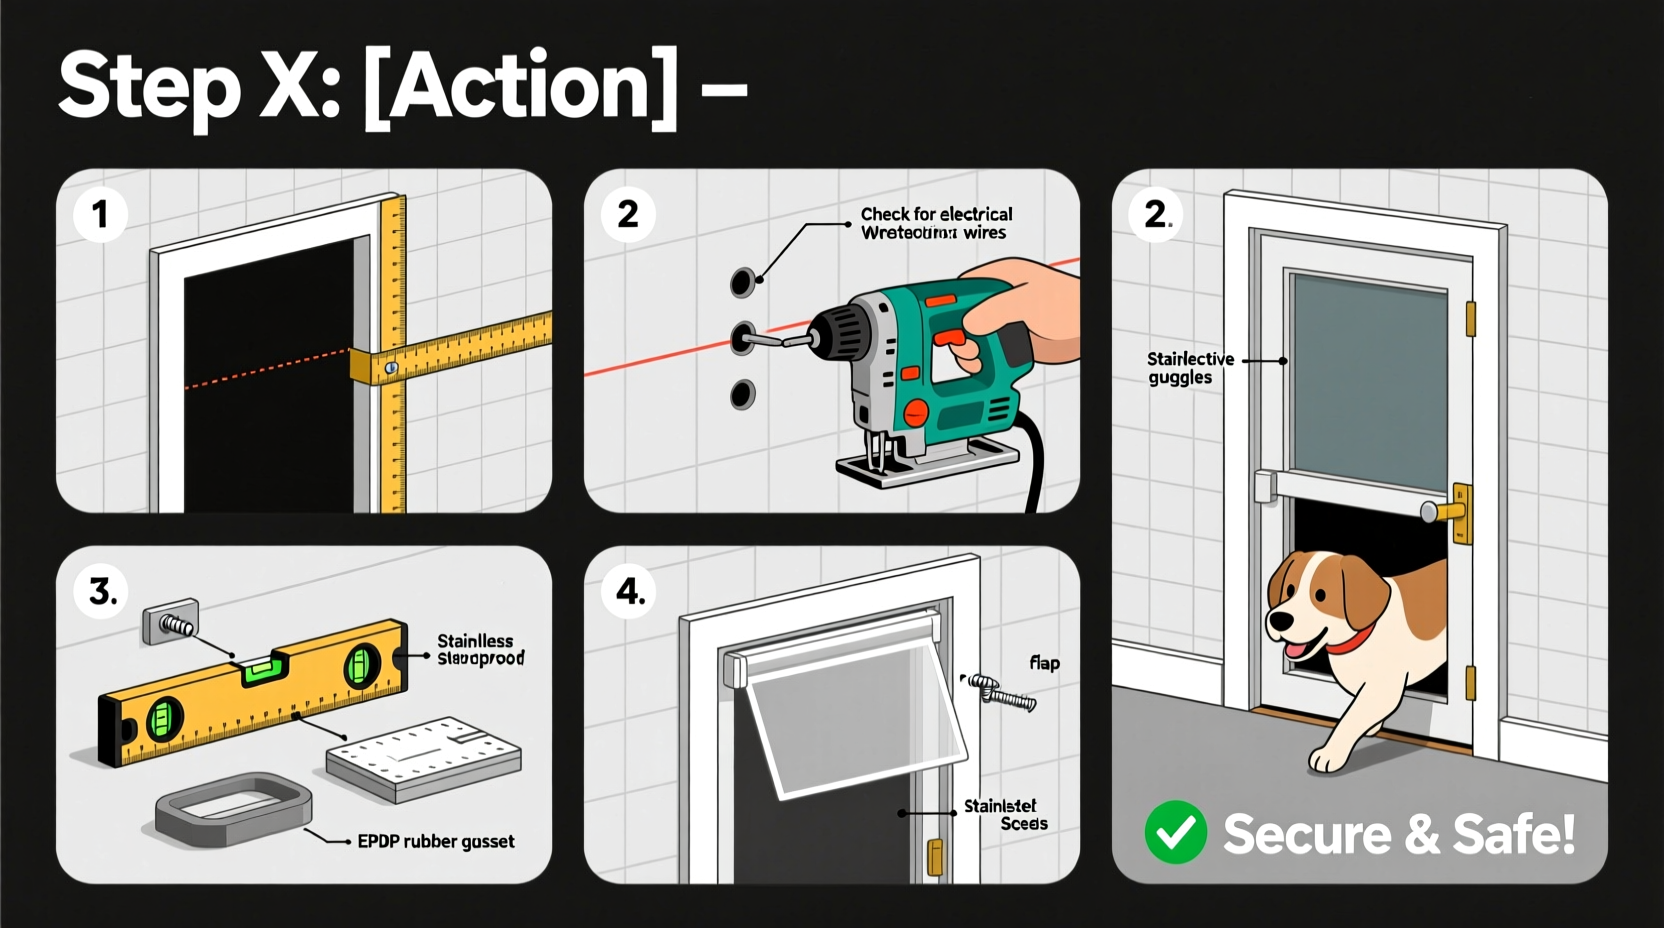
Step-by-Step Installation Process
- Measure Your Dog: Height from floor to shoulder determines flap height. Add 1–2 inches clearance. Width should allow comfortable passage. Most manufacturers provide sizing charts—follow them closely.
- Mark the Cutout Area: On the interior wall, use a level and pencil to outline the dog door frame. Ensure the bottom of the opening is high enough to avoid water intrusion outdoors but low enough for your pet to step through easily. Double-check alignment with studs—cutouts must fit between them (typically 16” apart).
- Locate and Avoid Obstructions: Scan the marked area with a stud finder. Use a small drill bit to probe from inside through the wall at corners of the outline. Check exterior side for wires, pipes, or obstructions.
- Cut the Interior Opening: Drill starter holes in each corner of the rectangle. Use a keyhole saw to connect them. Remove drywall carefully. Repeat on the exterior side after removing siding or cladding as needed.
- Install the Tunnel Frame: Insert the dog door’s tunnel section through the hole. It should span the entire wall thickness. Secure the interior and exterior frames with provided screws, ensuring the unit is level and flush on both sides.
- Weatherproof the Installation: Apply exterior-grade sealant around all edges. Install metal or plastic flashing above the unit to direct rainwater away. Overlap with siding to prevent backflow.
- Insulate Gaps: If there are air gaps around the frame, fill with expanding foam (use minimal-expansion type to avoid warping). Do not overfill.
- Finish Interior and Exterior Surfaces: Patch drywall with joint compound if needed. Reattach or replace siding, trim, or stucco. Paint or seal to match surrounding areas.
- Test the Door: Let your dog approach gradually. Reward calm interaction. Monitor for drafts, noise, or difficulty closing the flap.
Do’s and Don’ts During Installation
| Do’s | Don’ts |
|---|---|
| Use a level at every stage | Install near electrical outlets without verification |
| Seal all gaps with waterproof caulk | Use regular foam that expands aggressively |
| Check local building codes for exterior modifications | Leave insulation exposed to moisture |
| Train your pet to use the door gradually | Allow children or other pets unsupervised access during setup |
“Improperly sealed dog doors are among the top causes of hidden moisture damage in single-family homes.” — Dr. Lena Patel, Building Science Consultant, National Home Integrity Institute
Real-World Example: Installing in a Vinyl-Sided Home
Sarah, a homeowner in Portland, Oregon, wanted her 50-pound Labrador, Max, to access the fenced backyard independently. She chose a medium-sized, double-flap dog door rated for insulated walls. After locating two studs 16 inches apart, she marked a 10” x 14” opening centered between them.
Using a utility knife, she scored and removed the vinyl siding piece. Inside, she cut drywall cleanly and confirmed no wiring ran through the cavity. She installed the tunnel frame, secured it with stainless steel screws, then applied butyl tape and aluminum flashing above the unit. Finally, she sealed edges with silicone rated for temperature extremes. Two weeks later, Max used the door confidently, and Sarah noticed no drafts or water marks—even during heavy spring rains.
Frequently Asked Questions
Can I install a dog door in a load-bearing wall?
Yes, but only if the cutout avoids structural studs. The opening must be framed with header and footer supports to redistribute weight, similar to a window. Consult a contractor if unsure—this is not a beginner-level modification.
How do I prevent cold drafts in winter?
Choose a model with dual magnetic seals and insulated flaps. Ensure the frame is tightly sealed and consider adding a secondary indoor cover for extreme climates. Some high-end models include climate-controlled locking features.
Is it safe to let my dog use the door unsupervised?
Safety depends on your environment. Ensure the yard is fully enclosed, free of hazards, and inaccessible to predators or stray animals. Consider a lockable door for nighttime or when traveling.
Final Recommendations for Long-Term Success
A well-installed dog door blends functionality with structural integrity. Regular maintenance—checking seals annually, cleaning flaps monthly, and inspecting for pest entry—keeps the system operating smoothly. Choose quality over cost: premium units resist UV degradation, wind blowback, and accidental chewing.
If your wall contains complex materials like stone veneer or stucco over wire mesh, professional installation may be worth the investment. The same applies if you're uncertain about hidden utilities or insulation requirements.
“The best dog doors disappear into the home’s design while giving pets freedom. Precision in installation ensures they last decades, not years.” — Mark Tran, Certified Pet Access Installer & Contractor
Take Action Today
Your dog deserves reliable, safe access to the outdoors—and you deserve peace of mind knowing your home’s integrity remains intact. With careful planning, the right tools, and attention to detail, installing a dog door in any wall is a manageable weekend project. Start by measuring your pet, selecting the proper model, and verifying your wall’s structure. Then follow this guide step by step. Once complete, watch your furry companion enjoy newfound independence, one paw at a time.


 浙公网安备
33010002000092号
浙公网安备
33010002000092号 浙B2-20120091-4
Comments
No comments yet. Why don't you start the discussion?