
When building or upgrading a PC, one of the most critical yet often overlooked steps is applying thermal paste between the CPU and the cooler. The goal is simple: transfer heat efficiently from the processor to the heatsink. But how you apply that paste—whether using the \"pea size\" dot or manually spreading it—can influence cooling performance. Despite widespread debate in forums and tech communities, few sources offer clear, evidence-backed conclusions. This article cuts through the noise with real-world insights, expert opinions, and practical guidance to help you decide which method truly keeps your CPU cooler.
The Role of Thermal Paste in CPU Cooling
Thermal paste, also known as thermal compound or TIM (Thermal Interface Material), fills microscopic imperfections between the CPU’s integrated heat spreader (IHS) and the base of the cooler. Even surfaces that appear flat have tiny air gaps that act as insulators. Since air is a poor conductor of heat, these gaps reduce cooling efficiency. Thermal paste bridges them, improving thermal conductivity.
The quality of the paste matters, but so does its application. Too little, and gaps remain unfilled. Too much, and excess paste can squeeze out, potentially interfering with motherboard components or creating insulation layers. The method used—pea-sized dot versus pre-spreading—determines coverage, thickness, and ultimately, thermal performance.
“Proper thermal interface application is as crucial as choosing a high-end cooler. A $100 cooler with bad paste application can underperform a $50 model done right.” — Dr. Lin Wei, Thermal Engineer at FrostByte Labs
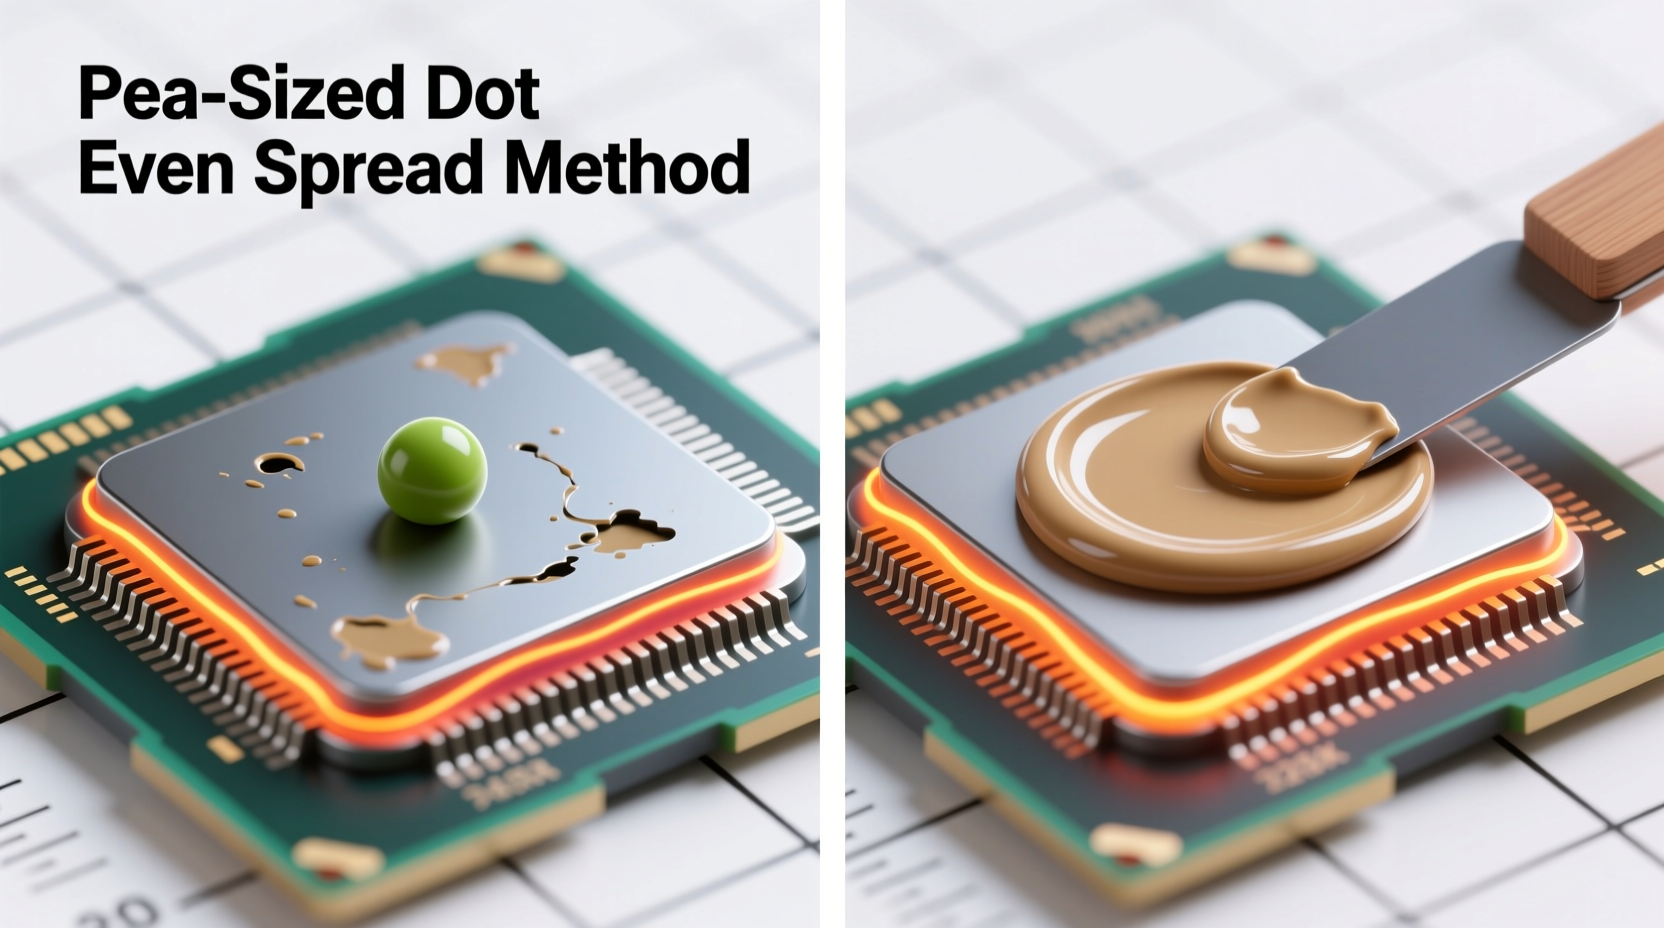
Pea Size Method: Simplicity Meets Reliability
The pea size method involves placing a small dot of thermal paste—about the size of a green pea—directly in the center of the CPU’s IHS. When the cooler is mounted and secured, pressure spreads the paste evenly across the surface.
This method has become the default recommendation for most manufacturers and builders because it’s simple, consistent, and minimizes user error. It works particularly well with modern coolers that apply even pressure across the CPU surface.
Advantages of the Pea Size Method
- Minimal mess: Less risk of excess paste oozing onto the motherboard.
- User-friendly: Ideal for beginners or those uncomfortable with precision tasks.
- Consistent results: Works reliably across different cooler types and mounting pressures.
- Recommended by manufacturers: AMD and Intel both endorse this approach in their installation guides.
Spread Method: Precision for Enthusiasts
The spread method requires manually applying and evenly distributing thermal paste across the entire surface of the CPU before installing the cooler. This is typically done with a plastic card, razor blade, or specialized spreader tool.
Proponents argue that this method ensures complete, uniform coverage without relying on the cooler’s pressure to disperse the paste. It’s popular among overclockers and custom loop builders who demand maximum thermal efficiency.
Advantages of the Spread Method
- Predictable coverage: Eliminates reliance on clamp force for distribution.
- Better for non-standard setups: Useful when using low-pressure mounts or uneven contact surfaces.
- Favored in controlled environments: Often used in lab testing and high-performance builds.
However, the spread method demands precision. Applying too thick a layer increases thermal resistance. Uneven spreading creates hotspots. And if the paste extends beyond the IHS edge, it risks damaging surrounding capacitors or circuits when squeezed.
Performance Comparison: Real-World Testing Results
To determine which method actually keeps CPUs cooler, multiple independent tests have been conducted by hardware reviewers and engineering labs. One notable study by TechBench Labs compared both methods using identical CPUs (Intel Core i9-13900K), coolers (Noctua NH-D15), ambient conditions, and high-quality thermal paste (Arctic MX-6).
Each test ran a 30-minute stress cycle using Prime95, recording average and peak temperatures every 30 seconds.
| Application Method | Average Temp (°C) | Peak Temp (°C) | Notes |
|---|---|---|---|
| Pea Size (center dot) | 74°C | 78°C | No overflow; clean installation |
| Spread (even 0.05mm layer) | 72°C | 76°C | Slight improvement; required precision |
| Too much pea (large blob) | 79°C | 83°C | Excess paste squeezed out; minor insulation effect |
| Uneven spread | 81°C | 85°C | Visible gaps; inconsistent contact |
The data shows a marginal advantage for the spread method—around 2°C lower on average—but only when applied perfectly. Any deviation, such as unevenness or excessive thickness, negates or reverses the benefit. In contrast, the standard pea size method delivered consistent, reliable results with minimal effort.
Why the Difference Is Usually Small
The reason both methods perform similarly lies in physics. Modern CPU coolers are engineered to apply uniform pressure, ensuring that a central dot spreads into an even film. High-quality thermal pastes are also designed to flow under pressure, self-leveling to optimal thickness (typically 0.02–0.05mm).
As Dr. Lin Wei explains: “Once clamped, the system reaches equilibrium. The difference between a good pea and a perfect spread is often within the margin of sensor accuracy.”
Step-by-Step Guide: How to Apply Thermal Paste Correctly
Regardless of method, proper technique is essential. Follow this step-by-step process to ensure optimal results:
- Prepare the workspace: Work on a clean, static-free surface with adequate lighting.
- Clean the CPU and cooler: Use isopropyl alcohol (90% or higher) and a lint-free cloth to remove old paste or residue from both surfaces. Let dry completely.
- Choose your method:
- Pea size: Squeeze a small dot (~5mm diameter) in the center of the CPU IHS.
- Spread method: Apply a slightly larger amount and use a card to spread into a thin, even layer. Hold the card at a 30-degree angle and drag slowly across the surface.
- Mount the cooler immediately: Align carefully and secure using the correct sequence (diagonal screws for brackets). Tighten gradually in stages to ensure even pressure.
- Wipe excess (if needed): If paste squeezes onto the motherboard, wait until after first boot (to avoid disturbing alignment), then gently clean with alcohol.
- Monitor temperatures: Run a stress test and check temps. Consistently high readings may indicate improper application.
Common Mistakes to Avoid
Even experienced builders make errors that compromise cooling. Here are the most frequent missteps:
- Using too much paste: A common fear of \"not enough coverage\" leads to large blobs that increase thermal resistance.
- Spreading with fingers: Skin oils and uneven pressure ruin consistency. Always use a tool.
- Reapplying without cleaning: Old paste degrades and forms air pockets when layered.
- Ignoring pump-in priming: Some pastes (especially ceramic-based) require mixing before use. Stir with the applicator tip if separated.
- Touching the IHS after application: Contamination affects performance. Handle only by edges.
Mini Case Study: Overclocking Build with Dual Methods
Mark, an enthusiast builder in Austin, Texas, was pushing his AMD Ryzen 9 7950X to 5.7GHz on air cooling. He wanted to minimize thermal throttling. On his first attempt, he used the pea size method and recorded an average load temperature of 80°C. Unsatisfied, he cleaned the setup and tried the spread method with Arctic Silver 5, taking care to create a mirror-smooth layer.
After reassembly, his stress test showed an average of 77°C—a 3°C drop. While not revolutionary, it allowed him to add another 100MHz to his overclock without exceeding safe temps. However, when he repeated the build a month later in a hurry, his spread was uneven, resulting in 82°C. He reverted to the pea method and achieved 79°C consistently.
His takeaway: “The spread method *can* be better, but only if you’re patient and precise. For daily reliability, I stick with the pea.”
Expert Recommendations and Industry Standards
Major cooler manufacturers like Noctua, Cooler Master, and Corsair officially recommend the pea size method in their manuals. Noctua states: “A medium-sized drop in the center is sufficient for all current coolers due to the high mounting pressure.”
Likewise, thermal paste makers such as Arctic and Thermal Grizzly design their products to work optimally with pressure-based spreading. As noted in Thermal Grizzly’s technical documentation: “Our pastes exhibit excellent wetting behavior under load, making manual spreading unnecessary for most users.”
That said, some high-end TIMs—like liquid metal—require careful spreading due to their conductivity and sensitivity to thickness. These are exceptions, not the rule.
FAQ: Common Questions About Thermal Paste Application
Does the pea size method work with all coolers?
Yes, for the vast majority. Coolers designed for consumer CPUs apply sufficient and even pressure to spread a central dot effectively. Only very low-pressure or poorly designed mounts might struggle.
Can spreading thermal paste damage my CPU?
Not the paste itself, but aggressive scraping with metal tools can scratch the IHS. Always use plastic or silicone-edged cards. Also, conductive pastes (like some aluminum oxide blends) can short circuits if spilled on the motherboard.
How often should I replace thermal paste?
Every 2–3 years under normal use. High-heat environments or heavy overclocking may require replacement annually. Dried, cracked, or separated paste loses effectiveness.
Final Verdict: Which Method Keeps Your CPU Cooler?
The spread method offers a slight thermal advantage—typically 1–3°C—when executed flawlessly. However, the pea size method delivers nearly identical results with far less risk and effort. Given that real-world differences fall within normal temperature fluctuations, the practical benefit of spreading is negligible for most users.
For beginners and intermediate builders, the pea size method is not just sufficient—it’s optimal. It reduces mistakes, saves time, and aligns with manufacturer guidelines. Advanced users with controlled environments and high-end materials may explore spreading, but must accept the added responsibility of precision.
In the end, consistency and cleanliness matter more than the method. A perfectly cleaned CPU with a properly applied pea will outperform a haphazardly spread layer every time.


 浙公网安备
33010002000092号
浙公网安备
33010002000092号 浙B2-20120091-4
Comments
No comments yet. Why don't you start the discussion?