
A well-distressed denim jacket is more than just a piece of clothing—it’s a statement. Whether you're aiming for vintage authenticity, punk edge, or modern streetwear flair, customizing your own ripped denim jacket allows you to express individuality while reviving an old favorite. The beauty of DIY distressing lies in its accessibility: no special tools or fashion training required. With the right approach, even beginners can achieve professional-looking results from their living room.
This comprehensive guide walks you through every stage of transforming a plain denim jacket into a uniquely worn-in masterpiece. From selecting the ideal base garment to mastering multiple distressing methods and preserving your creation, each step is designed for precision, creativity, and long-term wearability.
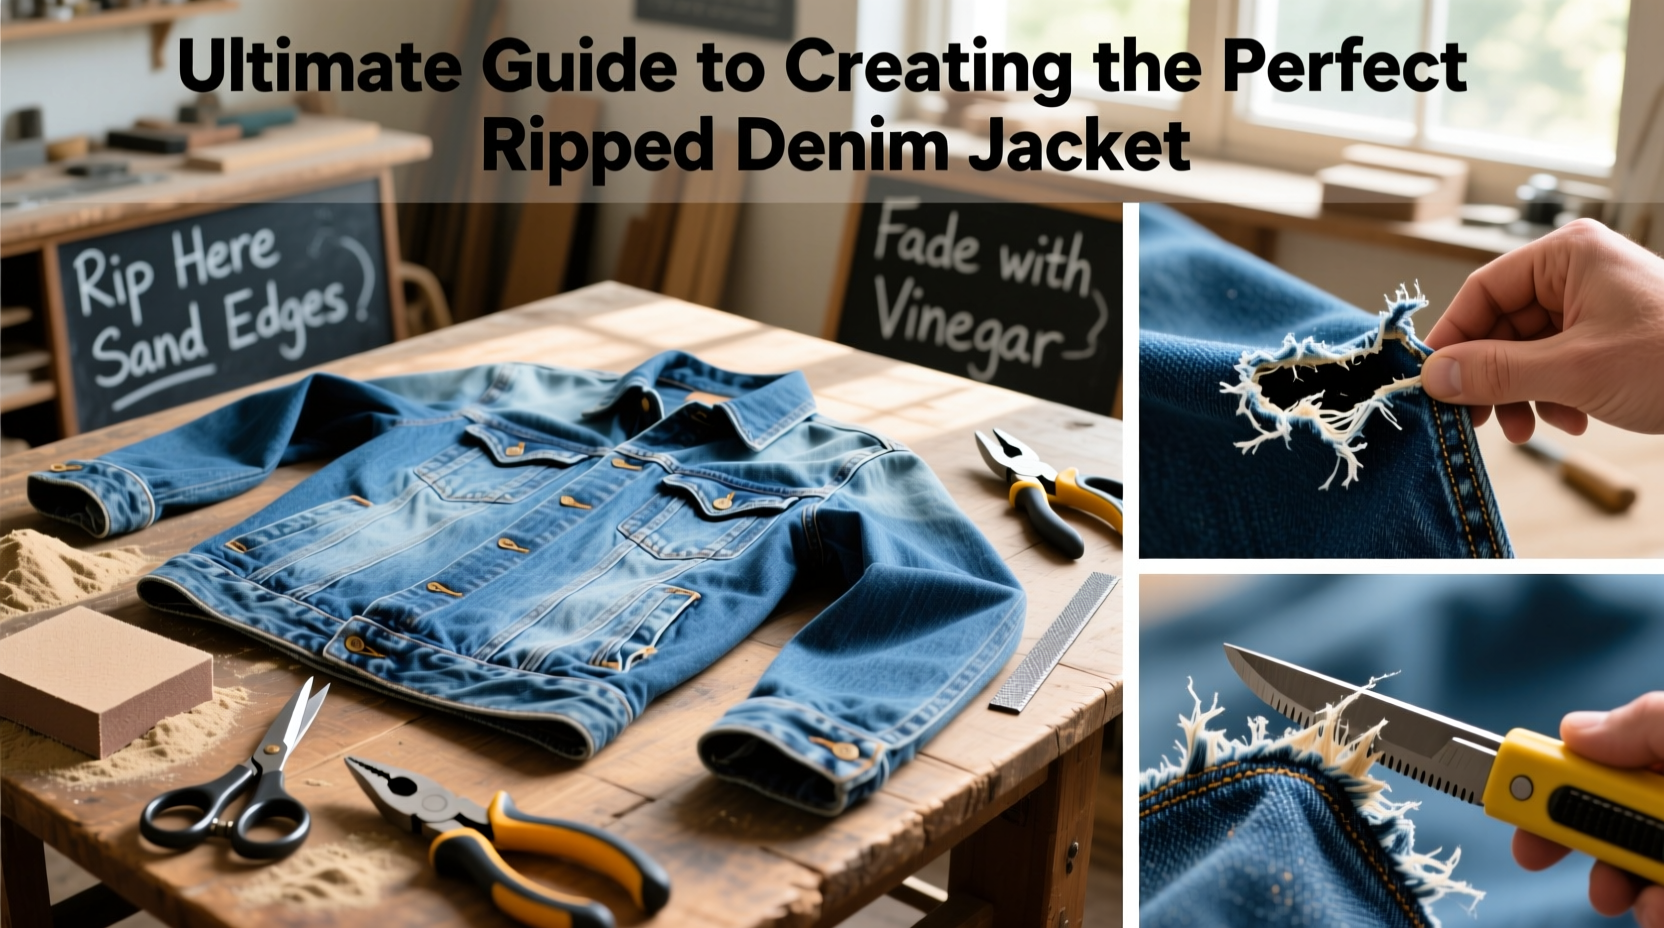
Choosing the Right Denim Jacket
The foundation of any successful DIY project is starting with quality materials. Not all denim jackets respond equally to distressing—some are too stiff, others too thin. Look for a 100% cotton or high-cotton blend jacket with medium to heavy weight (9–12 oz). These fabrics hold structure during sanding and tearing but break down naturally over time.
Pre-owned jackets often work better than brand-new ones because they’ve already undergone some shrinkage and softening. However, if buying new, opt for raw or lightly washed denim rather than pre-distressed styles, which may not allow full creative control.
Essential Tools & Materials
Gathering the correct supplies ensures clean execution and reduces frustration. Most items can be found around the house or purchased affordably at hardware or craft stores.
| Tool/Material | Purpose | Alternative Options |
|---|---|---|
| Sandpaper (80–120 grit) | Fray edges, fade color | Nail file, pumice stone |
| Box cutter or seam ripper | Create precise slits and rips | Sharp scissors, X-Acto knife |
| Coarse salt or baking soda | Spot-fade fabric | Lemon juice + sunlight (natural bleach) |
| Wire brush or cheese grater | Break down fibers quickly | Steel wool pad |
| Tape (masking or painter’s) | Protect areas from accidental damage | Paper + pins |
Always work on a protected surface like cardboard or scrap wood to avoid damaging floors or furniture. Wear gloves when handling sharp tools or abrasive compounds.
Step-by-Step Distressing Techniques
Different techniques yield distinct aesthetic outcomes. Combine them strategically for depth and realism.
- Mark Your Design: Use chalk or washable marker to outline where you want rips, frays, or fades. Common hotspots include elbows, chest pockets, shoulders, and hemline.
- Start with Sanding: Gently rub sandpaper along marked areas to weaken fibers. Focus on high-wear zones first. For subtle fading, use circular motions; for exposed weft threads, go back and forth.
- Create Controlled Tears: Make small incisions with a box cutter along sanded lines. Pull gently on the edges to separate warp and weft threads. Avoid cutting large holes initially—build up gradually.
- Add Texture with a Wire Brush: Scrape across weakened areas to lift loose fibers and enhance fraying. This mimics years of natural wear.
- Spot-Fade with Abrasives: Sprinkle coarse salt on damp sections (like collars or cuffs), then scrub lightly. Rinse and air dry to reveal mottled, sun-bleached effects.
- Reinforce or Leave Raw?: Decide whether to leave frayed edges as-is for ruggedness or hand-stitch around larger tears with contrasting thread for a stylized look.
“Authentic distressing isn’t about randomness—it’s about replicating how real life wears down fabric. Think about where your hands rest, where friction occurs.” — Jordan Lee, Sustainable Fashion Designer
Real Example: Transforming a Thrifted Classic
Sophia, a college student in Portland, bought a stiff, oversized Levi’s trucker jacket from a thrift store for $12. It had minimal fading and felt too generic. Over one weekend, she applied sandpaper to the elbows and upper back, used a cheese grater to create vertical streaks near the pockets, and sliced three half-inch tears under the left armhole. She sprinkled lemon juice on the collar and left it in sunlight for two hours to lighten select spots. After washing and drying, the jacket looked like it had been worn daily for a decade. Friends began asking where she bought such a “vintage gem.” Her total cost: under $3 in supplies and four hours of effort.
Do’s and Don’ts of DIY Distressing
| Do | Don't |
|---|---|
| Work gradually—add more damage later if needed | Rush and cut large holes too early |
| Test techniques on inconspicuous areas first | Use chlorine bleach unless going for extreme contrast |
| Balance symmetry with organic imperfection | Distress every panel uniformly (looks artificial) |
| Wash and dry post-project to set texture | Iron directly over frayed sections |
Care & Longevity Tips
A distressed jacket requires thoughtful maintenance. Exposed fibers can unravel further with improper care. Turn the jacket inside out before washing, use cold water, and choose a gentle cycle—or hand wash. Avoid frequent laundering; spot-clean stains instead. Air dry only, never tumble dry, as heat accelerates fiber breakdown.
If a tear grows too large, secure it with a few invisible stitches or reinforce with iron-on denim patches on the inside. Store flat or on a padded hanger to maintain shape without stressing seams.
FAQ
Can I distress a dark wash denim jacket?
Absolutely. Dark washes actually provide excellent contrast when sanded or faded. The underlying lighter indigo or white core threads become visible, creating dimension. Use extra sanding pressure and consider salt or citrus treatments to accelerate lightening.
How do I make rips look natural, not forced?
Natural wear follows patterns: elbows show horizontal creases, pockets develop vertical cracks, and collars fade from contact with hair products. Study photos of genuinely worn denim. Begin with micro-tears and pull individual threads outward—not all at once—to mimic gradual deterioration.
Is it possible to reverse distressing if I go too far?
Minor over-sanding can be disguised with dye pens or fabric paint matching your jacket’s tone. Large rips can be backed with patch fabric and stitched decoratively. While reversal isn’t perfect, strategic repairs often add character rather than detract.
Final Checklist Before You Begin
- ☐ Choose a suitable denim jacket (cotton-rich, medium weight)
- ☐ Pre-wash to soften fabric and remove finishes
- ☐ Gather tools: sandpaper, blade, brush, chalk, tape
- ☐ Sketch design plan focusing on natural wear zones
- ☐ Work slowly, building texture incrementally
- ☐ Wash and dry finished piece to finalize appearance
- ☐ Store properly and handle with care during future use
Make It Yours—And Wear It Proud
The perfect ripped denim jacket isn’t about perfection—it’s about personality. Every fray, fade, and hole tells a story you helped write. By mastering these accessible techniques, you’re not just customizing clothing; you’re participating in a tradition of self-expression that spans generations. No factory-made \"distressed\" label compares to the authenticity of handmade wear.


 浙公网安备
33010002000092号
浙公网安备
33010002000092号 浙B2-20120091-4
Comments
No comments yet. Why don't you start the discussion?