
There’s few holiday frustrations more disheartening than stringing up your favorite lights—only to discover that the first 25 bulbs glow warmly while the remaining 25 sit stubbornly dark. This isn’t a full failure; it’s a partial outage: one section works, another doesn’t. It suggests a break or fault *within* the circuit—not at the plug or fuse—but precisely where the current stops flowing. Unlike older incandescent strands wired in simple series (where one dead bulb kills the whole string), modern mini-light strands use a hybrid design: multiple short series circuits wired in parallel across the length. When half goes dark, you’re almost certainly dealing with an open circuit in one of those internal segments—often caused by a single faulty bulb, loose connection, or damaged wire junction. The good news? With methodical diagnosis and the right tools, most of these issues are repairable in under 20 minutes—and often without replacing the entire strand.
Why Half-Out Happens: The Circuit Logic Behind Mini-Light Strands
Understanding how your lights are wired is essential before reaching for pliers or spare bulbs. Most contemporary LED and incandescent mini-light strands (especially those sold since 2010) divide the total bulb count into “sub-circuits” of 10–50 bulbs each. These sub-circuits run in parallel off a common power line—meaning if one fails, the others remain lit. A typical 100-bulb strand may contain two 50-bulb circuits; a 200-bulb strand, four 50-bulb circuits. When exactly half the strand goes dark, you’re likely seeing the failure of one complete sub-circuit—most commonly triggered by:
- A single shunted (shorted) or open (broken filament) bulb in that segment;
- A broken wire at a socket or splice point within the dark half;
- A corroded or oxidized contact inside a bulb socket;
- A failed inline rectifier or current-limiting resistor (common in LED strands);
- A damaged male/female connector between sections—especially if the strand uses modular linking.
This architecture explains why replacing just one bulb—or gently wiggling sockets—can restore an entire dark section. It also clarifies why multimeter testing is far more effective than random bulb swapping.
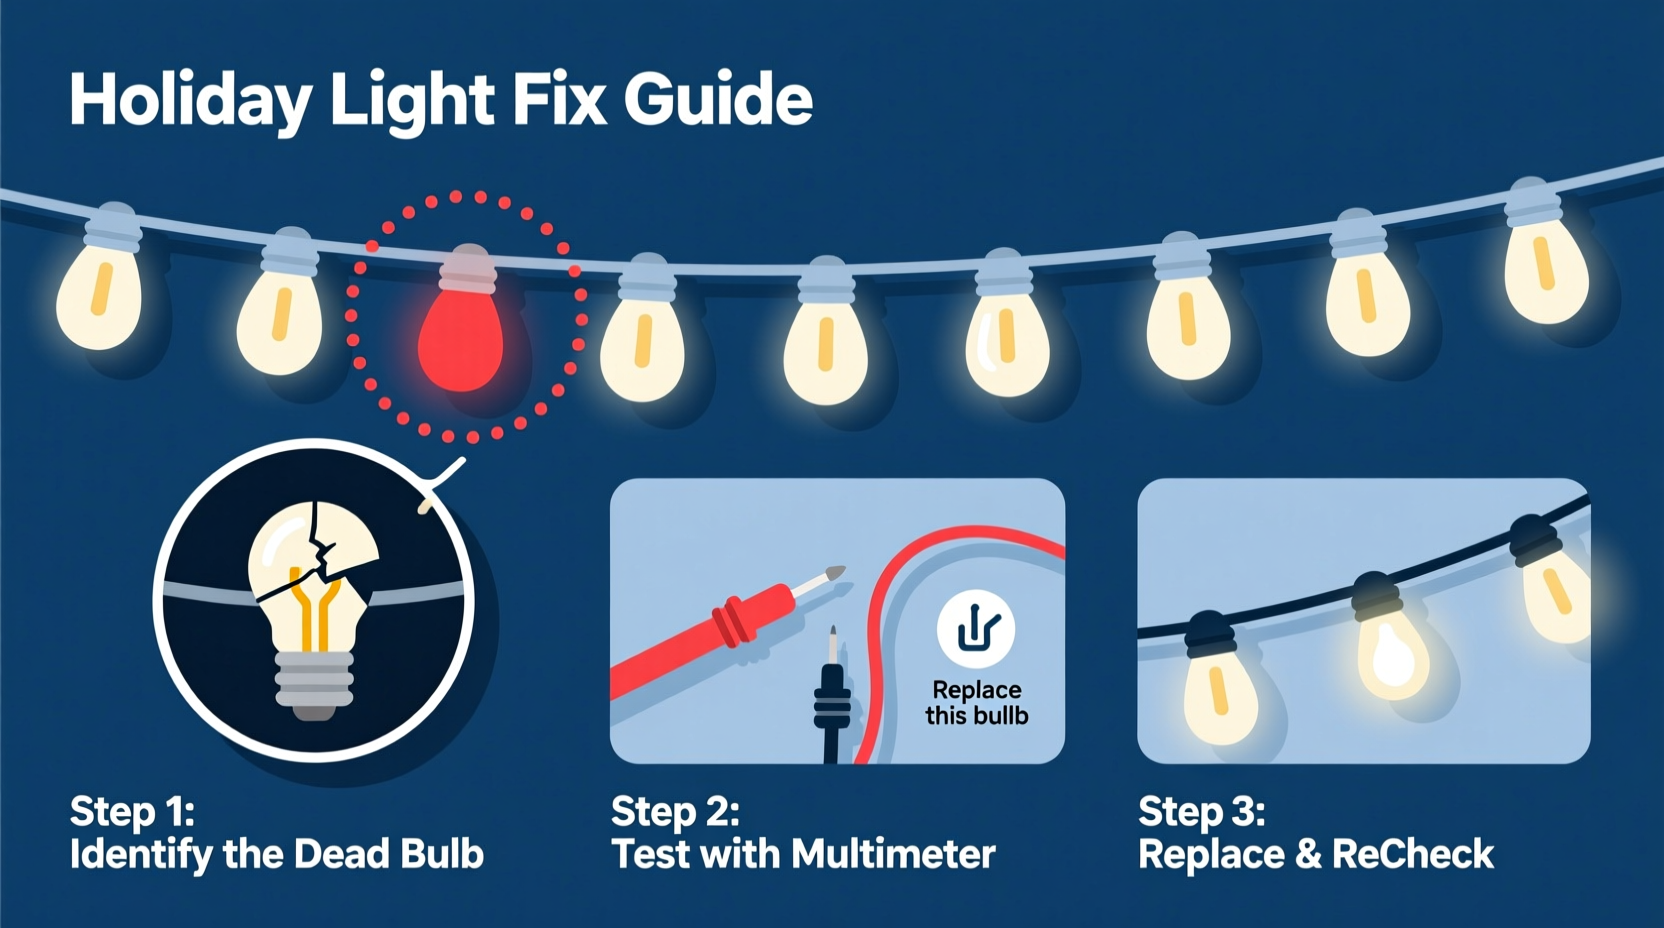
Step-by-Step Diagnostic & Repair Sequence
Follow this precise order. Skipping steps wastes time and risks overlooking the root cause.
- Unplug the strand completely. Never test or handle live wiring—even low-voltage lights can deliver a tingle or damage sensitive components.
- Identify the exact boundary between lit and unlit sections. Note which bulb is the last working one and which is the first dark one. This pinpoints the likely fault zone.
- Inspect physical continuity. Gently flex the wire along the dark half, especially near the transition point and at every third socket. Listen for faint crackles or watch for flickering—signs of intermittent contact.
- Test voltage at the first dark socket. Using a multimeter on AC voltage (or DC for battery/USB-powered LED strands), place probes across the two contacts inside the socket. If you read full line voltage (e.g., ~120V AC), current is reaching the socket—but not passing through. That points to a bad bulb or socket. If you read 0V, the break is upstream—in the wire or previous socket.
- Swap bulbs systematically. Starting at the first dark socket, remove the bulb and insert a known-good spare. Re-test. If the next bulb lights, the removed bulb was faulty. If not, move to the next socket and repeat—no more than five bulbs deep before pausing to re-evaluate.
- Check for “shunt” failure. In incandescent mini-lights, each bulb contains a tiny wire shunt that activates when the filament breaks, bypassing the dead bulb. If the shunt itself fails (melts, corrodes, or never engages), the circuit opens. A non-shunting bulb will appear intact but kill its entire sub-circuit. Use a bulb tester or continuity mode on your multimeter: a good shunted bulb reads open-circuit (infinite resistance) when cold—but shows continuity *after* brief power application (simulate with a 1.5V AA battery across contacts). This step separates myth from reality: not all “intact-looking” bulbs are functional.
Do’s and Don’ts: Critical Handling Practices
Mishandling accelerates failure—and creates safety hazards. Refer to this table before touching any component.
| Action | Do | Don’t |
|---|---|---|
| Bulb replacement | Use bulbs rated for the same voltage/wattage; verify base type (E12, T1¾, etc.) matches exactly | Force bulbs into mismatched sockets or use higher-wattage replacements—risking overheating and fire |
| Wire inspection | Look for flattened, kinked, or discolored insulation near sockets; gently tug wires to check for internal breaks | Pull hard on wires or strip insulation unless repairing—exposing conductors increases shock and short-circuit risk |
| Cleaning sockets | Use 91%+ isopropyl alcohol and a soft toothbrush to dissolve oxidation; dry thoroughly before reassembly | Spray water, vinegar, or household cleaners into sockets—corrosion and conductivity issues worsen |
| Testing tools | Use a digital multimeter with continuity beeper and diode test mode (for LEDs); calibrate before use | Rely solely on visual inspection or “bulb shaker” gadgets—they miss 60% of shunt failures |
| Storage | Wrap loosely around a cardboard tube; store in climate-controlled space below 75°F and <60% humidity | Wind tightly on plastic spools or leave coiled in attic/garage—heat and compression degrade wire insulation and solder joints |
Real-World Case Study: The “Ghost Half” Strand
Janet R., a school art teacher in Portland, OR, reported a puzzling issue each November: her vintage 1998 incandescent C7 strand—used for classroom window displays—would consistently light only the first 36 of 72 bulbs. She’d replace bulbs, clean sockets, even swap fuses. Nothing worked reliably. On her third season, she contacted a local lighting technician who performed a simple test: measuring voltage drop across each socket in the dark half. At socket #37—the first dark one—he found 120V input but 0V output. Removing the bulb revealed heavy copper oxide buildup on the socket’s brass contacts. Cleaning with alcohol and a brass brush restored full function. But the technician then discovered the root cause: Janet had been storing the strand wound tightly around a metal pipe in her damp basement. Moisture migrated into the sockets over years, accelerating corrosion specifically at the midpoint where tension and condensation pooled. After cleaning *all* sockets and switching to a ventilated plastic bin, the strand performed flawlessly for five more seasons.
This case underscores two truths: First, corrosion—not just bulb failure—is a leading cause of partial outages, especially in older or poorly stored strands. Second, environmental storage habits directly determine electrical reliability—not just aesthetics.
Expert Insight: What Industry Technicians See Most Often
“Over 80% of ‘half-out’ cases we diagnose trace back to three things: a single non-shunting bulb in an incandescent string, a cracked solder joint at a female connector in LED strings, or moisture-induced socket corrosion. The biggest mistake homeowners make is assuming the problem is ‘somewhere in the dark section’—when the real fault is often the *last working bulb* or the *first socket after the lit section*. Always test there first.” — Carlos Mendez, Senior Field Technician, HolidayLight Solutions (12 years servicing residential and municipal installations)
Troubleshooting Checklist: Before You Plug In Again
Run through this list *every time*, even if the fix seemed obvious. It prevents repeat failures and catches secondary issues.
- ☑ All bulbs in the dark section are verified functional (tested individually with multimeter or bulb tester)
- ☑ Every socket in the transition zone (last lit + first three dark) is cleaned and free of debris or corrosion
- ☑ Wires show no nicks, kinks, or exposed copper near sockets or connectors
- ☑ Male and female plugs are dry, undamaged, and click firmly when mated
- ☑ Strand is unplugged from *all* other strings—including extension cords and timers—during testing
- ☑ If using a timer or dimmer, it’s bypassed during initial diagnosis (plug directly into wall)
- ☑ For LED strands: confirm no visible discoloration on the PCB board near the dark section’s start (indicates failed driver)
FAQ: Your Top Questions Answered
Can I cut and splice a broken wire in the dark half?
Yes—but only as a last resort and with strict precautions. Strip ½ inch of insulation, twist wires tightly, solder the joint, and seal with heat-shrink tubing rated for 105°C. Electrical tape alone is unsafe: it degrades under heat, allows moisture ingress, and violates UL safety standards for seasonal lighting. If you’re not confident with soldering, replace the segment or the entire strand.
Why do some LED strands go half-dark but flash intermittently when wiggled?
This indicates a failing solder joint or cracked trace on the internal printed circuit board—common where wires enter the LED module housing. Intermittent contact causes the driver IC to reset repeatedly, creating the flashing effect. Repair requires micro-soldering skills and a temperature-controlled iron. For most users, replacement is safer and more cost-effective than attempting board-level repair.
Will using a higher-voltage replacement bulb fix the dark half?
No—and it’s dangerous. Bulbs are engineered for specific current draw and thermal dissipation. A higher-voltage bulb draws less current, starving downstream bulbs in the sub-circuit and causing uneven brightness or premature failure. Worse, mismatched bulbs can overload the strand’s internal fuse or current limiter, creating a fire hazard. Always match voltage, wattage, base type, and bulb count per circuit.
Prevention: Extend Your Strand’s Life Beyond This Season
Fixing today’s outage is urgent. Preventing next year’s is strategic. Begin now:
- Label and map your strands. Note bulb count, sub-circuit layout (e.g., “100-bulb: 2 × 50”), and purchase date on tape affixed to the plug. This saves hours of reverse-engineering later.
- Test before decorating. Plug each strand into an outlet tester or multimeter *before* hanging. Catch issues early—when you have time to troubleshoot calmly.
- Rotate usage. Don’t use your oldest strand every year. Rotate between 2–3 sets to distribute wear and catch degradation gradually.
- Install a surge protector. Voltage spikes from storms or grid switching are a silent killer of LED drivers and shunts. A basic 1200-joule protector costs less than $15 and pays for itself in one saved strand.
- Retire after 5 seasons. Even well-maintained strands suffer cumulative insulation brittleness and solder fatigue. Mark retirement dates in your calendar—don’t wait for failure.
Conclusion: Light the Way Forward—Confidently
A half-dark Christmas light strand isn’t a sign of holiday defeat—it’s a solvable engineering puzzle. With the right understanding of parallel sub-circuits, disciplined diagnostic sequencing, and respect for electrical safety, you reclaim control over your display. You stop guessing and start verifying. You transform frustration into quiet satisfaction when the final bulb ignites—not by luck, but by logic. This season, don’t just hang lights. Understand them. Maintain them. Respect their design. And when that familiar half-out moment arrives, meet it not with resignation, but with the calm confidence of someone who knows exactly where to look, what to test, and how to restore warmth—not just to the strand, but to the entire spirit of the season.


 浙公网安备
33010002000092号
浙公网安备
33010002000092号 浙B2-20120091-4
Comments
No comments yet. Why don't you start the discussion?