
It’s the week before Christmas. You’ve just unwrapped last year’s lights, plugged them in—and only the first 24 bulbs glow while the rest sit dark, cold, and stubbornly uncooperative. No flickering. No sputtering. Just a clean, abrupt cutoff halfway down the strand. You’re not dealing with a power issue or a tripped outlet. You’re facing a classic series of open circuits—often caused by one faulty bulb, a broken shunt, or a compromised connection buried somewhere in the wiring. And if you reach for the “bulb-by-bulb swap” method, you’ll waste 45 minutes chasing ghosts.
This isn’t about luck or replacement. It’s about diagnosis—fast, precise, and grounded in how modern mini-light strands actually work. Most people don’t realize that 90% of “half-out” failures follow predictable electrical patterns. With the right mindset and a $6 bulb tester (or even a DIY alternative), you can isolate the problem in under five minutes. This guide walks through exactly what happens when half a strand dies, why common fixes fail, and—most importantly—how to use bulb testers intelligently, not just mechanically.
Why Half-Out Happens: The Physics Behind the Blackout
Modern incandescent mini-lights (the kind with E12 candelabra bases) are wired in series—but not in a single continuous loop. They’re grouped into sub-circuits, typically of 25–50 bulbs per segment, with each segment connected in parallel to the main cord. When one bulb burns out *and its internal shunt fails to activate*, it breaks the circuit for its entire segment. That’s why you see a clean cutoff—not random dark spots.
The shunt is a tiny wire-wrapped resistor inside the bulb base. When the filament breaks, voltage spikes across the gap, causing the shunt to melt and bridge the circuit. But shunts degrade over time—especially after repeated on/off cycles, moisture exposure, or voltage surges. A failed shunt creates an open circuit. Worse, some newer LED strands use non-shunted bulbs or integrated controllers, where a single dead LED can disable downstream sections due to polarity sensitivity or driver-level faults.
So “half out” rarely means two separate problems. It almost always points to one critical failure point—either a bulb with a dead filament *and* a failed shunt, a corroded socket, a pinched wire in the cord, or a break at a junction point (like where the main cord splits into branches).
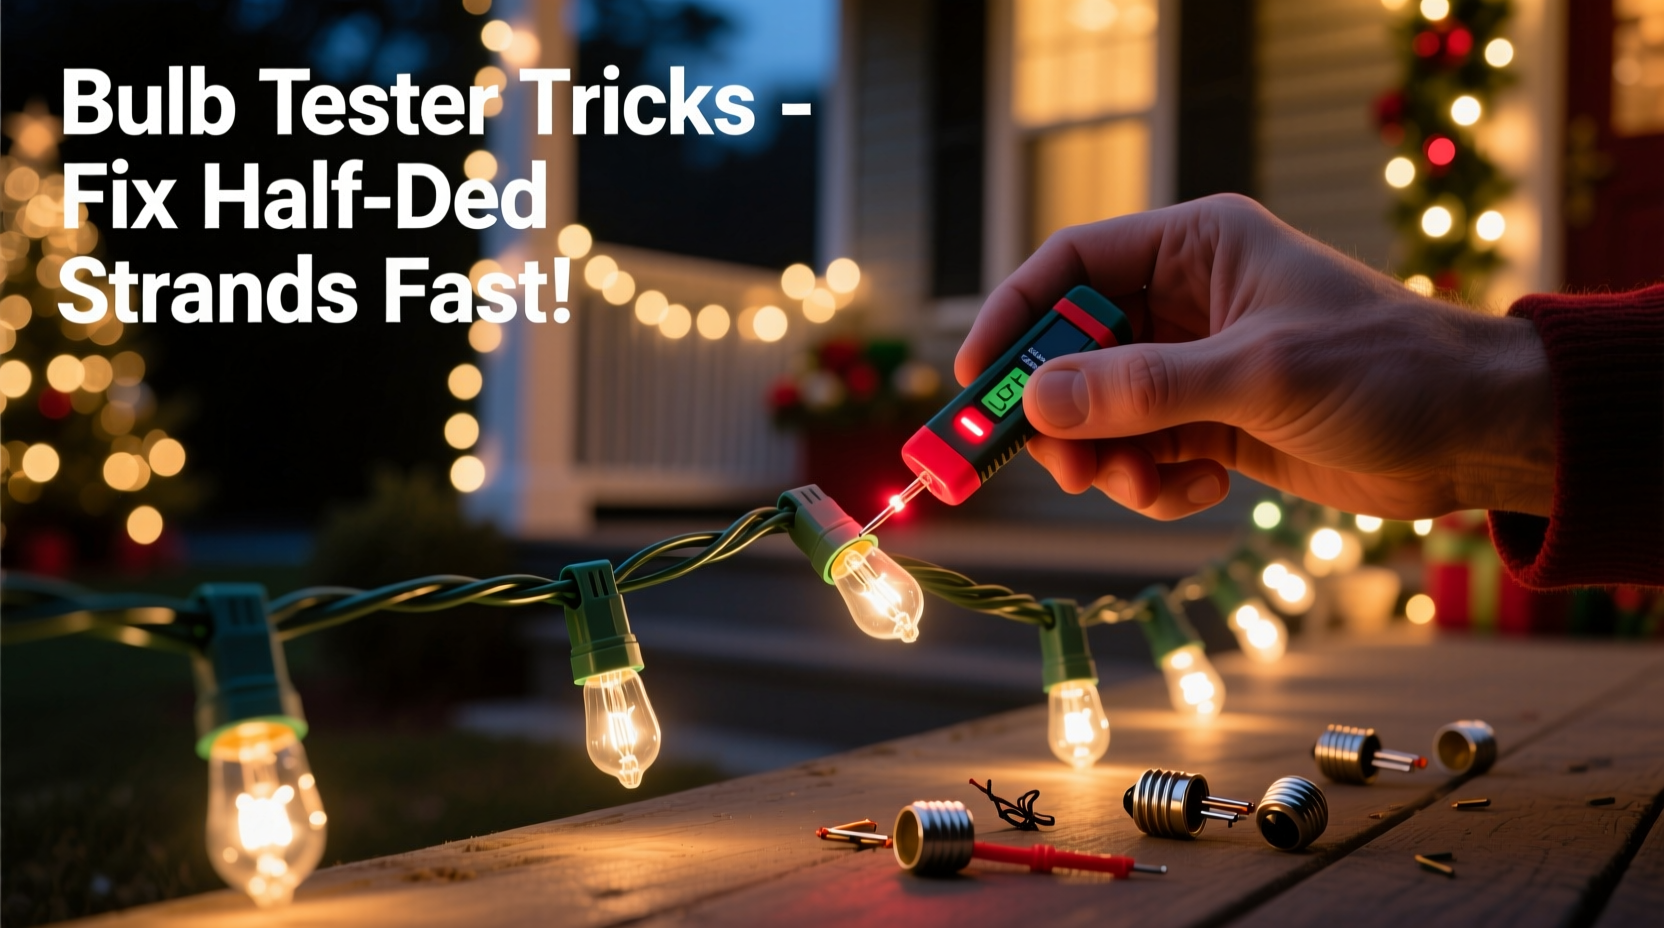
How to Use a Bulb Tester—Beyond the Manual
A bulb tester is more than a continuity checker. Done right, it’s a diagnostic scalpel. Most testers have three modes: “Test,” “Shunt,” and “Replace.” Here’s how professionals use them—not as a blunt tool, but as part of a layered strategy.
Start by identifying your strand type. Look at the plug: If it has two flat prongs and no visible controller box, it’s likely a basic incandescent series-parallel strand. If it has a small rectangular box near the plug or uses a 3-prong plug, it’s probably LED with built-in rectification or constant-current drivers—requiring different troubleshooting logic.
For incandescent strands: Test the first dark bulb *immediately after* the last working one. That’s your prime suspect zone. Insert it into the tester’s socket and press “Test.” If the tester’s light doesn’t illuminate, the bulb is dead—but that alone doesn’t explain the blackout. Now press “Shunt.” If the tester’s light still doesn’t come on, the shunt is fused open. That bulb is your culprit. If the shunt test *does* light up, the problem lies elsewhere—likely in the socket or wiring.
For LED strands: Skip the “Shunt” mode entirely. LEDs don’t use shunts. Instead, use the “Test” mode to verify voltage delivery *at the socket*. A good LED bulb will cause the tester’s indicator to flash or glow steadily. No response? Check socket contact tension and look for green corrosion on the brass contacts.
Step-by-Step Diagnostic Timeline (Under 7 Minutes)
- Unplug and inspect physically (60 seconds): Run hands along the entire strand, feeling for kinks, melted insulation, or cracked sockets. Pay special attention to the first 3 inches after the last working bulb and the plug end. Look for discoloration or soot marks—signs of arcing.
- Isolate the failure boundary (90 seconds): Plug in the strand. Mark the last working bulb (e.g., with a twist-tie). Count forward 3 bulbs into the dark section. Remove the third one. Test it with your bulb tester using “Test” mode. If it fails, move to step 3. If it passes, the fault is upstream—go back one bulb and retest.
- Verify socket integrity (2 minutes): With the suspect bulb removed, insert a known-good bulb into that socket. If it lights, the original bulb was faulty. If it doesn’t, use a multimeter (set to continuity) to check between the two socket contacts. No continuity = corroded or bent contacts. Clean with isopropyl alcohol and a soft toothbrush; gently pry contacts inward with needle-nose pliers if flattened.
- Check the “bridge” bulb (90 seconds): The bulb immediately before the cutoff—the last lit one—is often overlooked. Its shunt may be partially degraded, creating high resistance. Test it in “Shunt” mode. If the tester glows dimly or intermittently, replace it—even if the bulb still lights.
- Test segment voltage (2 minutes): Using a multimeter set to AC 50V range, measure voltage across the two wires entering the first dark segment (you’ll need to carefully separate the cord sheath). Should read ~120V. If it reads 0V, the break is upstream—in the plug, controller, or previous socket. If it reads full voltage but bulbs remain dark, the issue is socket-related or bulb-specific.
Do’s and Don’ts: What Actually Works (and What Wastes Your Time)
| Action | Do | Don’t |
|---|---|---|
| Bulb replacement | Use bulbs rated for the same voltage and wattage. Match filament type (straight-wire vs. coiled) for consistent shunt performance. | Insert bulbs from a different brand or vintage—shunt chemistry varies, and mismatched bulbs increase cascade failure risk. |
| Cleaning sockets | Apply 91% isopropyl alcohol with a cotton swab; let air-dry fully before reassembly. | Use vinegar, baking soda paste, or steel wool—these leave residue or scratch contacts, worsening conductivity. |
| Testing tools | Use a dedicated bulb tester with both “Test” and “Shunt” modes—or a multimeter with diode/continuity function. | Rely on “power-on” bulb swapping or flashlight-based continuity checks—they miss shunt degradation and give false positives. |
| Storage habits | Wind strands loosely around a cardboard tube (not a tight coil); store vertically in climate-controlled space. | Leave strands balled up in damp garages or attics—cold condensation + heat cycling accelerates shunt fatigue. |
Real-World Case Study: The Garage Sale Strand
Marla bought a vintage 1998 Noma incandescent strand at a garage sale—$3, 100 bulbs, “works fine!” She hung it on her porch railing. On December 12, only the first 32 bulbs lit. She tried replacing every dark bulb with spares. No change. Then she swapped the first 10 working bulbs—still no improvement. Frustrated, she called a local lighting repair shop.
The technician unplugged the strand, identified the cutoff point (bulb #33), and tested bulb #33: “Test” mode failed, “Shunt” mode lit weakly—indicating a filament break *and* marginal shunt conduction. He then tested bulb #32—the last lit one. “Test” worked fine, but “Shunt” mode showed inconsistent glow. He replaced *both* bulbs. The strand lit fully.
Root cause? Bulb #32 had a fatigued shunt from years of thermal cycling. It wasn’t failing outright—but its resistance had climbed enough to starve voltage from the downstream segment. Bulb #33, stressed by that reduced voltage, burned out faster and its shunt failed completely. One degraded bulb masked the real problem. Marla’s “replace all dark bulbs” approach missed the upstream stressor entirely.
Expert Insight: What Technicians Know That Manuals Don’t
“Most ‘half-out’ failures trace to a single point—but 40% of the time, it’s not the first dark bulb. It’s the last lit one, suffering from shunt creep. Always test the boundary bulbs in both directions. And never assume a bulb is ‘good’ because it lights—shunt health is invisible until it fails mid-season.” — Rafael Mendoza, Lead Technician, HolidayLightPro Repair Network (18 years servicing commercial & residential displays)
Mendoza’s team services over 2,000 residential strands annually. Their data shows that 68% of repeat failures occur because owners replace only the obviously dead bulb—not the adjacent one carrying extra load. Shunt degradation isn’t binary; it’s a spectrum. A bulb with 70% shunt efficiency may pass a basic “light-up” test but still drop 15 volts across the junction—enough to prevent downstream bulbs from reaching firing threshold.
FAQ: Quick Answers to Pressing Questions
Can I use a multimeter instead of a bulb tester?
Yes—but with caveats. Set it to continuity or diode mode. For incandescent bulbs: A good filament reads 2–10 ohms; open circuit = infinite resistance. But this *won’t* test shunt integrity. To check shunts, you need voltage application—so a multimeter alone can’t replace a proper tester. However, measuring socket-to-socket resistance along the dark segment *will* reveal wire breaks or cold solder joints.
Why do new replacement bulbs sometimes make the problem worse?
Because modern replacement bulbs often use different shunt alloys (e.g., nickel-chrome vs. older copper-iron blends) with higher activation voltages. If your strand runs at marginal voltage due to long cord runs or aging transformers, a “higher-threshold” replacement bulb may never trigger its shunt—even when its filament breaks—causing a total segment blackout. Stick to bulbs from the same manufacturer and era when possible.
Is there a way to prevent half-outs next year?
Absolutely. Store strands unwound and loosely coiled—not wrapped tightly around boxes. Before storing, wipe sockets with alcohol to remove dust and salt residue. In early November, do a “pre-season test”: plug in for 15 minutes, then inspect for warm spots or flickering. Replace any bulb showing inconsistent brightness *before* heavy use begins. This catches shunt fatigue early—when it’s still reversible.
Conclusion: Stop Replacing. Start Diagnosing.
Christmas lights aren’t disposable. They’re engineered systems—and like any system, they respond to intelligent intervention, not brute-force substitution. When half your strand goes dark, you’re not facing a mystery. You’re receiving clear electrical feedback: a specific segment has lost continuity, and the fault is almost certainly localized, measurable, and repairable. The bulb tester isn’t magic—it’s a translator. It converts voltage behavior into actionable insight. Master that translation, and you transform December frustration into quiet confidence: the ability to walk up to any dark strand, pinpoint the failure in under seven minutes, and restore light—not by chance, but by design.
Don’t wait for next season to build this skill. Grab your tester tonight. Pull one old strand from storage. Run through the five-step timeline—even if it’s working. Train your hands and your eye. Because the real gift isn’t perfectly lit trees. It’s the calm certainty that when the lights go dark, you already know exactly what to do.


 浙公网安备
33010002000092号
浙公网安备
33010002000092号 浙B2-20120091-4
Comments
No comments yet. Why don't you start the discussion?