
Baking cookies is one of the most satisfying kitchen rituals—until you pull a tray from the oven only to find flat, greasy discs instead of soft, pillowy treats. Excessive spreading ruins both appearance and texture, turning what should be a thick, chewy delight into a crispy disappointment. The good news? Cookie spread is almost always preventable. With a few targeted adjustments to ingredients, temperature, and technique, you can consistently bake cookies with ideal thickness and structure.
The causes of cookie spread are often subtle but interconnected. From butter temperature to flour ratios and oven dynamics, each variable plays a role in how your dough behaves under heat. Understanding these factors allows you to troubleshoot confidently and refine your process for bakery-quality results at home.
Understanding Why Cookies Spread Too Much
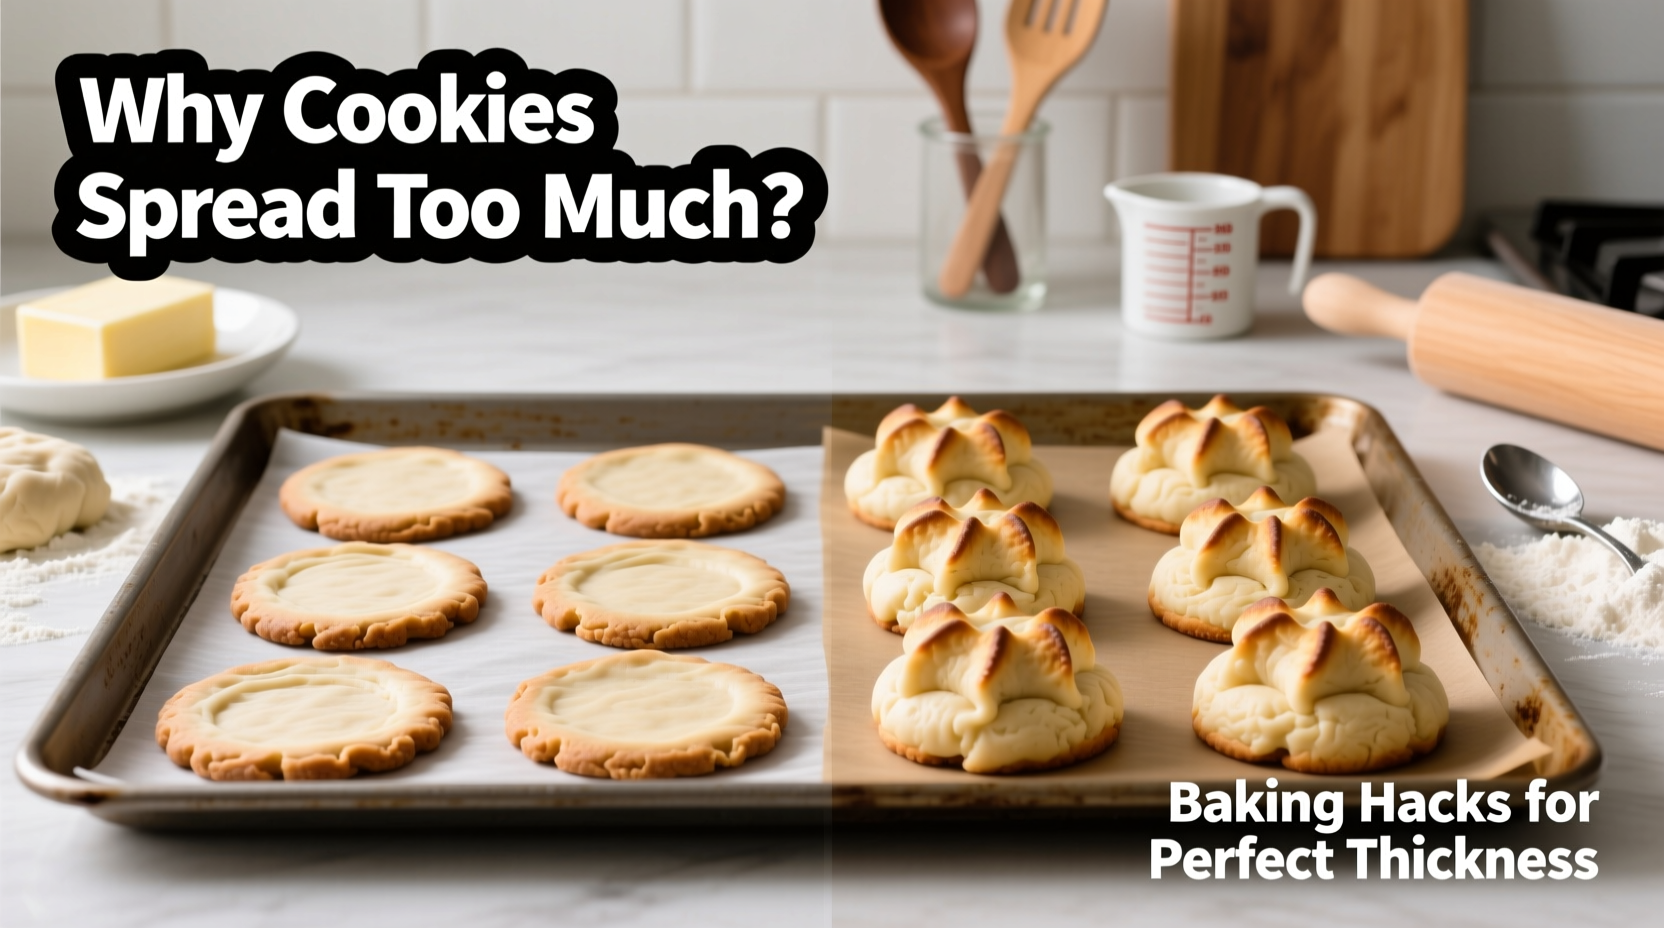
Cookies spread when the dough melts faster than it sets during baking. This imbalance means the fats liquefy before the proteins in the eggs and flour have time to coagulate and stabilize the structure. When that happens, gravity takes over, and your cookies flatten into unrecognizable puddles.
Several key elements contribute to this premature melting:
- Butter temperature: Using melted or overly soft butter increases liquidity from the start.
- Leavening agents: Too much baking soda or baking powder can create excess air, weakening structural integrity.
- Sugar content: Granulated sugar attracts moisture and promotes spreading more than brown sugar, which contains molasses that helps retain structure.
- Flour measurement: Under-measuring flour reduces gluten development, leaving the dough too weak to hold its shape.
- Oven temperature: An oven that’s too cool prolongs the melting phase, delaying set time.
Each of these variables interacts dynamically. For example, even if your butter is perfectly creamed, an under-floured dough will still collapse. Likewise, a hot oven can’t compensate for excessively liquid batter. Mastery comes from balancing all components in harmony.
Key Baking Hacks for Perfect Cookie Thickness
Achieving thick, bakery-style cookies isn’t about luck—it’s about control. These practical, tested strategies give you command over dough behavior from mixing to baking.
1. Chill Your Dough Before Baking
Chilling cookie dough is one of the most effective ways to prevent excessive spread. Cold dough takes longer to melt in the oven, giving the internal structure time to set before the fats fully liquefy.
For best results, refrigerate dough for at least 30 minutes—or up to 72 hours. Extended chilling not only controls spread but also deepens flavor through ingredient integration and slight fermentation.
2. Use the Right Butter Temperature
Butter should be softened—not melted. Ideal softening means the butter yields slightly to touch but holds its shape. It should feel cool, not warm, to the palm.
Melted butter introduces too much immediate liquidity. On the other hand, cold butter doesn’t cream properly with sugar, leading to dense cookies. The sweet spot? Let butter sit at room temperature for 30–45 minutes before use.
3. Increase Flour Slightly for Structure
If your recipe consistently produces thin cookies, try increasing the flour by 1–2 tablespoons per cup called for. This small adjustment strengthens the dough’s backbone without making it tough.
Use bread flour for extra chewiness due to higher protein content, or add 1 teaspoon of cornstarch per cup of flour for a softer yet stable crumb.
4. Optimize Sugar Ratios
Brown sugar contributes to moisture retention and acidity, which helps activate baking soda and improve rise. Replacing half the granulated sugar with brown sugar can reduce spread while enhancing flavor.
Avoid using all granulated sugar unless you want a crispier, flatter cookie. For thick, chewy results, aim for a 50/50 blend or go heavier on brown sugar.
5. Bake on Parchment Paper, Not Greased Sheets
Greasing your baking sheet encourages spreading by reducing friction. Instead, line your pan with parchment paper or a silicone baking mat. These surfaces provide just enough grip to help cookies maintain their shape.
Step-by-Step Guide to Preventing Cookie Spread
Follow this sequence to maximize thickness and minimize flatness:
- Measure ingredients accurately: Use a digital scale for flour and sugars to ensure precision.
- Cream butter and sugar properly: Beat softened butter and sugar until light and fluffy (2–3 minutes). This incorporates air, aiding lift.
- Add dry ingredients gradually: Mix flour, leavening, and salt in a separate bowl, then slowly incorporate into wet ingredients just until combined.
- Chill the dough: Portion dough into balls and refrigerate for at least 30 minutes. For ultimate control, freeze scooped dough for 15 minutes before baking.
- Preheat thoroughly: Ensure your oven reaches the correct temperature before baking. Use an independent oven thermometer to verify accuracy.
- Bake one tray at a time: Rotate position halfway through for even heat distribution. Convection ovens may require lowering temperature by 25°F.
- Cool on the tray: Let cookies rest on the baking sheet for 5 minutes post-bake to allow final setting before transferring.
Common Mistakes That Cause Flat Cookies
Even experienced bakers fall into traps that lead to disappointing results. Here are frequent errors and how to avoid them:
| Mistake | Why It Causes Spread | Solution |
|---|---|---|
| Using melted butter | Introduces liquid fat too early; no air incorporated during creaming | Use softened butter, cream with sugar until pale and fluffy |
| Overcreaming butter and sugar | Creates too much air; cookies rise then collapse | Cream only 2–3 minutes until light, not whipped |
| Under-measuring flour | Insufficient structure to support dough shape | Use a scale: 120g per cup of all-purpose flour |
| Baking on warm trays | Dough starts melting immediately upon contact | Cool sheets between batches or use multiple pans |
| Oven not preheated | Delayed heat prevents quick setting | Wait 15–20 minutes after oven indicates “ready” |
“Temperature control is the silent hero of cookie baking. Cold dough, cool pans, and a properly heated oven work together to lock in thickness.” — Chef Lila Nguyen, Pastry Instructor at Midwest Culinary Institute
Real Example: Fixing a Family Recipe Gone Flat
Sarah had been making her grandmother’s chocolate chip cookie recipe for years. Recently, they started coming out thin and greasy, despite using the same ingredients. Frustrated, she began testing variables one at a time.
She discovered that switching from margarine to European-style butter (higher fat content) was the culprit—without adjusting flour, the extra fat caused rapid spread. She also realized she’d been skipping the chilling step for convenience.
After returning to regular butter, adding 2 tablespoons more flour, and chilling the dough for 45 minutes, her cookies regained their classic dome and chewy center. The fix wasn’t drastic—just mindful attention to detail.
Checklist: How to Bake Thick, Non-Spreading Cookies
Before you bake, run through this checklist to ensure success:
- ✅ Weigh flour or spoon-and-level if using cups
- ✅ Use softened (not melted) butter at ~65°F
- ✅ Cream butter and sugar just until fluffy (no more than 3 minutes)
- ✅ Include at least 50% brown sugar in the mix
- ✅ Chill dough for minimum 30 minutes (or freeze scooped portions)
- ✅ Line baking sheets with parchment or silicone mat (do not grease)
- ✅ Preheat oven fully and verify with thermometer
- ✅ Bake one tray at a time in center rack
- ✅ Cool cookies on tray for 5 minutes before moving
Frequently Asked Questions
Can I freeze cookie dough to prevent spreading?
Yes. Freezing scooped dough before baking is highly effective. Place dough balls on a tray and freeze for 15–20 minutes. Transfer directly to the oven—no thawing needed. The frozen center delays melting, preserving shape.
Why do my cookies spread more on some days than others?
Humidity and ambient kitchen temperature affect dough consistency. On hot days, butter softens faster, increasing spread risk. Work quickly, chill ingredients, and consider air conditioning or baking during cooler parts of the day.
Does pan color affect cookie spread?
Absolutely. Dark metal pans absorb more heat than light or aluminum ones, causing bottoms to cook faster. While this might seem helpful, it can lead to burnt bases before tops set. For even baking, use light-colored aluminum sheets lined with parchment.
Final Tips for Consistently Perfect Cookies
Perfect cookies aren't born—they're engineered through precision and patience. Small changes compound into dramatic improvements. Keep a baking journal noting adjustments like flour weight, chill time, and oven variance. Over time, you’ll develop intuition for what your kitchen environment demands.
Remember: great baking isn’t about perfection on the first try. It’s about learning from each batch. Whether you're reviving a legacy recipe or designing your own, controlling spread is the cornerstone of achieving that ideal balance between crisp edge and tender center.


 浙公网安备
33010002000092号
浙公网安备
33010002000092号 浙B2-20120091-4
Comments
No comments yet. Why don't you start the discussion?