
It’s a familiar holiday frustration: you hang your favorite string of 100-count LED mini lights, plug it in—and only the first 30 bulbs glow brightly. The rest flicker weakly or stay dark. You swap outlets, check fuses, even test individual bulbs—but nothing changes. This isn’t faulty wiring or a bad batch of LEDs. It’s physics in action: voltage drop. Unlike household circuits designed for stable 120V delivery across short distances, Christmas light strings operate on a delicate balance of resistance, wire gauge, and cumulative load. When that balance tips, the far end of the strand receives significantly less than the required operating voltage—often dropping below 85V or even 70V. That’s why the last third of your lights appear “half dead.” Understanding this phenomenon isn’t just troubleshooting—it’s essential for safe, reliable, and energy-efficient holiday lighting.
What Voltage Drop Really Is (and Why It Matters)
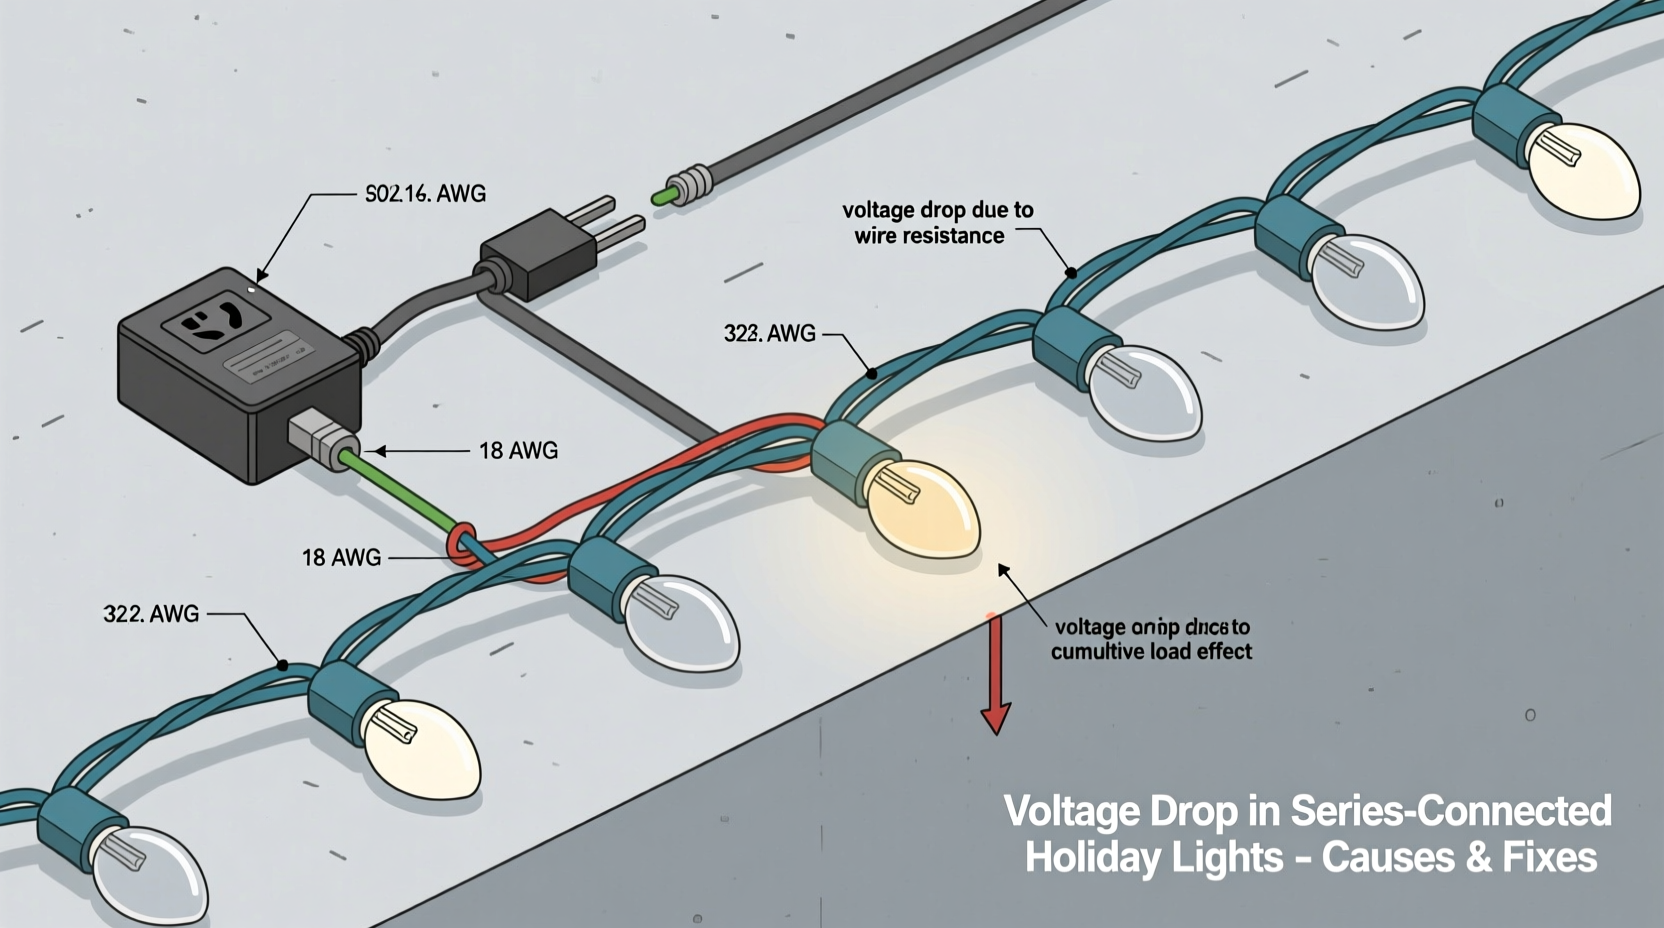
Voltage drop is the gradual reduction in electrical potential as current travels through a conductor—like the copper wires inside your light strand. Every inch of wire has inherent resistance. Multiply that by the current drawn by dozens of LEDs (especially in older incandescent or high-output LED sets), and the cumulative effect becomes measurable—and visible. In a typical 120V AC circuit, lights at the plug-in end receive close to full voltage. But by the time electricity reaches the final bulb in a long chain, it may have lost 15–30 volts due to resistance in the internal wiring. Most modern LED mini lights require a minimum of 90–100V to operate consistently. Below that threshold, LEDs dim, flicker, or fail to illuminate entirely. Incandescent sets suffer even more dramatically: a 5V drop can reduce filament temperature enough to cut brightness by nearly 40%.
This isn’t a design flaw—it’s an engineering trade-off. Manufacturers use thinner, cheaper wire (often 28–30 AWG) to keep strands lightweight and affordable. Thinner wire = higher resistance = greater voltage drop over distance. A 50-foot strand with 100 LEDs may lose only 3–4 volts under ideal conditions—but daisy-chaining five such strands multiplies resistance exponentially. Worse, many users overlook that “maximum connectable” ratings printed on packaging assume perfect conditions: room-temperature wires, no kinks or compression, and factory-fresh connections. Real-world use rarely matches those specs.
The 5 Key Causes Behind Half-Dead Strands
- Excessive daisy-chaining: Connecting more strands than the manufacturer’s stated limit (e.g., linking 12 strands when the box says “max 3”) overwhelms the circuit’s capacity and amplifies voltage loss at each connection point.
- Poor-quality or damaged connectors: Corroded, bent, or loosely seated male/female plugs increase contact resistance—creating localized “hot spots” where voltage bleeds away before reaching the next strand.
- Undersized extension cords: Using a thin 16-gauge outdoor cord for a 200-light display adds significant resistance between outlet and first strand—robbing voltage before it even enters your lights.
- Ambient temperature extremes: Cold weather increases copper’s resistance by up to 12%. A strand working perfectly indoors may dim noticeably when hung on a frosty eave.
- Worn or degraded internal wiring: After 3–5 seasons, insulation hardens, solder joints micro-fracture, and fine-gauge wires fatigue—raising resistance beyond original design parameters.
How to Diagnose Voltage Drop (Without a Multimeter)
You don’t need professional tools to confirm voltage drop is the culprit. Start with these observational tests:
- Unplug all but the first strand. If it lights fully and evenly, the problem lies downstream—not in the power source or first set.
- Swap the order of connected strands. Move the “dead” strand to the plug-in position. If it now works perfectly while the previously bright strand dims, voltage drop is confirmed.
- Check brightness progression. Walk along the strand: does brightness decline steadily from plug to end? Consistent fading—not random dead sections—is classic voltage drop behavior.
- Feel the wire near connectors. Gently touch the cord 2–3 inches from each plug after 5 minutes of operation. If one connector feels noticeably warmer than others, resistance is spiking there.
- Test with a different circuit. Plug the same configuration into another outlet on a separate breaker. If performance improves, your original circuit may be overloaded—not the lights.
If all five tests point toward voltage drop, avoid replacing bulbs or blaming “defective” sets. Focus instead on reducing resistance and optimizing current flow.
Proven Fixes: From Quick Adjustments to System Upgrades
Fixing half-dead strands requires matching the solution to your setup’s scale and constraints. Here’s what works—and what doesn’t:
| Solution | Effectiveness | Cost | When to Use |
|---|---|---|---|
| Reduce daisy-chain length by 50% | ★★★★☆ | $0 | Immediate fix for most residential displays; start here. |
| Use 12-gauge outdoor-rated extension cords | ★★★★★ | $15–$35 | Essential for runs over 25 feet or multi-strand setups. |
| Add mid-run power injectors (120V taps) | ★★★★★ | $25–$60 | For large displays (>200 lights) or permanent installations. |
| Switch to parallel-wired commercial-grade lights | ★★★★★ | $40–$120/strand | For homeowners prioritizing longevity over initial cost. |
| “Boost” with inline transformers (not recommended) | ★☆☆☆☆ | $20–$45 | Avoid—creates fire risk, voids UL listing, and stresses LEDs. |
Commercial-grade parallel-wired strands (like those used by municipalities or theme parks) route power separately to each bulb or small group—eliminating cumulative voltage loss. While pricier upfront, they pay for themselves in reduced troubleshooting time and longer service life. For DIYers, the most impactful upgrade is switching from series-daisy-chained consumer lights to a hub-and-spoke layout: run one heavy-gauge extension cord to a central location, then connect 2–4 strands directly to it using a UL-listed outdoor power strip with built-in surge protection.
Real-World Case Study: The Elm Street Display Rescue
In December 2022, Sarah K., a homeowner in Portland, OR, faced a recurring issue with her front-yard light display. Her 12-strand setup—each 100-light LED set—had worked reliably for two years. By year three, the last four strands stayed dim regardless of order. She replaced fuses, cleaned all connectors, and tested bulbs individually. Nothing helped. An electrician friend visited and measured voltage at the first strand’s input (118V) and at the last strand’s input (83V)—a 35-volt loss. The root cause? A single 100-foot, 16-gauge extension cord running from her garage outlet to the yard’s center, feeding all strands in series. The cold December air (28°F) increased wire resistance, and the cord’s age had degraded its copper purity.
The fix was methodical: Sarah replaced the long cord with two 50-foot, 12-gauge outdoor cords. She installed a weatherproof 4-outlet power hub at the yard’s midpoint and reconfigured her strands into four independent legs—each with no more than two strands daisy-chained. Total cost: $42. Result? Full brightness across all 1,200 lights—and zero flickering for the next three seasons. As she noted in a local gardening forum: “I thought I needed new lights. What I really needed was better current delivery.”
Expert Insight: Engineering Perspective on Holiday Lighting
“Consumers treat light strings like simple appliances—but they’re distributed electrical systems. Voltage drop isn’t failure; it’s predictable physics. The real issue is that manufacturers optimize for shelf appeal and low cost, not field longevity. A 30% reduction in daisy-chain length often delivers 100% reliability improvement because resistance scales exponentially, not linearly.” — Dr. Lena Torres, Electrical Engineer & Holiday Lighting Standards Advisor, UL Solutions
Step-by-Step: Rewiring Your Display for Zero Voltage Drop
Follow this sequence to eliminate half-dead strands permanently:
- Evaluate your total light count and layout. Sketch your display and note where each strand connects.
- Calculate maximum safe strand count per circuit. For standard LED mini lights: never exceed 3 strands in series unless using commercial-grade parallel wiring.
- Identify optimal power injection points. Place outlets or power hubs where they minimize cord length to any single strand (ideally ≤25 feet).
- Replace all extension cords with 12-gauge, outdoor-rated, SJTW type. Verify UL certification and temperature rating (e.g., -40°C to 60°C).
- Install a weatherproof power distribution hub (e.g., a 4-outlet GFCI-protected box) at each injection point.
- Connect strands directly to the hub—no daisy-chaining between outlets on the same hub.
- Label every cord and connection with waterproof tape: “Front Left Hub – Strand 1–2,” etc.
- Test voltage at the farthest bulb using a multimeter (if available): aim for ≥105V on LED sets, ≥110V on incandescent.
FAQ: Voltage Drop & Christmas Lights
Can I fix voltage drop by adding thicker wire to my existing strands?
No—and attempting it creates serious hazards. Consumer light strands are sealed, non-serviceable units. Cutting into the jacket exposes live conductors, voids UL certification, and risks shock or fire. Retrofitting requires complete rewiring by a licensed electrician, which costs more than replacing with purpose-built solutions.
Why do some brands claim “no voltage drop” on 100+ foot runs?
They’re using parallel wiring architecture—not traditional series strings. Each bulb or segment connects independently to main power lines within the cord. These are specialty products (often labeled “commercial,” “architectural,” or “C7/C9 premium”), not standard retail mini lights. Verify wiring diagrams before purchase.
Does using a smart plug or timer cause voltage drop?
No—smart plugs introduce negligible resistance (<0.1 ohm). However, cheap timers with undersized internal contacts *can* heat up and add resistance over time. Stick with UL-listed, 15-amp rated timers designed for lighting loads.
Conclusion
Voltage drop isn’t a mystery—it’s a solvable engineering challenge rooted in basic electrical principles. When half your Christmas lights fade, you’re not dealing with defective bulbs or bad luck. You’re encountering the quiet, cumulative effect of resistance in undersized wires, overloaded connections, and real-world environmental stress. The good news? Solutions exist at every budget level: from simply cutting your daisy-chain length in half, to upgrading to professional-grade parallel wiring, to designing a distributed power system that treats your display like the miniature grid it truly is. This holiday season, invest not in more lights—but in smarter power delivery. Test one strand with a shorter cord. Swap one old extension for a 12-gauge model. Measure voltage at the end of your longest run. Small changes yield dramatic results: consistent brightness, cooler-running wires, longer LED lifespan, and genuine peace of mind. Your lights deserve reliable power. And so do you.


 浙公网安备
33010002000092号
浙公网安备
33010002000092号 浙B2-20120091-4
Comments
No comments yet. Why don't you start the discussion?