
Every holiday season, millions of households encounter the same frustrating puzzle: two identical-looking Christmas light strands refuse to plug into each other—even when both work perfectly on their own. The lights glow, the bulbs shine, but the male plug won’t seat fully in the female socket, or worse, the downstream strand goes dark the moment it’s connected. This isn’t a manufacturing defect or a design flaw—it’s a fundamental electrical behavior rooted in circuit architecture, safety standards, and decades of evolving UL certification requirements. Understanding *why* this happens—and how to diagnose and resolve it—isn’t just about convenience. It’s about preventing overheating, avoiding fire hazards, and extending the usable life of your lighting investment.
How Christmas Light Circuits Actually Work (and Why That Matters)
Most modern mini light strands—especially those sold after 2010—are wired in a **series-parallel hybrid configuration**, not pure series or pure parallel. A typical 100-light strand contains ten groups of ten bulbs wired in series, with each group connected in parallel to the main line. This design balances brightness consistency, energy efficiency, and fault tolerance: if one bulb burns out, only its subgroup goes dark—or stays lit, depending on whether the strand uses shunt-wire bulbs.
Crucially, the ability to daisy-chain strands depends on three interlocking factors:
- Current rating compatibility: Each strand is rated for a maximum number of additional strands it can safely power (e.g., “Connect up to 3 sets end-to-end”). Exceeding this limit overloads the first strand’s internal wiring and fuse.
- Socket polarity and physical keying: Many manufacturers use non-reversible plugs with molded ridges or offset pins to prevent backward connections that could reverse polarity or short-circuit.
- Fuse integrity and location: Most strands have two 3-amp fuses—one in the male plug housing, one sometimes hidden near the female end. A blown fuse in either position interrupts the entire circuit path needed for downstream connection.
When strands “won’t connect,” it’s rarely about bent prongs or dirt alone. It’s usually a symptom of an underlying circuit-level mismatch or failure.
5 Common Causes—and How to Diagnose Each One
1. Blown Fuse in the Male Plug Housing
The most frequent culprit. When overloaded or subjected to a surge, the small glass fuse inside the male plug blows—halting current flow before it even reaches the first bulb. Since the circuit must be complete *through* the plug to energize the female socket’s contacts, a blown fuse means no power passes to the next strand’s input.
2. Voltage or Wattage Mismatch Between Strands
You cannot reliably daisy-chain LED strands with incandescent ones—even if both say “120V.” Incandescent strings draw significantly more current (often 0.3–0.5 amps per 50-light set), while comparable LED sets draw just 0.04–0.07 amps. Mixing them overwhelms the LED strand’s low-amperage-rated internal wiring and controller, tripping thermal protection or blowing its fuse instantly.
3. Non-Stackable Design or UL Listing Restrictions
UL 588 certification requires manufacturers to label strands with explicit “maximum connectable” limits. Some budget or older strands carry no UL listing at all—or list “0” for connectable sets. These are designed as standalone units only. Their female sockets may lack the internal jumper wires needed to pass current forward, or they use proprietary pin spacing incompatible with standard NEMA 1-15P plugs.
4. Corroded or Oxidized Contacts
Moisture exposure—even from indoor humidity over years of storage—causes copper contacts to oxidize. What looks like clean metal may be coated in a non-conductive greenish film. Unlike household outlets, light strand sockets rely on tight friction-fit contact. Oxidation increases resistance, generates heat, and prevents sufficient current transfer to activate downstream bulbs.
5. Internal Wire Break or Solder Joint Failure
Repeated bending at the plug base fatigues internal stranded wire. Over time, individual strands break, especially the neutral or return leg. You might see full brightness on the first strand but zero output at the female end—even with intact fuses and clean contacts. This is invisible without opening the plug housing.
Step-by-Step Diagnostic & Repair Protocol
Follow this sequence *in order*. Skipping steps leads to misdiagnosis and wasted effort.
- Verify standalone operation: Plug each strand individually into a known-good outlet. Confirm full illumination and stable operation for at least 90 seconds.
- Inspect fuses: Open the male plug’s cover (usually two screws or a sliding panel). Check both fuses visually. Replace any that appear blackened or have a broken filament.
- Clean contacts: Use 91% isopropyl alcohol and a cotton swab to wipe male prongs and female socket interiors. Let dry completely. For stubborn oxidation, gently scrub with a fiberglass pen (not steel wool—it sheds conductive particles).
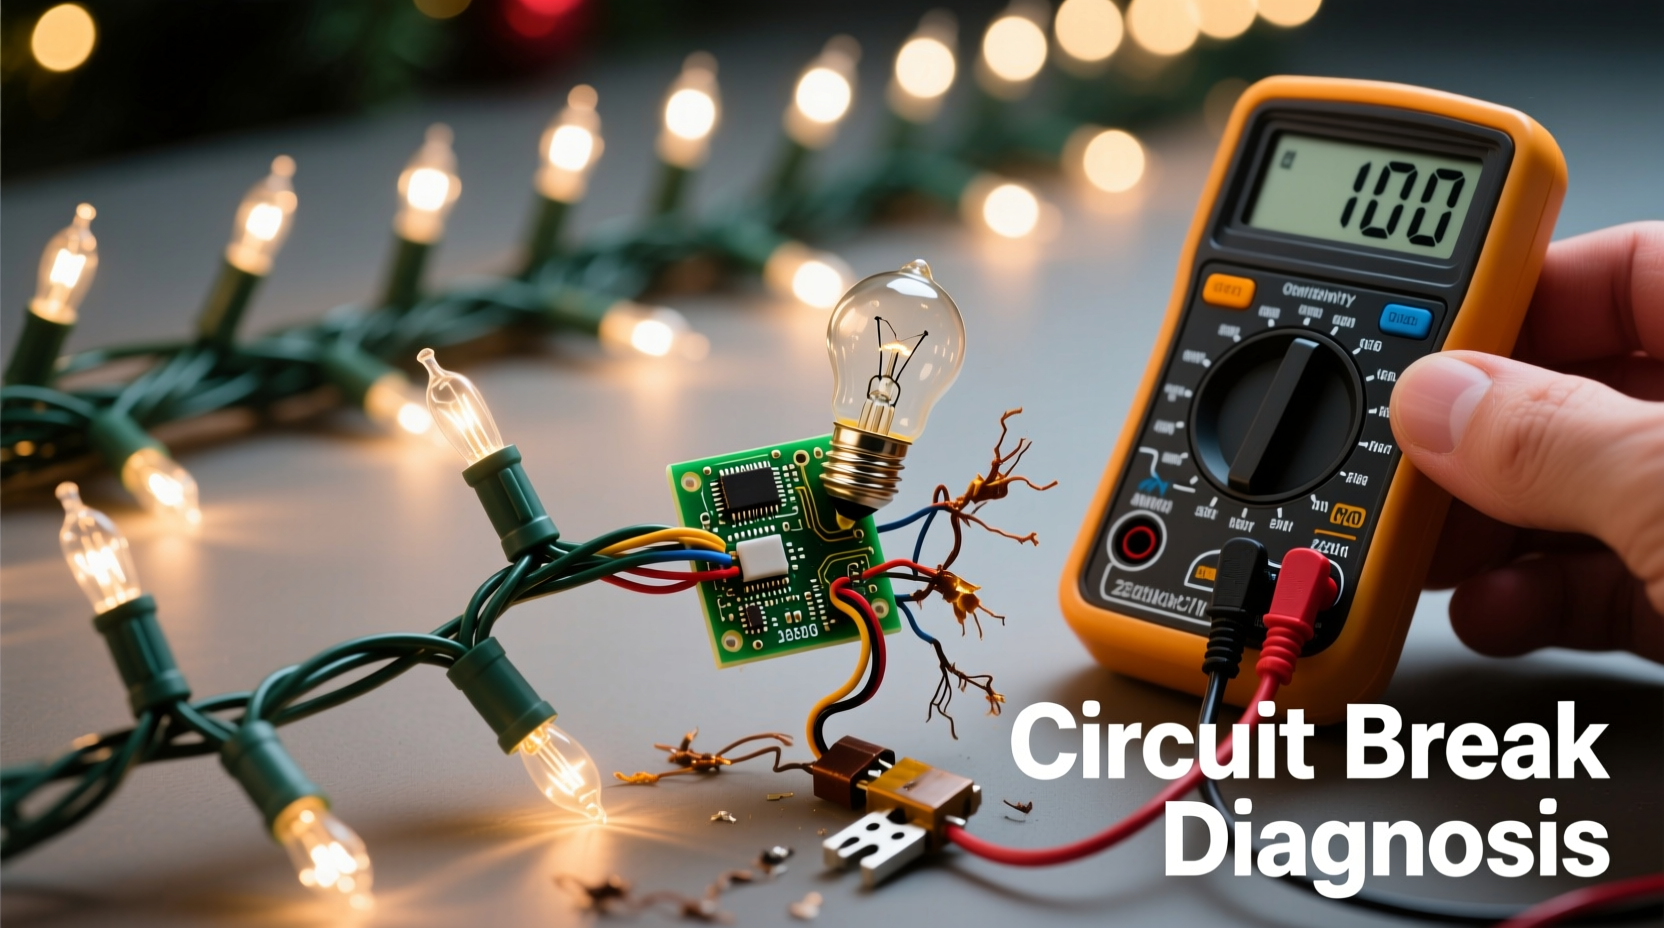
- Test continuity with a multimeter: Set to continuity mode. Touch one probe to the wide (neutral) prong of the male plug; touch the other to the corresponding contact inside the female socket. A beep confirms the circuit path is intact. Repeat for the narrow (hot) side.
- Check strand compatibility: Locate the UL tag or printed label on the cord near the plug. Note the “Max Sets” value and compare it across both strands. If one says “Max 0” or “Do Not Connect,” stop here—daisy-chaining is unsafe by design.
- Measure voltage drop: With both strands connected and powered, measure AC voltage at the female end of the first strand. Should read ≥110V. If below 105V, the first strand is overloaded or internally degraded.
Do’s and Don’ts When Connecting Light Strands
| Action | Do | Don’t |
|---|---|---|
| Fuse replacement | Use only the exact amperage and type specified (e.g., 3A AGC glass fuse) | Substitute with higher-amp fuses, automotive blade fuses, or foil/tape “fixes” |
| Strand mixing | Mix only same-tech, same-brand, same-vintage strands with matching UL max-connect ratings | Combine incandescent and LED, or mix C7/C9 with mini lights on the same circuit |
| Storage prep | Wipe contacts with alcohol, coil loosely, store in ventilated plastic bins away from attics/garages | Leave strands coiled tightly in cardboard boxes in humid basements |
| Outdoor use | Use only strands explicitly rated “For Outdoor Use” and plug into GFCI-protected outlets | Use indoor-only strands outside—even under eaves or covered patios |
| Troubleshooting | Start with fuse + contact inspection before disassembling plugs or cutting wires | Assume “it’s just the bulbs” and replace dozens before checking the fuse |
Real-World Case Study: The “Three-Strand Wall” Incident
In December 2022, Sarah K., a high school physics teacher in Portland, OR, purchased four identical 100-light warm-white LED strands labeled “UL Listed, Max 3 Sets.” She successfully connected three along her front porch railing—but the fourth refused to light, despite working fine alone. She replaced fuses twice, cleaned contacts with vinegar (a mistake—acid accelerates corrosion), and even swapped bulbs. Frustrated, she brought the strands to her school’s electronics lab.
Using a multimeter, her students discovered the voltage at the third strand’s female end measured just 89V—well below the 110V minimum required for reliable LED driver operation. Further testing revealed the third strand’s internal resistance had increased by 40% due to micro-fractures in its PCB traces (likely from repeated cold-weather installation). The strand wasn’t “broken”—it was thermally derated. Replacing it resolved the issue immediately. Her takeaway? “The label says ‘Max 3’ for a reason—not just marketing. It’s the point where cumulative voltage drop and heat buildup cross into unreliable territory.”
Expert Insight: What Electrical Engineers Say About Daisy-Chaining
“Consumers treat light strands like USB cables—plug-and-play. But they’re miniature branch circuits with real impedance, thermal limits, and safety cutoffs. A strand rated for ‘up to 3 sets’ isn’t guaranteeing performance at exactly three—it’s setting a hard ceiling where the first unit’s internal transformer and wiring remain within UL-mandated temperature rise limits (<30°C above ambient). Exceed that, and you’re not just risking flicker—you’re inviting insulation breakdown.”
— Dr. Lena Torres, P.E., Senior Electrical Safety Consultant, Underwriters Laboratories (ret.)
FAQ: Quick Answers to Persistent Questions
Can I cut and rewire non-connectable strands to make them daisy-chainable?
No. Strands labeled “Max 0” lack the internal jumper wiring, fused neutral paths, and thermal monitoring needed for safe cascading. Rewiring voids UL certification, creates shock hazards, and almost always results in immediate fuse blowouts or melted sockets. It is neither safe nor code-compliant.
Why do some new LED strands have USB-style connectors instead of standard plugs?
These are proprietary low-voltage DC systems (typically 5V or 12V) designed for battery packs, solar chargers, or USB-powered controllers. They eliminate AC line hazards and allow precise dimming/patterning—but they’re intentionally incompatible with standard 120V AC strands. Never force-adapt adapters; voltage mismatches destroy drivers instantly.
If one bulb is out in a series string, why does the whole strand go dark—but sometimes only half goes dark?
Traditional incandescent mini-lights use shunted bulbs: when the filament breaks, a carbon-based bypass wire inside the bulb base activates, restoring continuity. If the shunt fails (common in cheap bulbs), the entire series string opens. In hybrid designs, only the affected 10-bulb subgroup loses power—leaving other parallel groups lit. LED strands behave differently: a single dead LED rarely kills the whole string unless it’s part of a critical control IC pathway.
Conclusion: Light Up Safely, Not Just Brightly
Christmas lights are more than decoration—they’re functional electrical devices operating at line voltage, often in unattended settings for hours at a time. When strands won’t connect, resist the urge to force plugs, stack adapters, or bypass safety features. Take the time to read labels, test fuses, clean contacts, and respect manufacturer-specified limits. A five-minute diagnostic saves hours of frustration—and prevents risks no holiday should carry. Your lights don’t need to be perfect to be joyful. They just need to be safe, reliable, and respectful of the physics that makes them glow. This season, choose understanding over assumption. Choose verification over guesswork. And choose to light your home—not your insurance claim.


 浙公网安备
33010002000092号
浙公网安备
33010002000092号 浙B2-20120091-4
Comments
No comments yet. Why don't you start the discussion?