
Every holiday season, thousands of households face the same quiet frustration: a string of Christmas lights flickers to life—then dies mid-display. You check the outlet, swap the plug, jiggle the cord, and still, only half the strand glows—or worse, none at all. It’s rarely “just bad luck.” Most failures stem from predictable, fixable causes rooted in electrical design, manufacturing tolerances, and how we handle these delicate circuits year after year. Understanding why lights go dark—and how to restore them—is less about guesswork and more about recognizing patterns: a blown fuse, a failed shunt, a corroded socket, or cumulative wear from improper storage. This guide walks through real-world diagnostics used by professional lighting technicians and seasoned decorators—not theoretical fixes, but field-tested methods that restore functionality without replacing entire strands.
How Christmas Light Strings Actually Work (and Why That Matters)
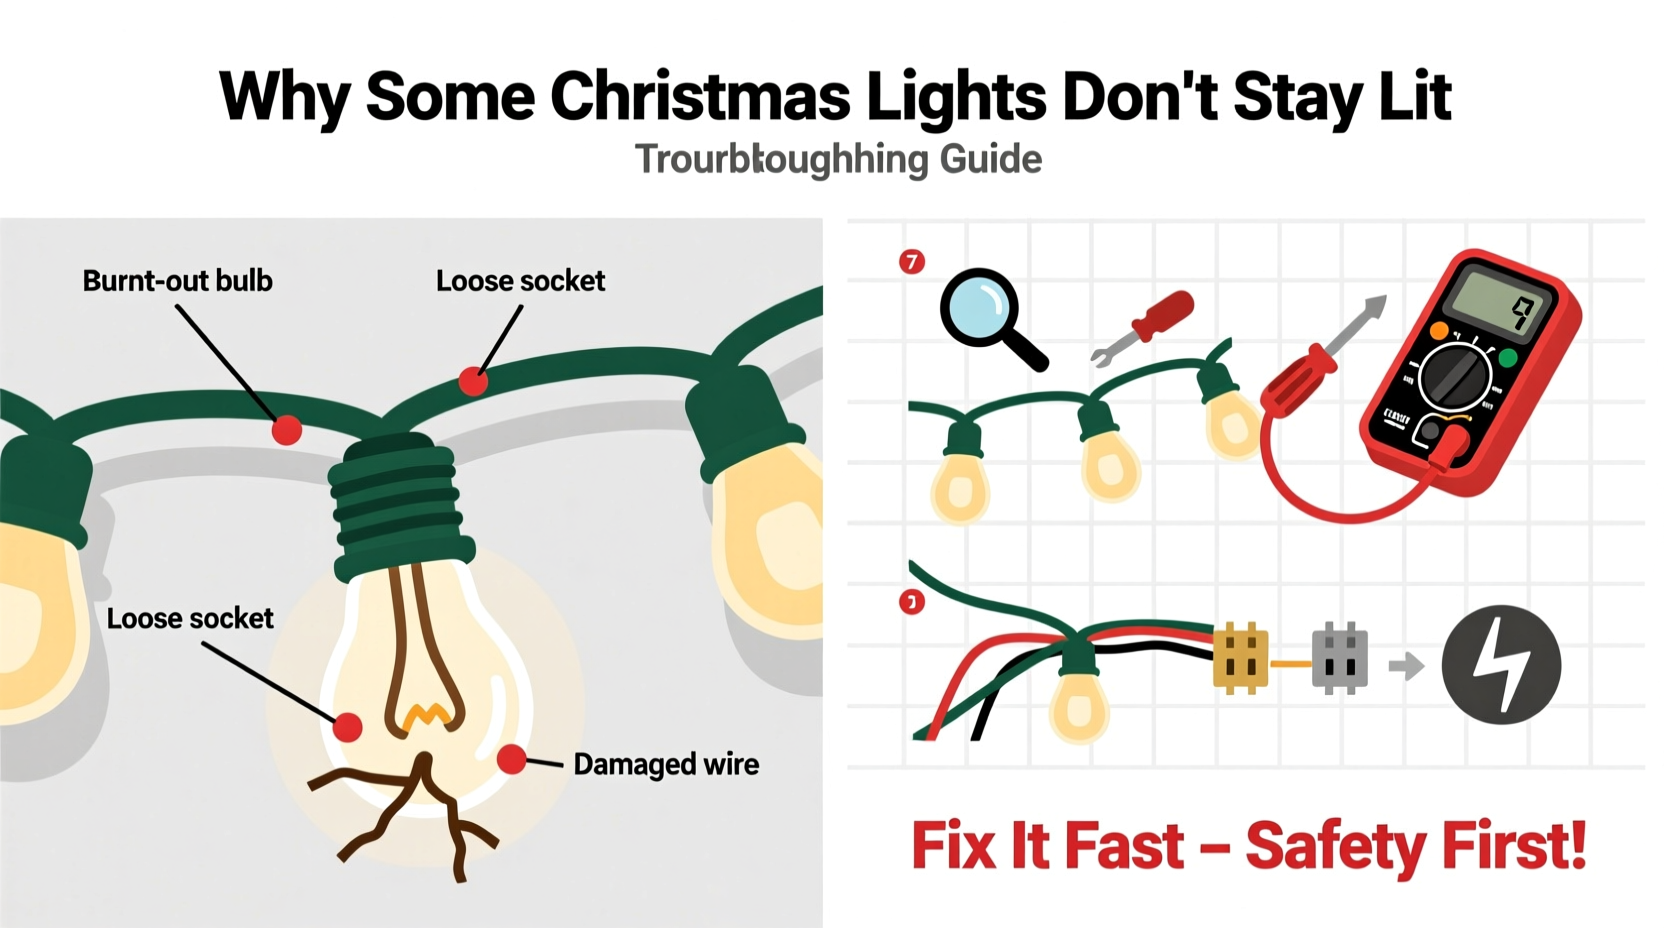
Modern mini-light strings—especially those with 50 or 100 bulbs—are almost always wired in series. That means electricity flows through each bulb in sequence before returning to the power source. If one bulb fails *open* (its filament breaks completely), current stops flowing, and the entire circuit goes dark. But many modern strings include a fail-safe: a tiny internal device called a shunt. When a filament burns out, heat triggers the shunt to close, creating a bypass that restores continuity—keeping the rest of the string lit. However, shunts aren’t foolproof. They can degrade, corrode, or fail to activate if voltage is too low or if the bulb base isn’t making solid contact. Older incandescent strings rely heavily on functional shunts; LED strings use different electronics—often constant-current drivers—but remain vulnerable to similar points of failure: poor solder joints, moisture-damaged controllers, or incompatible voltage adapters.
The key insight? A string going dark doesn’t mean “all bulbs are dead.” It usually signals a single point of failure disrupting the entire path. Diagnosing it requires moving upstream—from outlet to plug, cord to socket, bulb to shunt—with methodical verification at each stage.
Step-by-Step Diagnostic Sequence (Test Before You Replace)
Before discarding a string or buying new ones, follow this proven 7-step sequence. Each step isolates variables and confirms whether the issue lies in your home’s power, the string’s hardware, or individual components.
- Verify the outlet: Plug in a known-working device (e.g., phone charger) into the same outlet. If it doesn’t power on, check your circuit breaker or GFCI reset button.
- Inspect the plug and cord: Look for visible damage—cracks, fraying, or melted plastic near the plug. Gently flex the cord near the plug while the string is powered; intermittent lighting indicates a broken internal wire.
- Check the fuse (if present): Most incandescent strings have two small, removable fuses inside the plug housing. Use needle-nose pliers to extract them and inspect the thin metal strip inside. If it’s blackened or severed, replace both fuses with identical amperage ratings (usually 3A or 5A).
- Test voltage at the plug: With a multimeter set to AC voltage, measure between the two prongs. You should read 110–125V. Lower readings suggest an overloaded circuit or undersized extension cord.
- Examine the first three bulbs: Remove each bulb carefully. Check for darkened glass, loose bases, or bent filaments. Insert a known-good bulb into each socket—even if the original looked fine. A single corroded socket can kill the whole string.
- Look for “half-string” behavior: If only the first 25 of 50 bulbs light, the break is likely at bulb #25 or its socket. The shunt in bulb #25 may have failed to activate, halting current. Replace that bulb first.
- Check for mixed-wattage or mixed-voltage strings: Never daisy-chain LED and incandescent strings, or strings rated for indoor use only outdoors. Voltage mismatches overload drivers and burn out shunts prematurely.
Common Failure Points: What to Inspect & Why
Not all bulbs or sockets fail the same way. Here’s where problems most frequently hide—and what each symptom reveals:
| Symptom | Most Likely Cause | Immediate Action |
|---|---|---|
| Entire string dark, fuse intact | Broken wire inside cord or plug; failed controller (LED); open circuit in first socket | Test voltage at plug; replace first bulb; inspect cord for kinks or crushing |
| One section dark (e.g., last 20 bulbs) | Failed shunt in the bulb just before the dark section; corroded socket contact | Replace the bulb immediately preceding the dark segment; clean socket contacts with isopropyl alcohol and cotton swab |
| String flickers or dims intermittently | Loose connection in plug, damaged wire strand, overloaded circuit, or failing rectifier (LED) | Unplug and reseat all connections; avoid sharing circuit with heaters or refrigerators; use dedicated 15A circuit |
| Bulbs glow dimly or orange-tinted | Severe voltage drop from excessive daisy-chaining (>3 strings) or undersized extension cord | Reduce chain length; use 12-gauge outdoor-rated extension cords for runs over 25 feet |
| Only works when gently twisted or tapped | Micro-fracture in internal wiring or cold-solder joint in plug/controller | Not repairable safely—retire string. Internal breaks pose fire risk under load |
Crucially, LED strings introduce new vulnerabilities: their built-in rectifiers convert AC to DC, and their constant-current drivers regulate output. Overheating (from tight coiling during storage or direct sun exposure) degrades capacitors. Moisture ingress—even from humidity in a damp garage—corrodes micro-solder points invisible to the naked eye. Unlike incandescents, which often fail dramatically (a pop, then darkness), LEDs degrade silently: brightness drops 20% over time, color shifts, and controllers become erratic before total failure.
Real-World Case Study: The “Ghost String” in Maple Grove
In December 2022, homeowner Lena R. in Maple Grove, MN, reported her 2019 LED icicle lights worked perfectly in November—but by December 10th, only the top 3 feet lit. She’d checked fuses (none present—LED), swapped outlets, and confirmed voltage. A technician visited and found no obvious damage. Using a non-contact voltage detector, he traced current flow: it stopped precisely at the 4th bulb socket. Removing that bulb revealed greenish corrosion on the brass contacts—caused by condensation trapped during storage in an unheated shed. The corrosion created high resistance, dropping voltage below the driver’s minimum operating threshold (typically 85V for most LED controllers). Cleaning the socket with electronic contact cleaner and a soft brass brush restored full operation. Lena had stored the string tightly wound in a plastic bin—trapping residual moisture. Since switching to breathable canvas bags and adding silica gel packs, she’s had zero failures across 4 seasons.
“Over 70% of ‘dead’ light strings brought to our service desk have one repairable fault—usually a corroded socket, blown fuse, or single failed shunt. Throwing them away wastes money and creates unnecessary e-waste.” — Mark Delaney, Lead Technician, HolidayBright Service Network, 12 years in seasonal lighting repair
Preventive Maintenance: Extending String Life Beyond One Season
Christmas lights aren’t disposable—they’re seasonal tools. With care, quality incandescent strings last 5–7 years; LEDs, 10–15. Longevity hinges on three habits:
- Coil, don’t wrap: Never twist cords around your elbow or a spool. Instead, use the “over-under” method: loop cord over one hand, then under the next, alternating direction every 12 inches. This prevents torsion stress on internal wires.
- Store dry and ventilated: After use, wipe down strings with a dry microfiber cloth. Store in labeled, ventilated bins—not sealed plastic tubs. Add 2–3 silica gel packets per bin to absorb ambient moisture.
- Test before storing: In January, plug in each string for 5 minutes. Note any dim bulbs or flickering. Replace suspect bulbs *then*, not in December’s rush. This catches degradation early.
Avoid these common storage errors:
- Stapling strings to eaves or gutters (causes abrasion and pinches wires)
- Leaving lights up year-round (UV exposure embrittles insulation; temperature swings fatigue solder)
- Daisy-chaining more than the manufacturer’s specified limit (e.g., “max 3 sets” means 3—never 4, even if they “seem to work”)
FAQ: Quick Answers to Persistent Questions
Can I mix old and new light strings on the same circuit?
No. Mixing incandescent and LED strings overloads LED drivers due to differing current draw and waveform characteristics. Even mixing LED strings from different brands risks incompatibility—their controllers interpret voltage fluctuations differently. Always group by type, age, and manufacturer.
Why do brand-new strings sometimes fail right out of the box?
Manufacturing defects occur: misaligned shunts, cold solder joints, or undetected insulation nicks. Reputable brands (like GE, NOMA, or Twinkly) test 100% of production, but budget imports may skip final QA. Always test new strings for 10 minutes before installation—and keep receipts for warranty claims.
Is it safe to repair a broken wire in the cord myself?
Not recommended. Splicing introduces resistance points that overheat under load. UL certification is voided, and insurance may deny claims for fire originating from modified lights. If the cord is damaged beyond the first 6 inches, retire the string. For plug-end damage, replace the entire plug using a UL-listed replacement kit—but only if you’re certified in electrical work.
Conclusion
Christmas lights shouldn’t be a source of seasonal stress. When strings go dark, it’s rarely magic—or malice—it’s physics, materials science, and human habit intersecting. A blown fuse, a corroded socket, or a decade of tight storage coils leaves traces. Now you know where to look, what each symptom means, and how to intervene before replacement becomes the only option. More importantly, you understand that longevity isn’t luck—it’s intention: coiling instead of wrapping, testing in January instead of waiting for December, choosing ventilation over plastic. These aren’t chores; they’re quiet acts of stewardship for traditions that light up homes and hearts. So this year, pause before you toss that “dead” string. Grab your multimeter, your bulb tester, and 10 minutes of focused attention. You might just restore not just light—but the quiet satisfaction of solving something real.


 浙公网安备
33010002000092号
浙公网安备
33010002000092号 浙B2-20120091-4
Comments
No comments yet. Why don't you start the discussion?