
Candle tunneling—when a candle burns straight down the center, leaving thick walls of wax along the edges—is one of the most common frustrations for candle lovers. It wastes wax, shortens burn time, and undermines the ambiance a well-crafted candle should deliver. While many assume tunneling is inevitable or due to poor quality, the truth is that it's largely preventable with proper knowledge and habits. Understanding why candles tunnel and how to correct it isn’t just about aesthetics—it’s about maximizing your investment and enjoying every ounce of fragrance and light.
The Science Behind Candle Tunneling
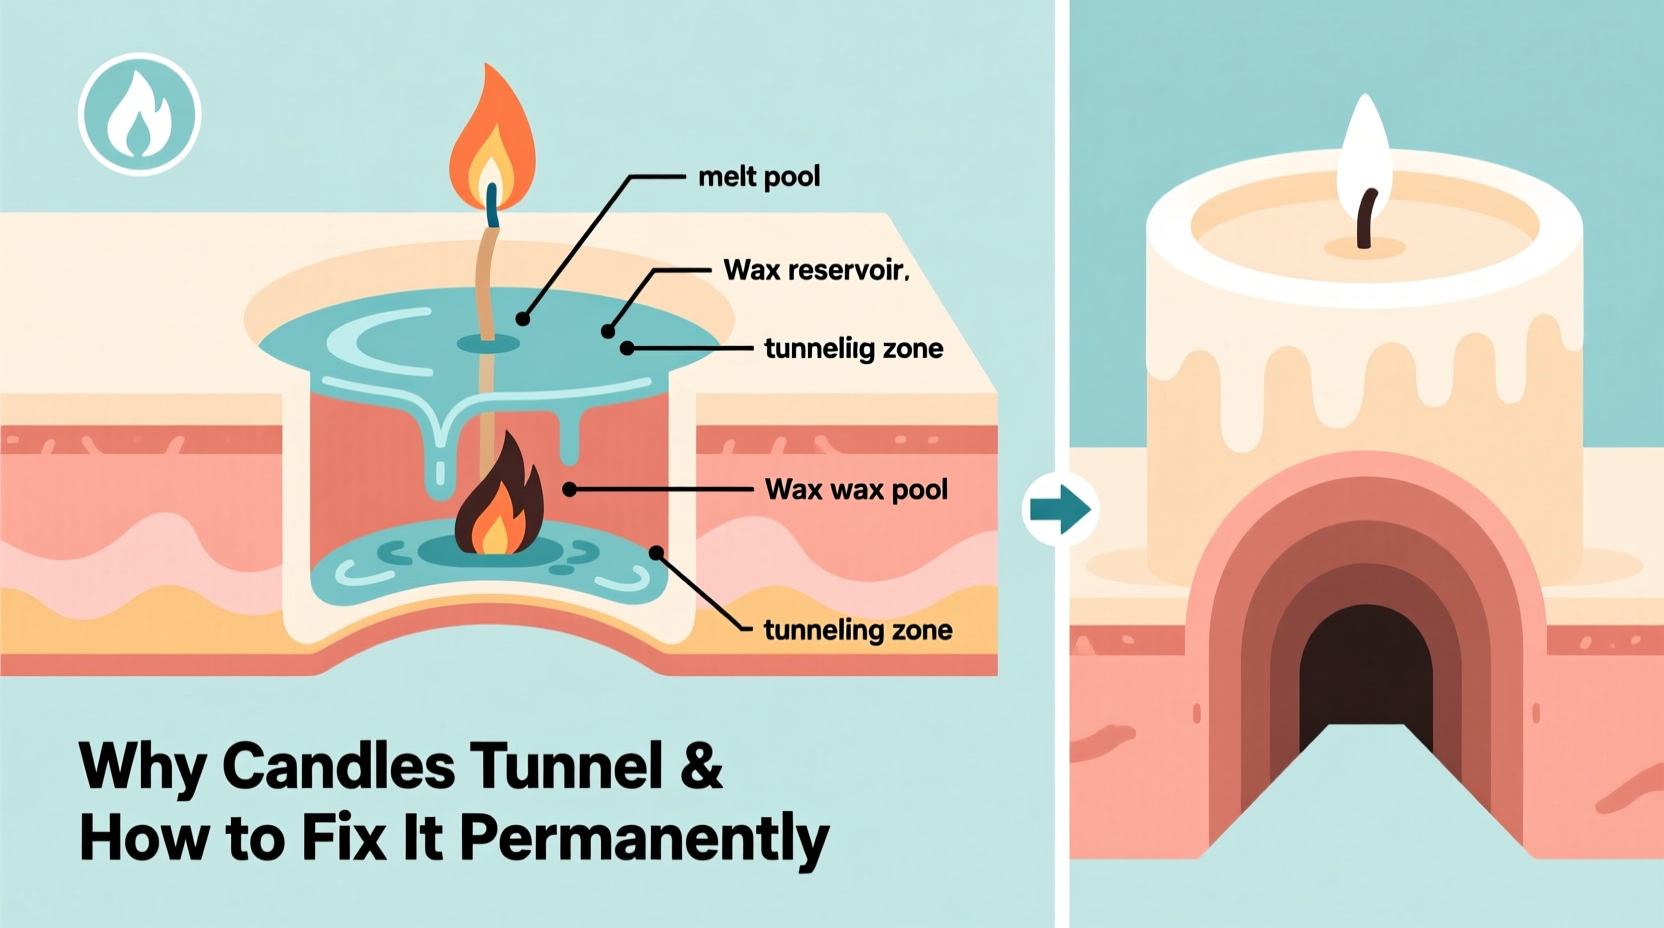
Candle tunneling occurs when the wick fails to generate enough heat to melt wax all the way to the container’s edge during each burn. Instead of forming a full \"melt pool,\" only a narrow column melts around the wick, leaving hardened wax on the sides. Over time, this creates a deep hole resembling a tunnel.
This phenomenon is rooted in the physics of wax melting and flame behavior. When a candle is first lit, the flame heats the surrounding wax, which then liquefies and gets drawn up the wick via capillary action. The size of the melt pool depends on several factors: wick thickness, wax composition, ambient temperature, and burn duration.
Most modern container candles are made from soy, paraffin, or blends. Soy wax, while eco-friendly and clean-burning, has a lower melting point than paraffin and tends to \"remember\" its first burn. If the initial burn doesn’t create a full melt pool across the surface, subsequent burns will follow that same shallow pattern. This is known as the \"memory effect.\"
“Candles don’t forget their first burn. A short initial lighting sets the stage for tunneling later.” — Daniel Reyes, Master Candle Artisan, Brooklyn Wax Co.
Common Causes of Uneven Burning
Tunneling rarely happens without cause. Identifying the root issues helps prevent recurrence. Below are the most frequent contributors:
- Insufficient First Burn: Lighting a candle for less than 1–2 hours prevents the wax from reaching the edges, especially in wider containers.
- Wick Issues: A wick that’s too small won’t produce enough heat; one that’s too large may flare and smoke but still fail to distribute heat evenly.
- Poor Candle Quality: Some manufacturers use undersized wicks or inconsistent wax blends to cut costs, leading to performance problems regardless of user care.
- Environmental Factors: Drafts, cold rooms, or placing candles near vents disrupt consistent flame behavior and heat distribution.
- Frequent Extinguishing: Blowing out a candle before a full melt pool forms trains it to burn narrowly each time.
It’s also worth noting that container shape plays a role. Wider jars require longer burn times to achieve full melt pools. Candles over 3 inches in diameter typically need at least 4 hours per burn to perform optimally.
How to Fix Tunneling Permanently: A Step-by-Step Guide
If your candle is already tunneling, don’t discard it—repair is possible. Follow this methodical process to restore even burning and reclaim wasted wax.
- Trim the Wick: Ensure the wick is between 1/8” and 1/4” tall. A longer wick produces a larger, uncontrolled flame that can carbonize but not spread heat effectively.
- Create a Foil Shield (Optional): For severely tunneled candles, wrap aluminum foil around the rim, letting it drape slightly over the edges. Leave an opening at the top to allow oxygen flow. This reflects heat back into the center, helping melt the outer walls.
- Burn Until Full Melt Pool Forms: Light the candle and let it burn for 3–4 hours, monitoring closely. The goal is to liquefy wax from the center all the way to the container walls. Never leave unattended.
- Rotate the Container (If Safe): On a stable, heat-resistant surface, gently rotate the candle a quarter turn every 30 minutes to encourage even heat exposure. Only do this if the container is cool enough to handle safely.
- Repeat if Necessary: Some candles may take two or three corrective burns to fully recover. Be patient—consistent application yields results.
- Maintain Proper Future Burns: After correction, always burn long enough during future uses to maintain a full melt pool.
For candles with deep tunnels where the wick is submerged below usable wax level, consider removing excess unmelted wax manually. Use a spoon to scoop out solid wax carefully after cooling, then resume regular burning with trimmed wick.
Prevention Checklist: Avoid Tunneling Before It Starts
Once you’ve fixed a tunneled candle, protect your progress. Use this checklist every time you light a new or repaired candle:
- ☑ Burn for at least one hour per inch of candle diameter (e.g., 3-inch jar = 3+ hours)
- ☑ Trim wick to 1/8”–1/4” before each lighting
- ☑ Place candle away from drafts, fans, or air vents
- ☑ Keep room temperature above 65°F (18°C) for optimal wax flow
- ☑ Allow wax to fully harden between burns (minimum 2 hours cooling)
- ☑ Never burn for more than 4 consecutive hours
- ☑ Store unused candles in cool, dark places to preserve integrity
Material Comparison: How Wax Type Affects Burning
Different waxes behave uniquely under flame. Knowing what you're working with helps tailor your approach. The table below compares common candle waxes in terms of tunneling risk and best practices.
| Wax Type | Tunneling Risk | Burn Characteristics | Best Prevention Strategy |
|---|---|---|---|
| Soy Wax | High | Low melting point, strong memory effect | Long first burn (3–4 hrs), avoid cold rooms |
| Paraffin Wax | Moderate | Higher melting point, less memory retention | Consistent trimming, moderate burn times |
| Beeswax | Low | Dense, slow-burning, natural heat distribution | Minimal maintenance, rare tunneling |
| Coconut-Blend Wax | Low-Moderate | Clean burn, excellent scent throw, moderate memory | Proper wick sizing critical; follow manufacturer guidelines |
While soy remains popular for its sustainability, users must be especially vigilant about burn discipline. Conversely, beeswax and high-quality coconut blends often resist tunneling naturally due to superior thermal conductivity.
Real Example: Recovering a Lost Scent Journey
Sarah, a frequent candle buyer from Portland, purchased a premium 14-ounce soy candle marketed for 80 hours of burn time. After three uses—each lasting only 45 minutes—the candle had tunneled nearly half an inch deep. Frustrated, she assumed it was defective and almost returned it.
Instead, she researched and discovered the importance of the first burn. Following the recovery steps outlined here, she trimmed the wick, wrapped the jar in foil, and burned it for four hours under supervision. By the second corrective burn, the wax walls began to collapse inward. Within a week, the candle burned evenly, releasing its full lavender-vanilla aroma consistently. She extended its life by over 30 hours simply by correcting early mistakes.
Her experience underscores a key truth: many perceived defects are actually care errors. With informed intervention, even deeply tunneled candles can be revived.
Frequently Asked Questions
Can I fix tunneling without burning the candle?
No safe method exists to correct tunneling without controlled burning. Heat is required to liquefy wax, and open flame remains the most effective source. Methods like ovens or microwaves pose fire hazards and can crack containers or ignite fumes.
Why does my expensive candle still tunnel?
Even high-end candles can tunnel if misused. However, recurring tunneling despite proper care may indicate wick mismatch or suboptimal wax formulation. Contact the manufacturer—they may offer replacements or advice specific to their product line.
Does using multiple wicks prevent tunneling?
Yes, multi-wick designs are often used in wide-diameter containers to ensure even heat distribution. They help create full melt pools faster and reduce tunneling risk. But they require simultaneous lighting of all wicks and careful maintenance to avoid carbon buildup.
Final Thoughts: Mastery Over Melt Pools
Candle tunneling isn't a flaw of fate—it's a solvable issue grounded in science and habit. By respecting the first burn, maintaining wick health, and creating stable burning conditions, you gain control over how your candle performs. Fixing existing tunneling takes patience, but once corrected, consistent practices ensure it won’t return.
Every candle holds potential far beyond its initial glow. With the right knowledge, you unlock fuller fragrance throws, longer lifespans, and cleaner burns. Don’t let wasted wax dim your experience. Apply these insights today and transform the way you enjoy candles—one even melt pool at a time.


 浙公网安备
33010002000092号
浙公网安备
33010002000092号 浙B2-20120091-4
Comments
No comments yet. Why don't you start the discussion?