
Christmas light projectors offer a convenient and festive way to decorate homes during the holiday season. With minimal setup—no strings of lights, no ladders, just plug and play—they’ve become a popular alternative to traditional lighting. However, many users report a common frustration: uneven, blotchy, or distorted light patterns that detract from the magical effect. Instead of a crisp starry sky or seamless snowfall, you’re left with patchy spots, dark streaks, or misshapen images.
This issue isn’t random. Uneven projection stems from specific technical and environmental factors. Understanding these causes is the first step toward fixing them. From lens alignment to surface texture, multiple variables influence how cleanly your projector casts its image. More importantly, most of these problems are correctable with simple adjustments, proper placement, or minor maintenance.
This guide breaks down the science behind uneven projections, identifies root causes, and provides actionable solutions so you can enjoy a flawless holiday light show year after year.
How Christmas Light Projectors Work
Unlike conventional string lights, Christmas light projectors use LED arrays and optical lenses to project animated or static light patterns onto surfaces such as walls, fences, or driveways. Inside the unit, a small digital disc or LED matrix generates the design (like snowflakes, stars, or reindeer), which is then magnified and projected through a lens system powered by a focused light source.
The quality of the output depends on several internal components:
- Lens clarity and focus: A clean, properly aligned lens ensures sharp, even distribution.
- LED uniformity: LEDs must emit consistent brightness; variations cause hotspots or dim zones.
- Projection angle and optics: The internal mirror and lens arrangement determines how evenly the pattern spreads.
- Digital pattern integrity: Lower-end models may use compressed or low-resolution animations that inherently appear uneven.
When any of these elements are compromised—by dirt, misalignment, or design limitations—the result is an inconsistent display. But external factors play just as big a role.
Common Causes of Uneven Light Patterns
Uneven projection rarely comes down to a single flaw. It’s usually a combination of hardware condition, positioning, and surface characteristics. Here are the most frequent culprits:
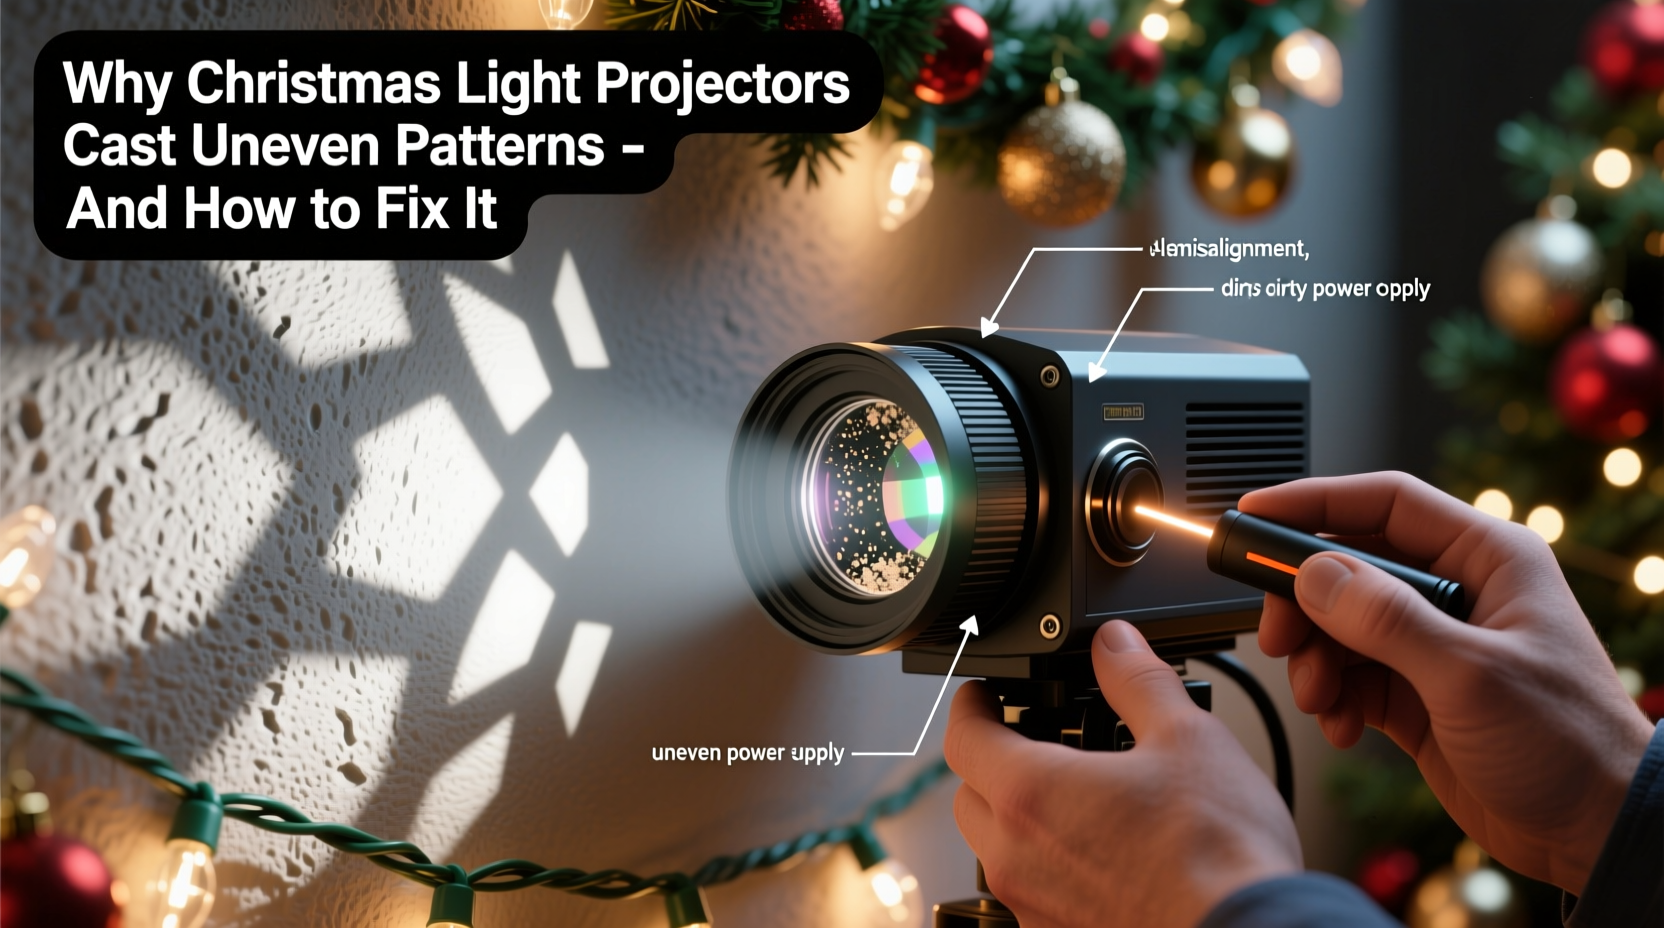
1. Dirty or Smudged Lens
Even a thin layer of dust, moisture, or fingerprints on the lens can scatter light, leading to blurry or splotchy patterns. Outdoor units are especially vulnerable to grime buildup over time.
2. Improper Focus Adjustment
Most projectors have a manual focus ring. If it’s not adjusted correctly, parts of the image may appear sharp while others remain fuzzy or faded, creating visual imbalance.
3. Incorrect Distance and Angle
Projectors have an optimal throw distance—the ideal range between the device and the target surface. Too close, and the image compresses, intensifying brightness in the center. Too far, and the edges blur or fade. Similarly, tilting the projector upward or sideways without adjusting for keystone distortion leads to stretched or skewed visuals.
4. Surface Texture and Color
Light behaves differently depending on what it hits. Rough stucco, brick, or wood siding scatters light unevenly. Dark-colored walls absorb more light, reducing visibility, especially at the edges. Flat, light-colored surfaces reflect best.
5. Obstructions in the Light Path
Overhanging branches, railings, or architectural features can partially block the beam, casting shadows or cutting off sections of the pattern.
6. Low-Quality or Aging Internal Components
Budget-friendly models often use lower-grade LEDs and plastic lenses that degrade faster. Over time, individual LEDs may dim or fail, causing dark patches. Internal warping from heat exposure can also misalign the optics.
“Many customers don’t realize that projector performance is 50% about placement and 50% about surface compatibility. A high-lumen unit on a dark brick wall will still underperform.” — Marcus Lin, Lighting Engineer at HolidayLume Technologies
Step-by-Step Guide to Fixing Uneven Projections
Resolving uneven patterns doesn’t require technical expertise—just systematic troubleshooting. Follow this sequence to identify and correct the issue.
- Power down and inspect the lens. Wipe it gently with a microfiber cloth dampened with lens cleaner or distilled water. Avoid paper towels or abrasive cloths.
- Check the focus ring. Rotate it slowly while observing the projection until the entire image appears sharp and uniformly bright.
- Reposition the projector. Place it on a stable, level surface. Start at a distance of 15–20 feet from the target wall. Use the manufacturer’s recommended throw ratio if available.
- Aim directly at the center of the surface. Ensure the projector faces the wall straight-on. Tilt introduces distortion. If elevation is needed, use a small stand rather than angling the unit.
- Clear obstructions. Trim nearby foliage, move furniture, or reposition the projector to ensure an unobstructed line of sight.
- Test on different surfaces. If possible, project onto a smooth, light-colored area like a garage door or blank fence panel. Compare results to isolate surface-related issues.
- Adjust brightness settings. Some models allow manual intensity control. Reduce brightness slightly if the center appears washed out.
- Inspect for hardware wear. Look for flickering LEDs or discolored areas in the pattern. These may indicate failing internal components needing replacement.
Pro Tip: Use the Grid Test Method
Create a temporary grid on your wall using painter’s tape. Project the light pattern over it. This helps you visually assess distortion, skew, or brightness drop-off at the edges. Adjust position or focus until the pattern aligns evenly within each square.
Do’s and Don’ts: Best Practices for Even Lighting
| Do | Don’t |
|---|---|
| Use on flat, light-colored surfaces like vinyl siding or painted stucco | Project onto rough stone, dark brick, or textured wood |
| Keep the lens clean and covered when stored | Touch the lens with bare fingers regularly |
| Maintain a level, stable base | Place on uneven ground or wobbly furniture |
| Follow manufacturer’s throw distance guidelines | Assume closer = brighter = better |
| Use weatherproof enclosures for outdoor models | Leave units exposed to rain or snow without protection |
Mini Case Study: Fixing a Patchy Snowfall Display
Homeowner Laura K. installed a new snowfall-effect projector on her front porch but noticed the animation looked fragmented—snowflakes were dense in the upper left but nearly invisible in the lower right. She initially assumed the unit was defective.
After reviewing the manual, she realized the projector was angled downward due to the slope of her porch. She raised it using a small wooden platform and re-leveled it with a bubble app on her phone. She also wiped the lens, which had accumulated morning dew and dust.
Next, she moved the unit five feet farther from the house, increasing the throw distance from 12 to 17 feet. She refocused the lens and observed an immediate improvement: the snowfall now covered the entire two-story facade evenly, with smooth motion and consistent density.
Laura’s experience highlights how small adjustments—often overlooked—can dramatically improve performance without replacing equipment.
Troubleshooting Checklist
Use this checklist to diagnose and resolve uneven patterns efficiently:
- ✅ Clean the lens with a microfiber cloth
- ✅ Adjust focus ring until image is sharp across all areas
- ✅ Position projector 15–25 feet from the target surface
- ✅ Ensure the unit is level and facing the wall squarely
- ✅ Remove any physical obstructions (plants, railings, etc.)
- ✅ Test on a smoother, lighter-colored surface if possible
- ✅ Check for flickering or dead LEDs inside the unit
- ✅ Verify power supply is stable (use a surge protector)
- ✅ Consult the manual for model-specific calibration tips
- ✅ Consider upgrading to a higher-lumen model if issues persist
Frequently Asked Questions
Can I use a Christmas light projector indoors?
Yes, many models work well indoors, especially in large rooms or near ceilings. Indoor use often produces sharper results due to controlled lighting and smoother walls. Just ensure proper ventilation to prevent overheating.
Why does the center of the pattern look brighter than the edges?
This is called “hotspotting” and occurs when the lens focuses too much intensity in the middle. It can be caused by incorrect focus, short throw distance, or low-quality optics. Increasing distance and refocusing usually balances the spread.
Are some projector brands less prone to uneven patterns?
Higher-end brands like Luminara, Noma, and Hadley tend to use superior lenses and more uniform LED arrays, resulting in more consistent projections. While more expensive, they often include adjustable focus, wider throw ratios, and better weather resistance.
Conclusion: Achieve a Flawless Holiday Display
Uneven patterns from Christmas light projectors are a common but solvable issue. By understanding the interplay between optics, environment, and setup, you can transform a spotty, disappointing display into a stunning holiday spectacle. Most fixes require no tools, no cost—just attention to detail and a few minutes of adjustment.
Start with the basics: clean the lens, set the right distance, aim straight, and choose the best surface. Then fine-tune focus and brightness. If problems continue, consider whether the unit itself is due for an upgrade. Modern projectors offer better resolution, adaptive optics, and improved durability, making them worth the investment for annual use.


 浙公网安备
33010002000092号
浙公网安备
33010002000092号 浙B2-20120091-4
Comments
No comments yet. Why don't you start the discussion?