
Fake snow sprays are a popular seasonal decoration used to create a winter wonderland effect on windows, mirrors, and glass surfaces. While they add festive charm, many users quickly discover an unwelcome side effect: stubborn white residue that clings to glass long after the holidays end. This film can dull transparency, attract dust, and even etch into the surface if left untreated. Understanding why this happens—and how to safely reverse it—is essential for homeowners, renters, and decorators alike.
The residue issue isn’t just cosmetic; over time, repeated use without proper cleanup can degrade window coatings, interfere with visibility, and complicate future cleaning. The good news is that most residues can be removed effectively with the right approach. More importantly, prevention strategies can minimize or eliminate the problem altogether.
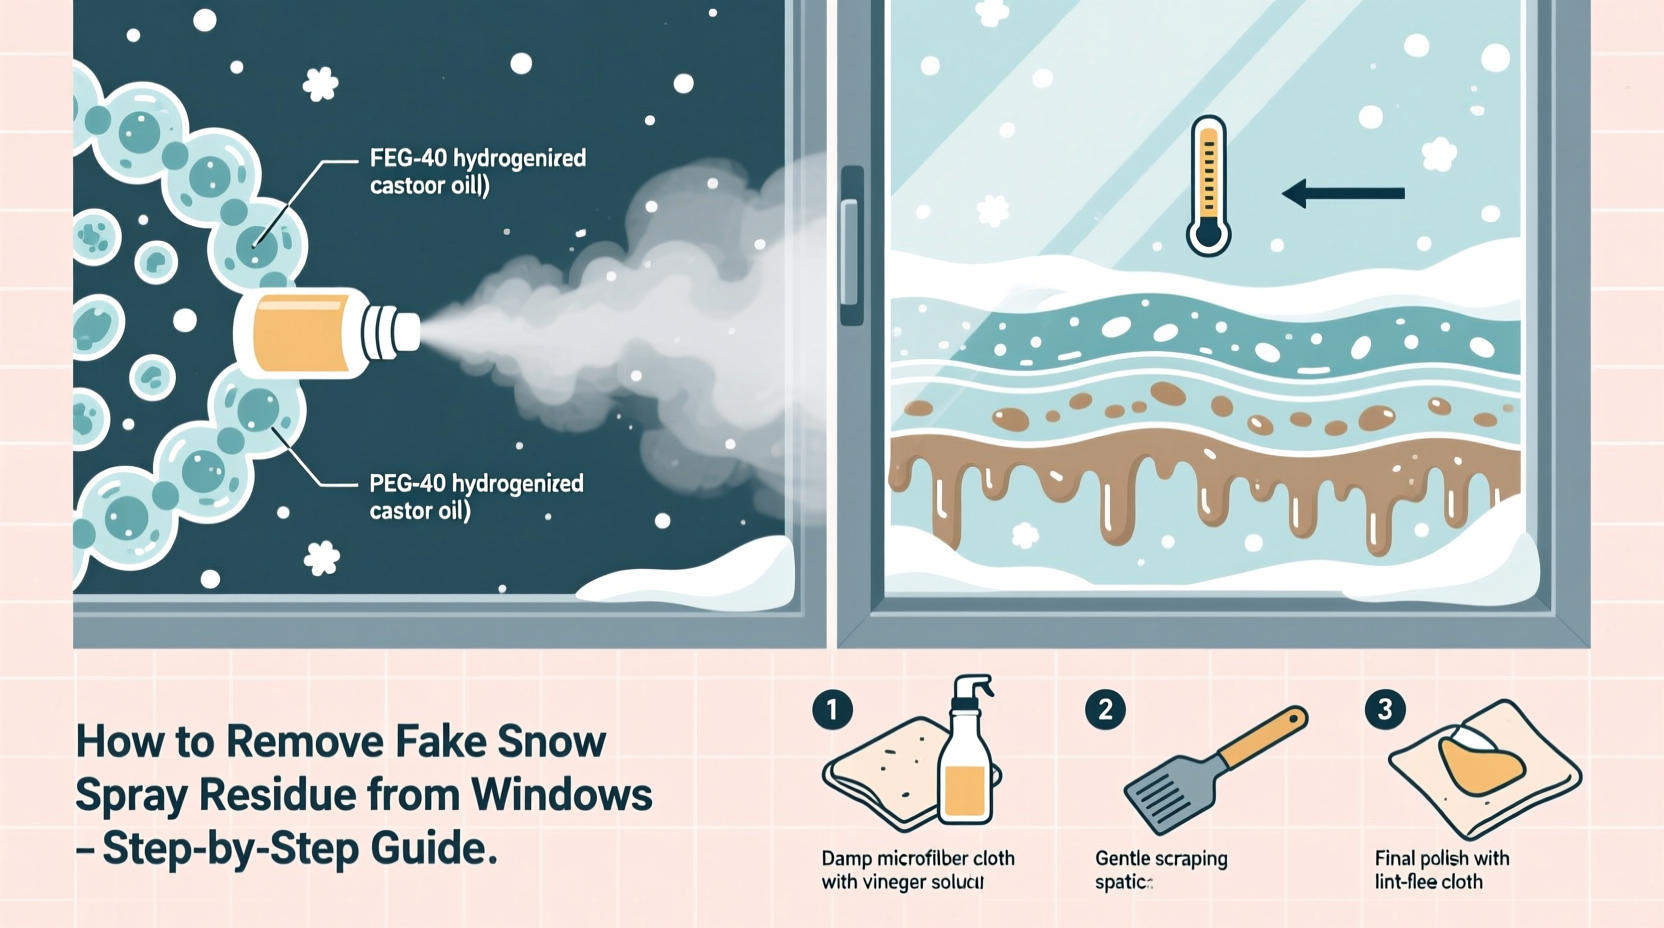
Why Fake Snow Sprays Leave Residue
Fake snow sprays typically consist of water, volatile solvents (like alcohol or propane), and polymers or resins designed to expand and harden upon contact with air. When sprayed, the liquid mixture expands into a foam-like substance that mimics freshly fallen snow. As the solvent evaporates, the polymer structure solidifies—this is what creates the visual effect. However, not all components fully dissipate.
The primary culprit behind residue is the polymer base. These synthetic compounds are engineered to adhere temporarily to surfaces but often lack complete biodegradability or solubility in water. Over time, especially when exposed to sunlight or temperature fluctuations, the residue can oxidize, becoming harder and more difficult to dissolve. Additionally, some formulations include UV blockers or opacifiers to enhance the snowy appearance, which further contribute to chalky buildup.
Another factor is application technique. Over-spraying or applying too close to the surface increases the thickness of the deposit, making evaporation less efficient and leaving behind concentrated solids. Windows, particularly those exposed to outdoor elements, may also trap moisture beneath the spray layer, accelerating chemical reactions that bond the residue to the glass.
“Many decorative aerosols contain acrylic copolymers that mimic frost but don’t fully break down. They’re meant for short-term display, not long-term adhesion.” — Dr. Alan Reeves, Materials Chemist at GreenSurface Labs
How to Remove Fake Snow Residue from Windows: Step-by-Step Guide
Removing fake snow residue requires patience and the right tools. Aggressive scraping or harsh chemicals can scratch glass or damage window seals, so a methodical approach is best. Follow this timeline-based process for optimal results.
🕒 Step 1: Soften the Residue (5–10 minutes)
Begin by moistening the affected area with warm water. Use a clean spray bottle filled with lukewarm water to gently mist the surface. Let it sit for several minutes to allow penetration. Avoid hot water, as thermal shock can crack tempered or double-pane glass.
🕒 Step 2: Apply a Cleaning Solution (10–15 minutes)
Create a safe yet effective cleaning solution using one of these options:
- Vinegar-Water Mix: Equal parts white vinegar and water. Natural, non-toxic, and excellent for dissolving mineral deposits.
- Isopropyl Alcohol (70%): Effective against polymer films. Use sparingly and ventilate the area.
- Commercial Glass De-Greaser: Choose ammonia-free products labeled safe for tinted or coated glass.
Spray the solution liberally over the residue and let it dwell for 10 minutes. Do not allow it to dry.
🕒 Step 3: Gently Agitate (5 minutes)
Using a soft microfiber cloth or non-abrasive sponge, gently rub the area in circular motions. For tougher spots, a plastic razor blade (used at a 30-degree angle) can carefully lift flakes without scratching. Never use metal scrapers on glass.
🕒 Step 4: Rinse and Wipe (5 minutes)
Rinse thoroughly with clean water using a spray bottle or damp cloth. Then, dry with a lint-free towel or squeegee to prevent streaks.
🕒 Step 5: Final Inspection and Repeat if Necessary
Inspect under natural light. If haze remains, repeat steps 2–4. Persistent buildup may require a second treatment after several hours.
Do’s and Don’ts: Table of Best Practices
| Do | Don’t |
|---|---|
| Use warm, soapy water to pre-soak residue | Use boiling water—it can crack glass |
| Apply vinegar or alcohol-based solutions | Use acetone or nail polish remover—too harsh |
| Scrub gently with microfiber or felt pads | Use steel wool or abrasive scrubbers |
| Test cleaners on a small hidden area first | Assume all “glass cleaners” are safe for residue |
| Work in shaded areas to prevent premature drying | Leave cleaning solutions unattended on glass |
Prevention: How to Use Fake Snow Sprays Without the Mess
The easiest way to avoid residue is to change how you use the product. Most damage occurs due to improper application or treating fake snow spray like permanent decor. With minor adjustments, you can enjoy the aesthetic without the aftermath.
First, consider alternatives. Static-cling window decals or removable vinyl snowflakes offer similar visual appeal with zero residue. If you prefer spray-on effects, look for water-soluble or eco-friendly formulas explicitly labeled “residue-free” or “easily removable.” These often use modified cellulose or starch-based polymers instead of acrylics.
When using traditional sprays, apply sparingly. Hold the can at least 12–18 inches from the surface and use short bursts. Focus on edges or corners rather than covering the entire pane. This reduces material usage and makes cleanup easier. Also, avoid spraying on sunny or windy days—heat accelerates drying before the product can be wiped, while wind causes uneven distribution.
Plan for removal from the start. Treat fake snow as temporary art—not a set-and-forget decoration. Schedule removal within 3–5 days of application, ideally before the residue has time to cure. Light wiping with a damp cloth immediately after use can prevent most buildup.
Real-World Example: A Holiday Decorator’s Mistake
Jessica, a homeowner in Portland, Oregon, decorated her front bay windows with fake snow spray every December for five years. She loved the cozy, snowy cottage look but began noticing that each year, the glass appeared cloudier, even after cleaning. By the third season, she struggled to remove thick, patchy residue that seemed bonded to the surface.
After consulting a window restoration specialist, she learned that repeated applications had layered polymer films, some of which had micro-fractured and trapped moisture. The technician used a combination of isopropyl alcohol and gentle polishing compounds to restore clarity—but warned that prolonged neglect could have led to permanent etching.
Now, Jessica uses reusable snowflake decals and reserves spray for indoor, non-porous surfaces like ornaments. She also keeps a log of when and where she applies any temporary decor, ensuring timely removal.
FAQ: Common Questions About Fake Snow Residue
Can fake snow residue damage windows permanently?
Yes, if left for months or years, especially in direct sunlight. UV exposure can cause polymers to degrade into acidic byproducts that etch glass. Coated or low-E windows are particularly vulnerable, as residue can compromise the thin metallic layer responsible for insulation.
Is vinegar safe for removing fake snow from tinted windows?
Generally, yes—but with caution. Vinegar is mildly acidic and safe for most glass types when diluted (50/50 with water). However, avoid prolonged contact with window edges or seals, and never mix vinegar with bleach or ammonia. Always test on a small area first.
Are there any completely residue-free fake snow sprays?
A few brands claim to offer water-soluble or biodegradable formulas. Look for products specifying \"easy wipe-off\" or \"no sticky residue.\" However, even these may leave traces if over-applied or not cleaned promptly. Read reviews and check ingredient lists for polyvinyl alcohol or PVA-based systems, which dissolve more readily in water.
Checklist: Safe Fake Snow Application & Cleanup
- ✔️ Choose a water-soluble or low-residue formula when possible
- ✔️ Test spray on a small, inconspicuous area first
- ✔️ Apply in cool, shaded conditions with moderate humidity
- ✔️ Hold can 12–18 inches from surface; use light, even coats
- ✔️ Protect frames and sills with tape or drop cloths
- ✔️ Plan removal within 3–5 days of application
- ✔️ Clean with warm soapy water or vinegar solution
- ✔️ Dry completely with microfiber or squeegee
- ✔️ Inspect for haze and re-treat if necessary
- ✔️ Store leftover cans upright in a cool, dry place
Expert Insight: Long-Term Impact on Glass Surfaces
While occasional use of fake snow spray may seem harmless, building up multiple layers over seasons increases risk. Window manufacturers rarely endorse such products, and their warranties often exclude damage caused by chemical exposure or improper cleaning.
“Glass surfaces aren’t inert—they interact with environmental chemicals. Repeated polymer deposition alters surface energy and can lead to wettability issues or delamination of coatings.” — Maria Lin, Senior Consultant at ClearView Building Science
This means that over time, windows may repel water unevenly, develop fogging between panes, or lose insulating efficiency. In commercial settings, this has led to costly replacements after holiday displays were improperly removed.
Conclusion: Enjoy the Festive Look Without the Lasting Mess
Fake snow sprays can bring seasonal joy, but their residue is a real concern for window maintenance and longevity. The key lies in informed use: understanding the chemistry behind the spray, applying it responsibly, and committing to prompt, thorough cleanup. By following safe removal techniques and adopting preventive habits, you can preserve your windows’ clarity and function year-round.
Consider shifting toward reusable or static alternatives for high-traffic areas, and reserve sprays for short-term indoor displays. Your future self—and your windows—will thank you when spring arrives without a trace of last winter’s magic.


 浙公网安备
33010002000092号
浙公网安备
33010002000092号 浙B2-20120091-4
Comments
No comments yet. Why don't you start the discussion?