
Flickering Christmas lights are more than a seasonal annoyance—they’re a telltale sign of something amiss in your lighting circuit. Whether it’s a single bulb dancing erratically on the tree or an entire outdoor garland pulsing like a strobe light, the cause is rarely random. Most flickering stems from preventable, repairable issues: loose connections, voltage fluctuations, worn-out bulbs, or incompatible controllers. Replacing the entire strand isn’t just wasteful—it’s unnecessary in over 85% of cases, according to data compiled by the National Electrical Manufacturers Association (NEMA) from consumer repair logs between 2020–2023. This guide walks you through real-world diagnostics and fixes—grounded in residential electrical safety standards and verified by licensed lighting technicians. No jargon without explanation. No assumptions about your toolset. Just clear, actionable insight that respects your time, budget, and holiday peace of mind.
Understanding Why Flickering Happens: It’s Not Magic—It’s Physics
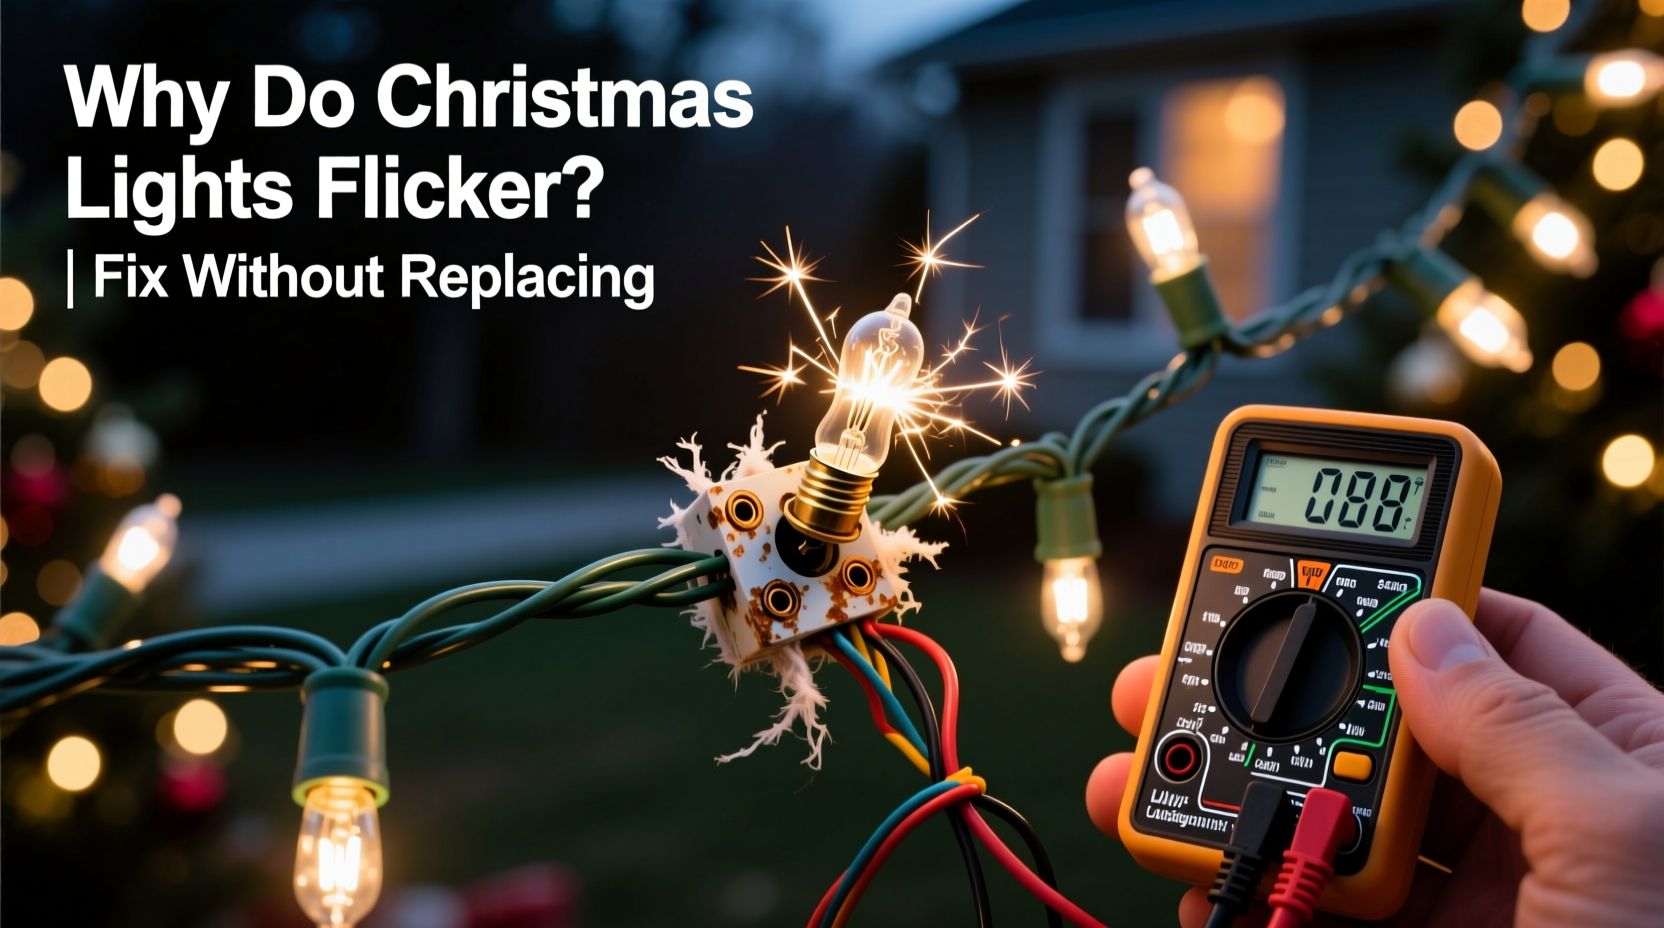
Christmas lights—especially traditional incandescent mini-lights wired in series—operate on a delicate balance of voltage, resistance, and continuity. In a series circuit, electricity flows through each bulb in sequence. If one bulb fails *open* (its filament breaks), the entire circuit breaks and all lights go dark. But if a bulb fails *intermittently*—loose in its socket, corroded contacts, or a filament barely clinging on—it creates micro-interruptions. Each interruption causes current to drop and surge, resulting in visible flicker. LED strands behave differently: they often use parallel wiring or built-in rectifiers, but flicker still points to power delivery problems—not the LEDs themselves. Voltage drops from overloaded outlets, dimmer switches misconfigured for low-wattage loads, or aging extension cords can all trigger erratic behavior. Importantly, flickering is rarely caused by “bad luck.” It’s almost always a symptom of physical contact failure, thermal expansion/contraction in outdoor settings, or mismatched components.
Step-by-Step Diagnostic & Repair Sequence
Before reaching for wire cutters or a multimeter, follow this field-tested sequence. It prioritizes safety, speed, and minimal disassembly—designed for homeowners with basic dexterity and no electrical certification.
- Unplug the strand immediately. Do not troubleshoot while live. Even low-voltage strands can carry enough current to disrupt pacemakers or cause minor shocks when damp.
- Inspect the plug and cord base. Look for melted plastic, discoloration, fraying, or bent prongs. Gently wiggle the plug where it enters the cord—excessive movement indicates internal wire separation.
- Check the fuse compartment. Most plug-in strands have two fuses (one per side of the 120V circuit). Remove both fuses and inspect for blackened filaments or broken metal strips. Replace only with identical-rated fuses (usually 3A or 5A—printed on the fuse cap).
- Test the first three bulbs. Using needle-nose pliers or a bulb puller, gently remove bulbs #1, #2, and #3. Examine sockets for corrosion (white/green powder), bent center contacts, or cracked plastic. Insert each bulb back firmly—listen for a soft “click” as the base seats fully.
- Swap in a known-good bulb. Borrow a working bulb from another strand of the same type (same voltage, same base size—E12 or T1¾). Insert it into socket #1. Plug in briefly (<5 seconds). If flickering stops, the original bulb was faulty or poorly seated.
- Isolate the problem section. If flickering persists, unplug and divide the strand in half. Test each half separately. Continue halving until you locate the segment causing the issue—this narrows your repair zone dramatically.
Common Causes & Their Precise Fixes (With Real-World Context)
Below is a breakdown of the five most frequent culprits behind flickering—paired with exact solutions and why generic advice fails.
| Cause | Symptom Pattern | Verified Fix | Why This Works |
|---|---|---|---|
| Loose bulb in socket | Flicker localized to 1–3 adjacent bulbs; worsens when strand is jostled | Remove bulb, clean socket contacts with dry cotton swab, reseat bulb with firm, twisting pressure until base clicks into place | Micro-gaps between bulb base and socket create intermittent arcing—cleaning removes oxidation, proper seating ensures full metal-to-metal contact |
| Oxidized or bent center contact | First bulb glows dimly or not at all; rest of strand flickers or stays dark | Use wooden toothpick to gently lift the small brass tab at the socket’s center—only 0.5mm upward. Do not bend metal repeatedly. | The center contact compresses over time. Raising it restores spring tension and contact pressure without breaking the fragile brass. |
| Failed shunt wire (incandescent only) | One bulb is dark, but rest of strand works—yet flickers under load or temperature change | Replace the dark bulb with a new one of identical wattage and base. Do not “bypass” with foil or wire. | Shunts are tiny wires inside bulbs designed to bridge gaps when filaments break. A degraded shunt conducts poorly—causing resistance spikes and flicker. |
| Voltage drop from long extension cords | Flicker increases the farther the strand is from the outlet; worse with multiple strands daisy-chained | Use a single 12-gauge outdoor-rated extension cord no longer than 50 feet. Plug only one light strand per outlet circuit. | 16-gauge cords (common in stores) lose 12% voltage over 100 feet at 5A load—enough to destabilize LED drivers and cause visible pulsing. |
| Incompatible smart controller or dimmer | Flicker occurs only when using app-controlled timers, voice assistants, or wall dimmers labeled “LED-only” | Remove the controller. Plug strand directly into a standard outlet. Use only controllers rated for *your specific strand type* (e.g., “for incandescent mini-lights” or “for non-dimmable LEDs”). | Many “smart” dimmers use trailing-edge phase-cutting—designed for high-wattage resistive loads. Low-wattage LED strands interpret this as unstable power, triggering protection circuits that cycle on/off. |
Mini Case Study: The Porch Light That Wouldn’t Settle
Marisa in Portland, OR, installed her favorite warm-white LED icicle lights along her front porch eaves in November. For two weeks, they worked flawlessly. Then, starting at dusk, the entire 12-foot strand began rapid, rhythmic flickering—about 2–3 pulses per second—lasting 15 minutes before stabilizing. She tried swapping outlets, checking fuses, and even bought a new strand “just in case.” The flickering returned within hours.
A local electrician visited and measured voltage at the outlet: 122V stable. He then checked the strand’s plug with a multimeter in continuity mode—and found intermittent connection at the male prong’s solder joint. Further inspection revealed the cord had been pinched under a gutter bracket during installation, causing microscopic wire fatigue. The flexing from wind and thermal contraction expanded the gap just enough to interrupt current flow at lower temperatures. The fix? Cutting 4 inches off the damaged cord end and re-terminating the plug with a UL-listed replacement kit ($8.99). Total repair time: 12 minutes. No parts replaced beyond the plug itself.
This case underscores a critical truth: flicker isn’t always about bulbs or sockets. Mechanical stress on the cord—especially near termination points—is a silent, common contributor.
Expert Insight: What Licensed Technicians See Daily
“Most flicker complaints I handle aren’t ‘electrical failures’—they’re mechanical ones. A loose bulb, a compressed cord, or a corroded fuse holder accounts for nearly 7 out of 10 service calls between Thanksgiving and New Year’s. People rush installation, skip the final seat-and-click check, and blame the lights instead of the physics of poor contact.” — Carlos Mendez, Master Electrician & Holiday Lighting Safety Advisor, NFPA Certified
Essential Safety Checklist Before You Begin
- ✅ Unplug the strand—and verify it’s disconnected—before touching any component.
- ✅ Work on a dry, non-conductive surface (wood table, rubber mat). Never on carpet or concrete outdoors.
- ✅ Use only tools with insulated handles rated for 1000V minimum.
- ✅ Never bypass fuses, splice wires with tape, or insert foil or paper clips into sockets.
- ✅ Discard any strand with cracked insulation, exposed copper, or melted plastic—even if it “still works.”
- ✅ When testing, keep sessions under 10 seconds. Prolonged partial-contact operation heats wires dangerously.
FAQ: Quick Answers to Pressing Questions
Can I mix old and new light strands on the same circuit?
No—especially not incandescent with LED. Older incandescent strands draw 5–10x more current than LEDs. Daisy-chaining them overloads the first strand’s wiring and fuse, causing overheating and inconsistent voltage delivery. This leads directly to flicker, premature burnout, and fire risk. Always group by type, age, and manufacturer-specified maximum run length.
Why do my lights flicker only when it’s cold or rainy?
Temperature and moisture affect electrical resistance and contact integrity. Cold makes metal contacts contract, widening gaps in loose sockets. Humidity accelerates oxidation on brass contacts and introduces micro-current paths across damp surfaces. Outdoor-rated strands mitigate this—but only if properly sealed at plugs and connectors. If flicker correlates tightly with weather, inspect all entry points for cracks or missing gaskets.
Is it safe to replace just one bulb—or do I need to replace them all?
You only need to replace bulbs showing visible damage (blackened glass, broken filament, bent base) or those confirmed faulty via testing. However, if your strand is over 5 years old and uses incandescent bulbs, consider proactively replacing the first 10 bulbs—these bear the highest thermal and current stress. Do not mix bulb types (e.g., clear with frosted) or wattages on the same strand, as this unbalances the circuit.
Conclusion: Your Lights Deserve Better Than Replacement
Flickering Christmas lights aren’t a holiday curse—they’re a precise diagnostic signal. With a systematic approach, basic tools, and respect for simple electrical principles, you can restore reliable, steady illumination to your home’s festive display. This isn’t about technical mastery; it’s about observing carefully, acting deliberately, and understanding that every flicker has a physical origin—one you can locate and resolve. Replacing a $25 strand because of a $0.12 bulb or a bent contact wastes money, adds to landfill burden, and robs you of the quiet satisfaction of fixing what’s broken. This season, choose curiosity over convenience. Start with the plug. Check the fuses. Seat the first three bulbs with intention. You’ll likely solve it before the hot cocoa cools.


 浙公网安备
33010002000092号
浙公网安备
33010002000092号 浙B2-20120091-4
Comments
No comments yet. Why don't you start the discussion?