
Every holiday season begins with excitement—pulling out the decorations, untangling strings of lights, and transforming your home into a festive wonderland. But nothing kills the cheer faster than plugging in your favorite strand of Christmas lights only to hear a faint pop, see half the string go dark, and realize yet again: the fuse has blown. If this happens every year, you're not alone. Thousands of homeowners face the same frustrating issue. The good news is that most causes are fixable with basic troubleshooting and a few smart habits.
Fuse blowouts in Christmas lights aren’t random acts of bad luck. They’re symptoms of underlying electrical issues—some minor, others potentially hazardous. Understanding why fuses blow empowers you to fix the problem quickly and safely. More importantly, it helps prevent future failures and reduces fire risks during one of the busiest times of the year for home electrical use.
How Christmas Light Fuses Work
Miniature incandescent Christmas light strings typically come with built-in fuses located inside the plug. These small, glass or ceramic components protect the circuit by breaking the flow of electricity when too much current passes through. Most standard strands operate on a 3-amp or lower circuit, and their fuses are usually rated between 0.5 and 3 amps depending on length and bulb count.
When a power surge occurs—or if the circuit becomes overloaded—the fuse “blows” to prevent overheating, wire damage, or even fire. It’s a safety feature, not a flaw. However, repeatedly replacing fuses without addressing the root cause means you’re treating the symptom, not the disease.
Common Reasons Why Fuses Keep Blowing
Several factors can lead to recurring fuse failures. Identifying which applies to your setup is key to finding a lasting solution.
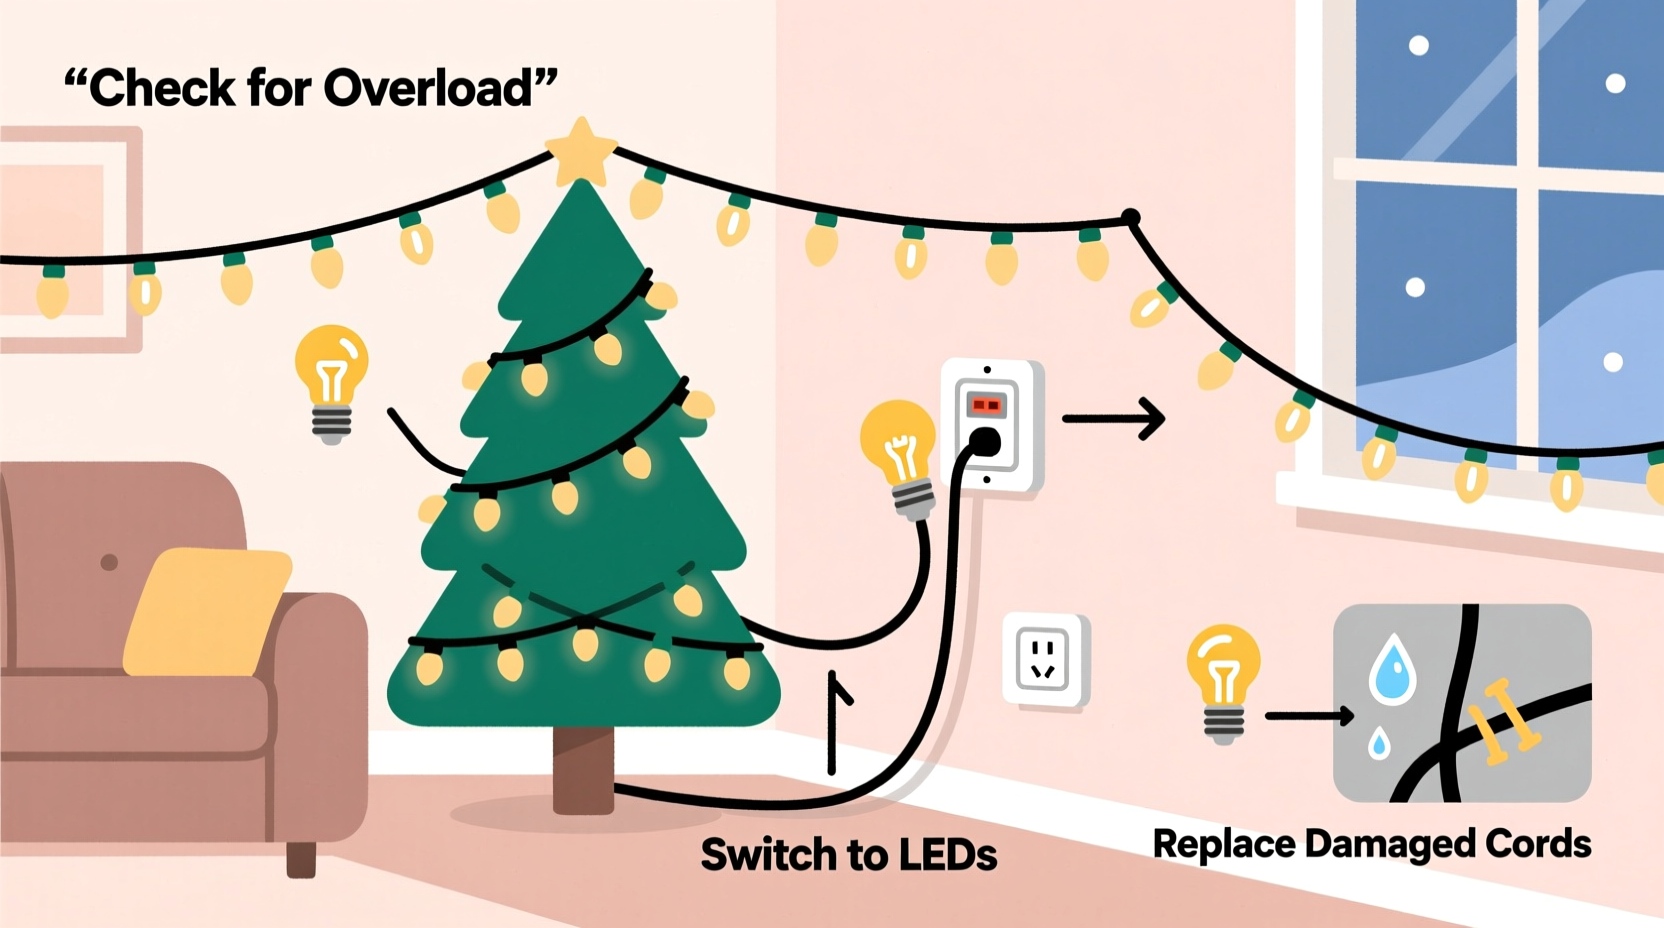
1. Overloading the Circuit
One of the most frequent causes is connecting too many light strands together. Many manufacturers specify a “maximum connectable” limit—often 3 to 6 sets per series. Exceeding this increases current draw beyond what the fuse can handle. Even if the label says \"connect up to 6,\" doing so on an already loaded outlet or extension cord compounds the strain.
2. Faulty or Damaged Wiring
Worn insulation, crushed wires, or frayed sections (especially near bends or connectors) create short circuits. A short allows current to bypass its intended path, causing a sudden spike that blows the fuse. Damage often occurs during storage—think boxes with sharp edges or lights wrapped tightly around corners.
3. Moisture Exposure
Outdoor lights exposed to rain, snow, or condensation can develop internal moisture buildup. Water conducts electricity and may cause arcing or leakage currents, triggering fuse failure. Poorly sealed end caps or cracked sockets worsen this risk.
4. Using Non-Compatible Extension Cords
Extension cords not rated for outdoor or high-wattage use overheat under load. Thin-gauge cords (like 18 AWG) resist current flow more than heavier ones (16 or 14 AWG), generating heat and increasing voltage drop. This forces lights to pull harder for power, stressing the system.
5. Power Surges and Voltage Spikes
Sudden surges from storms, grid fluctuations, or other appliances cycling on/off can overwhelm delicate lighting circuits. While indoor breakers may not trip, these spikes are enough to fry tiny fuses in light strings.
6. Mixing Old and New Light Strands
Older incandescent strings have different voltage tolerances and resistance levels compared to newer models. Daisychaining mismatched sets—even within the same brand—can create uneven current distribution, leading to premature fuse failure.
“Frequent fuse blowing is nature’s way of telling you something’s wrong with your setup. Ignoring it isn’t just inconvenient—it’s dangerous.” — David Langley, Residential Electrical Safety Inspector, NFPA Contributor
Step-by-Step Guide to Diagnose and Fix Blown Fuses
Follow this logical sequence to identify and resolve the issue efficiently:
- Unplug everything immediately. Safety first. Never work on live circuits.
- Inspect the plug for blown fuses. Use a small screwdriver or coin to gently pry open the female end plug where fuses are housed. Look for visible signs: blackened glass, broken filament, or discolored metal ends.
- Replace with correct-rated fuses. Use only the amperage specified on the label (usually printed near the fuse compartment). Most are 3A/125V, but verify before inserting.
- Test each light strand individually. Plug in one set at a time. If it works fine alone, the problem likely lies in combination with others.
- Check for physical damage. Run your fingers along the wire length, feeling for cuts, kinks, or melted spots. Pay attention to connection points between bulbs and where wires enter sockets.
- Verify daisy-chaining limits. Count how many strands you’ve linked. Compare against manufacturer guidelines. Disconnect excess sets.
- Use a multimeter (optional). Set to continuity mode and test across the fuse terminals. No beep means the fuse is dead. You can also check for shorts by testing between wires at both ends—if there's continuity when there shouldn’t be, you have a short circuit.
- Upgrade your extension cord. Switch to a heavy-duty, outdoor-rated cord (14 or 16 AWG) with grounded prongs. Avoid using indoor-only cords outside.
- Plug into a GFCI outlet or surge protector. Especially important outdoors. These devices cut power during surges or ground faults, protecting both you and your lights.
- Reassemble and retest. Once repairs are made, reconnect cautiously and monitor for flickering, dimming, or warmth in plugs/wires.
Do’s and Don’ts When Handling Christmas Light Fuses
| Do’s | Don’ts |
|---|---|
| Always match fuse ratings exactly (e.g., 3A, 125V) | Never substitute car fuses or higher-amperage types |
| Use gloves and insulated tools when handling outdoor strings | Don’t attempt repairs while lights are plugged in |
| Label repaired strands to track history | Don’t reuse visibly damaged wires or cracked plugs |
| Store lights on cardboard reels or soft spools | Don’t wrap tightly around sharp objects or pinch wires |
| Test all strings before installing | Don’t overload wall outlets or power strips |
Real Example: Sarah’s Front Porch Problem
Sarah had been decorating her front porch for over a decade. Each year, she’d hang three long strands of traditional C7 incandescent lights across the railing. Two years ago, she added two more sets to fill gaps—and since then, the fuses started blowing almost weekly.
She replaced fuses multiple times, assuming they were just cheaply made. After the third outage in one weekend, she called a handyman who discovered the root cause: she was daisy-chaining five 25-light strands rated for a maximum of three per circuit. The total wattage exceeded 400 watts, far beyond the safe capacity of the original plug fuse.
The fix? She separated the display into two independent runs, each powered by its own heavy-duty extension cord plugged into different circuits. She also upgraded to LED versions for two of the strands, cutting energy use by 80%. Since then, no more blown fuses—and her electric bill dropped too.
Upgrade Smart: When to Switch to LED
If you're still using older incandescent mini-lights, consider switching to LED alternatives. Beyond longevity and brightness, LEDs consume significantly less power—typically 10% of what incandescents require. That means lower current draw, reduced heat output, and far less stress on fuses and circuits.
For example:
- A 100-bulb incandescent string uses about 40 watts and draws ~0.33 amps.
- The same length in LED uses only 4–6 watts and draws ~0.05 amps.
This dramatic reduction allows you to connect more strands safely and eliminates many common causes of overloads. Plus, LEDs are less prone to burnout, generate minimal heat, and last 25,000+ hours—meaning fewer replacements and better long-term value.
Preventative Checklist for Long-Term Success
Use this checklist annually before setting up your display:
- ✅ Inspect all light strands for damaged wires, cracked sockets, or loose bulbs
- ✅ Test each string individually using a known-working outlet
- ✅ Replace any blown fuses with correct-spec replacements
- ✅ Verify daisy-chain totals don’t exceed manufacturer limits
- ✅ Use outdoor-rated, grounded extension cords (16 AWG or thicker)
- ✅ Plug into GFCI-protected outlets or surge-protected power strips
- ✅ Avoid running cords under rugs, through doors, or near water sources
- ✅ Store lights properly after the season using reels or soft containers
- ✅ Consider upgrading older incandescent sets to energy-efficient LEDs
- ✅ Label repaired or modified strands for future reference
Frequently Asked Questions
Can I replace a fuse with a higher amp rating to stop it from blowing?
No. Doing so defeats the safety mechanism. A higher-rated fuse won’t blow when it should, risking wire overheating, insulation meltdown, or fire. Always use the exact replacement specified by the manufacturer.
Why do my lights blow a fuse only after being on for 10 minutes?
This often indicates a developing short or thermal expansion issue. As wires warm up, minor internal damage may expand and create contact where it shouldn’t. Unplug immediately and retire the strand—this is a fire hazard.
Are blown fuses more common in older light sets?
Yes. Over time, repeated bending, exposure to elements, and oxidation weaken connections. Older sets also tend to have thinner wiring and less robust construction. If a string needs new fuses every year, it’s time to replace it entirely.
Conclusion: Turn Frustration Into Festive Confidence
Blown fuses don’t have to be a holiday tradition. With a little knowledge and proactive care, you can diagnose the real reasons behind repeated failures and implement solutions that last. Whether it’s correcting an overload, repairing damaged wiring, or upgrading to modern LED technology, each step brings you closer to a safer, more reliable display.
Remember: every pop of a fuse is a warning sign worth heeding. Addressing it now protects your home, saves money on replacements, and ensures your lights shine brightly throughout the season—without interruption.


 浙公网安备
33010002000092号
浙公网安备
33010002000092号 浙B2-20120091-4
Comments
No comments yet. Why don't you start the discussion?