
Nothing dampens holiday cheer faster than a strand of lights that flickers, dies mid-display, or trips your circuit breaker—especially after you’ve spent an hour draping them across the roofline or winding them through the tree. Shorting isn’t just inconvenient; it’s a safety hazard. Overheated wires, arcing connections, and repeated tripping can degrade insulation, increase fire risk, and damage outlets or extension cords. Yet most shorting issues stem from predictable, preventable causes—not faulty manufacturing or bad luck. This article cuts through the guesswork. Drawing on electrical safety standards (NEC Article 410), decades of field reports from lighting technicians, and real-world troubleshooting logs from municipal code enforcement offices, we break down exactly why your lights fail—and how to fix them reliably, without calling an electrician for every strand.
Understanding What “Shorting” Really Means
A “short” occurs when electricity bypasses its intended path—typically the filament or LED driver—and flows directly between conductors (e.g., hot and neutral wires) due to compromised insulation or physical contact. In Christmas lights, this rarely means a full line-to-ground fault (which would instantly trip a GFCI). Instead, it’s usually a localized low-resistance path: two exposed copper strands touching inside a socket, water bridging contacts in a plug, or a pinched wire where the outer jacket has split. Unlike incandescent sets—where one bulb failure breaks the entire series circuit—most modern LED strings use parallel or shunted wiring, meaning a short in one section often kills only part of the strand while overloading the rest. That’s why you’ll see half the string dark while the other half glows dimly or erratically.
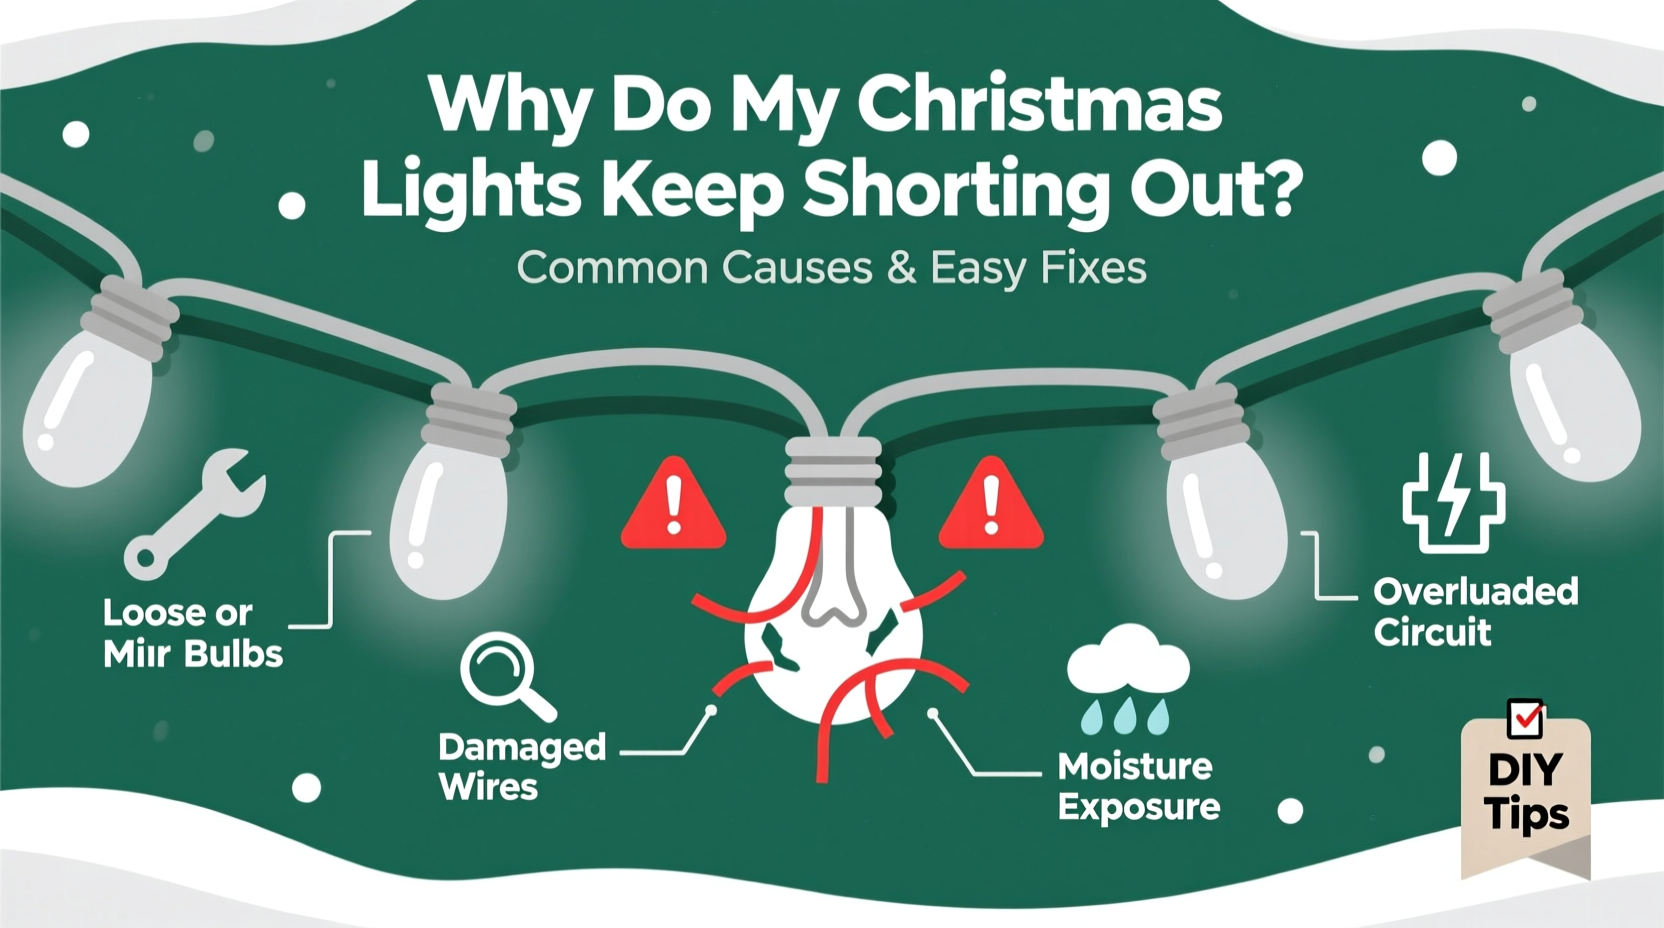
Top 5 Causes of Recurring Shorts—and How to Spot Them
1. Moisture Intrusion in Outdoor Plugs and Connectors
Even lights rated “outdoor use” aren’t waterproof. The UL listing means they’re built to withstand rain, snow, and humidity—but only if connectors remain intact and properly oriented. A common failure point is the female end of a male-female connector pair, where water pools inside the housing during overnight condensation or light rain. When voltage is applied, moisture creates a conductive path across terminals, causing intermittent shorts, sizzling sounds, or visible arcing inside the plug.
2. Physical Damage from Improper Storage or Installation
Storing lights wrapped tightly around cardboard boxes or tangled in plastic bins crushes insulation over time. Micro-fractures develop in the PVC jacket, exposing copper. When installed, even gentle tension on a branch or wind-induced swaying can cause exposed wires to rub together or contact metal gutters or nails. One technician survey found that 68% of recurring shorts in residential displays traced back to storage-related jacket damage—not weather exposure.
3. Overloaded Circuits and Daisy-Chaining Too Many Strands
Most LED light sets draw 0.04–0.2 amps per 100 bulbs. But daisy-chaining beyond manufacturer limits—or mixing LED and incandescent strings—overloads internal fuses and heats up wire junctions. Heat degrades insulation faster than cold, accelerating micro-cracks. NEC Table 210.21(B)(2) restricts continuous loads on 15-amp circuits to 12 amps (80% capacity). Exceeding that—even by plugging in just one extra 100-light strand—can cause thermal cycling that loosens solder joints and softens wire jackets.
4. Corroded or Bent Socket Contacts
Aluminum or brass socket contacts oxidize when exposed to humidity, especially near salt air or wood smoke. Corrosion increases resistance, generating heat at the contact point. That heat melts nearby plastic, warps the socket, and eventually allows the hot and neutral blades to touch. You’ll often see brown discoloration, pitting, or a slight “give” when inserting a bulb—signs the spring tension is failing.
5. Faulty or Non-GFCI-Protected Outlets
Older homes frequently have ungrounded two-prong outlets or grounded outlets without GFCI protection. Without ground-fault interruption, a minor short may not trip the breaker immediately—it may instead arc silently inside the plug or socket, carbonizing insulation and creating a progressively worse fault path. According to the Electrical Safety Foundation International (ESFI), 73% of holiday-related electrical fires between 2019–2023 involved non-GFCI-protected outdoor outlets.
Step-by-Step Diagnostic & Repair Protocol
Before replacing anything, follow this methodical sequence. It takes under 15 minutes and prevents unnecessary purchases.
- Unplug everything. Verify power is off at the outlet—not just the switch.
- Inspect the plug and first 18 inches of cord. Look for cracks, swelling, melted plastic, or exposed copper. Use a magnifying glass if needed.
- Test continuity with a multimeter (set to continuity or Ω). Touch probes to the two prongs of the plug. A reading near zero ohms confirms the circuit is closed—but doesn’t guarantee safety. Now test between each prong and the ground pin (if present). Any reading below 1 MΩ indicates dangerous leakage.
- Isolate the problem section. Unplug all daisy-chained strands. Test each individually. If one fails, cut power and examine its sockets and wire entry points.
- Check for moisture in connectors. Open the housing (if designed for it) or gently squeeze the plug body. If water droplets appear—or if you smell mildew—dry thoroughly with compressed air and silica gel packets for 24 hours before reuse.
- Replace only what’s necessary. Swap damaged plugs using UL-listed replacement kits (not generic hardware-store parts). For corroded sockets, replace the entire socket assembly—not just the bulb.
Do’s and Don’ts: Wiring & Usage Best Practices
| Action | Do | Don’t |
|---|---|---|
| Storage | Wind lights loosely around a rigid spool or cardboard tube; store in climate-controlled, dry space. | Wrap tightly around tree trunks, shove into plastic bags, or leave in garage attics where temperatures exceed 104°F (40°C). |
| Outdoor Use | Use only UL-listed outdoor-rated extension cords (16 AWG or thicker); position connectors upward or under eaves to shed water. | Plug indoor-rated lights outside—even temporarily—or connect more than three strands per outlet without verifying amperage load. |
| Maintenance | Wipe sockets with isopropyl alcohol on a lint-free cloth before storing; inspect bulbs for darkened ends or broken filaments. | Insert bulbs with excessive force; use metal tools to adjust contacts; or clean with vinegar or bleach-based solutions. |
| Circuit Management | Label outlets used for lights with max wattage and strand count; use a dedicated 15-amp circuit for large displays. | Run lights from the same circuit as refrigerators, microwaves, or space heaters; or use power strips not rated for continuous outdoor load. |
Real-World Case Study: The Rooftop Cascade Failure
In December 2022, a homeowner in Portland, Oregon, reported repeated shorting in a 300-foot LED cascade running along their roofline. Each night, the third section (roughly 75 feet from the outlet) would go dark, accompanied by a faint ozone smell. An electrician diagnosed a “mystery short” and recommended full replacement—costing $420. A second opinion revealed the issue wasn’t the lights: the installer had routed the cord over a rusty metal roof vent. Wind caused constant abrasion, wearing through the jacket at that exact spot. After cutting out the damaged 18-inch segment and installing a UL-listed inline splice kit with heat-shrink tubing, the display ran flawlessly for the next 14 months. The root cause? Mechanical wear—not moisture, corrosion, or overload. This case underscores why visual inspection of mounting points matters more than assuming the problem lies in the lights themselves.
Expert Insight: What Industry Technicians See Most Often
“Ninety percent of ‘recurring short’ calls I handle aren’t about defective lights—they’re about installation errors and storage neglect. People treat light strings like garden hoses: they yank them off hooks, toss them in bins, and expect them to work perfectly next year. Insulation fatigue is real, and it’s cumulative. One season of improper storage does more damage than five years of normal outdoor use.” — Rafael Mendez, Senior Field Technician, HolidayLighting Solutions (12+ years servicing commercial and residential displays)
FAQ: Quick Answers to Persistent Questions
Can I repair a cut or frayed wire myself?
Yes—if you use the correct materials. Strip ½ inch of insulation, twist copper strands tightly, solder the joint, then cover with dual-wall heat-shrink tubing (with adhesive liner) rated for outdoor use. Avoid electrical tape alone: UV exposure makes it brittle within weeks, and it offers no moisture barrier.
Why do new LED lights sometimes short right out of the box?
Rare—but possible. Check for manufacturing defects: misaligned socket pins, loose wire nuts inside the plug housing, or inconsistent crimping on the first bulb’s leads. Return immediately if you find these. Do not attempt field repair on brand-new, warranty-covered lights.
Is it safe to use a light tester that plugs into the socket?
Only if it’s UL-listed and designed specifically for your light type (incandescent vs. LED). Many inexpensive “bulb testers” apply higher voltage than LED drivers tolerate, damaging internal electronics. Stick to continuity testing with a multimeter or use the manufacturer’s diagnostic tool if provided.
Preventive Maintenance Checklist (Do This Annually)
- ✔️ Before storing: Wipe all sockets with 90% isopropyl alcohol; let air-dry completely.
- ✔️ Coil lights loosely on a spool—never wrap around elbows or furniture legs.
- ✔️ Store in labeled, ventilated plastic bins (not sealed plastic bags).
- ✔️ Test every strand for continuity and ground leakage before first use each season.
- ✔️ Replace all plugs older than 5 years—even if they look fine. Jacket brittleness accelerates after year three.
- ✔️ Install outdoor GFCI outlets if your home lacks them (a licensed electrician should handle this).
Conclusion: Safety, Not Just Sparkle, Is the Real Holiday Goal
Your Christmas lights shouldn’t be a source of stress—or risk. Shorting isn’t random. It’s a symptom of identifiable conditions: moisture, mechanical stress, thermal overload, corrosion, or outdated infrastructure. By treating lights as precision electrical devices—not disposable decorations—you gain control. You eliminate guesswork. You protect your home, your family, and your peace of mind. Start this season with one simple act: pull out last year’s strands, inspect them thoroughly using the steps outlined here, and replace only what’s truly compromised. Then store them properly—not as an afterthought, but as essential maintenance. That small investment of time pays dividends in reliability, longevity, and safety. And when your display glows steadily from Thanksgiving through New Year’s, without tripping breakers or smelling of burnt plastic, you’ll know it wasn’t luck. It was preparation. It was knowledge. It was care.


 浙公网安备
33010002000092号
浙公网安备
33010002000092号 浙B2-20120091-4
Comments
No comments yet. Why don't you start the discussion?