
Baking cookies should be a joyful experience—pulling golden, soft-centered treats from the oven that hold their shape and taste just like you remember. But if your cookies consistently turn into flat, greasy puddles on the baking sheet, you're not alone. Cookie spreading is one of the most common frustrations in home baking. The good news? It's almost always preventable with the right techniques and understanding of what’s happening in your dough.
Cookies spread when the fat melts faster than the structure can set, allowing the dough to flatten before it bakes through. While a little spread is normal, excessive flattening ruins texture, appearance, and even flavor balance. By identifying the root causes—from ingredient ratios to oven behavior—you can regain control and bake cookies that rise slightly, hold their shape, and deliver consistent results.
Understanding Why Cookies Spread: The Science Behind the Spread
Cookies are a delicate balance of ingredients, each playing a critical role in texture and structure. When this balance is disrupted, spreading becomes inevitable. At its core, cookie spread happens due to the interplay between fat, sugar, flour, eggs, and leavening agents during baking.
Fat—usually butter—is essential for flavor and tenderness, but it also melts under heat. If the butter melts too quickly, the dough collapses before the proteins in the flour and eggs have time to coagulate and form a stable structure. Sugar contributes to spread by liquefying as it heats and delaying gluten development. Leavening agents like baking soda or powder create air bubbles that expand when heated, which can increase spread if not balanced with enough structure-building ingredients.
Temperature is another major factor. Warm dough goes into the oven already partially melted, giving the fat a head start on spreading. Room-temperature butter creamed with sugar traps air, which expands in the oven—but if the dough isn’t chilled, that expansion turns into runaway flattening.
“Cookie spread isn't random—it's chemistry in action. Control the melt rate of your fat and the strength of your structure, and you control the outcome.” — Dr. Linda Park, Food Scientist & Baking Researcher, Culinary Institute of America
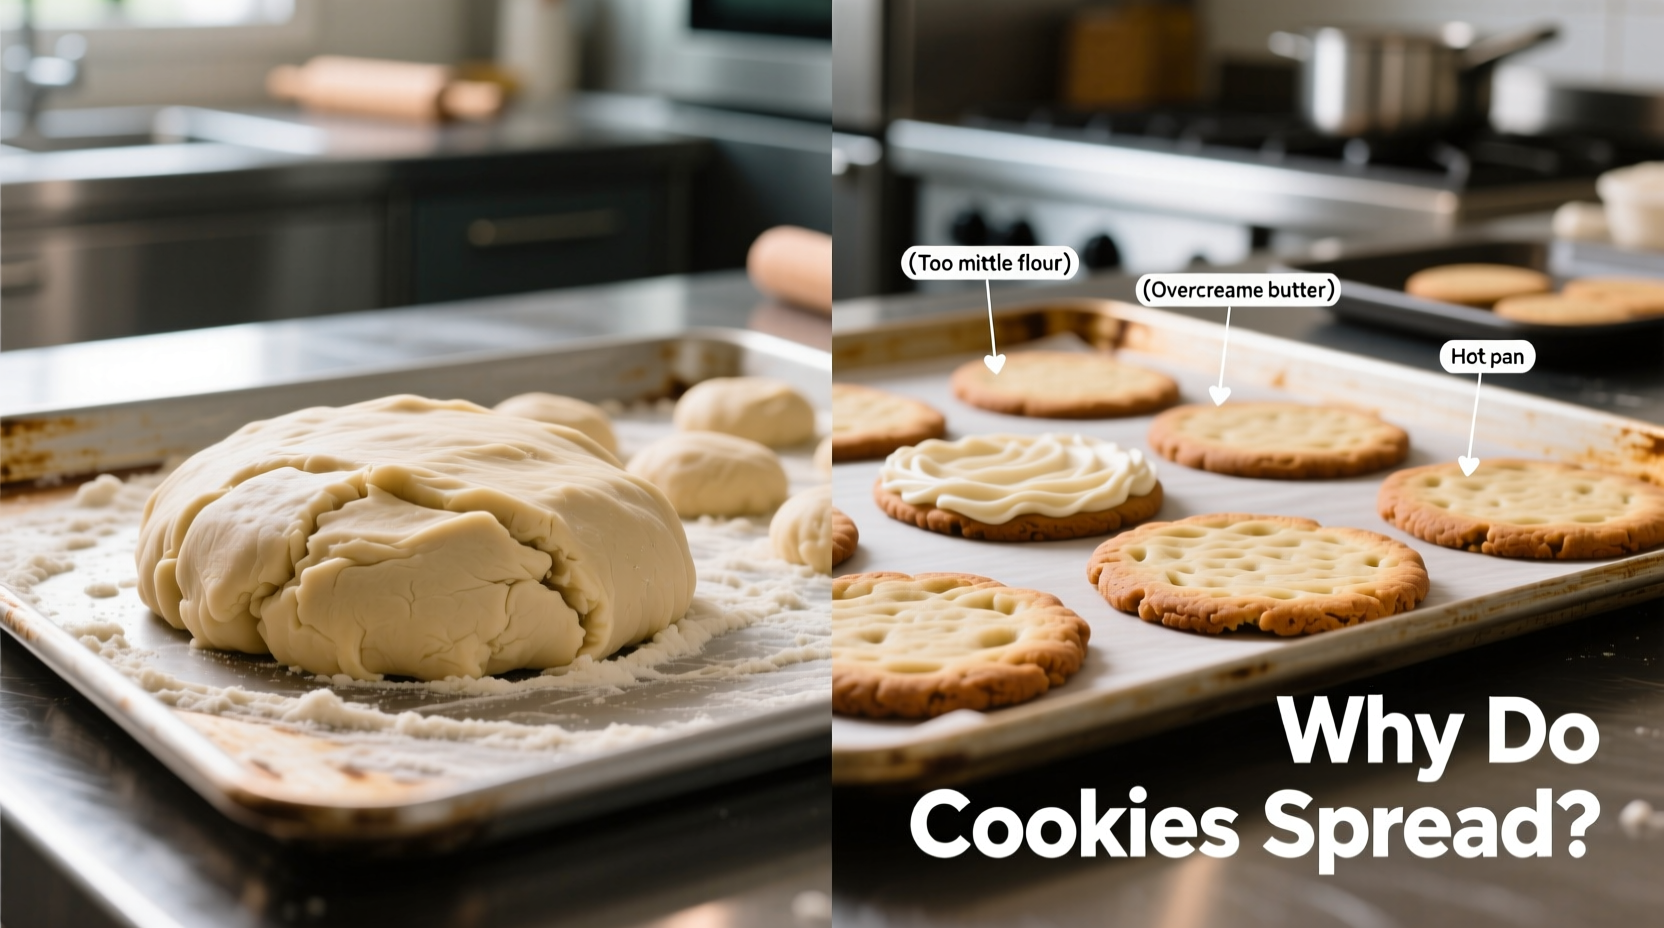
Key Factors That Cause Excessive Spreading (And How to Fix Them)
Solving cookie spread starts with diagnosing the cause. Below are the most frequent culprits and their fixes.
1. Butter Temperature Is Too High
Using warm or melted butter accelerates spread because it begins melting the moment it hits the oven. For chewy or cakey cookies, softened butter (around 65°F) is ideal. For thicker, more structured cookies, consider using cold butter grated into the flour to delay melting.
2. Insufficient Flour or Incorrect Measurement
Too little flour means less structure. Many home bakers scoop flour directly from the bag, packing it down and creating inconsistencies. This leads to either too much or too little flour, both of which affect spread.
Use the spoon-and-level method: lightly spoon flour into your measuring cup, then level off with a knife. Better yet, use a kitchen scale—1 cup of all-purpose flour weighs about 120 grams.
3. Overcreaming Butter and Sugar
Creaming incorporates air, which helps cookies rise. But overmixing after adding eggs or continuing to beat the butter-sugar mixture too long creates excess air and warms the butter further, promoting spread.
Mix butter and sugar only until light and fluffy—about 2–3 minutes. Once eggs and dry ingredients are added, mix just until combined.
4. Using Melted Butter Instead of Softened
Some recipes call for melted butter for chewier textures, but this dramatically increases spread unless balanced with extra flour, cornstarch, or chilling. If you prefer melted butter, chill the dough for at least 2 hours before baking.
5. Dough Isn’t Chilled Before Baking
Chilling dough solidifies the fat, so it melts more slowly in the oven. This gives the flour and eggs time to set the structure before the butter fully liquefies. Skipping this step is a primary reason for flat cookies.
Even 30 minutes in the refrigerator makes a difference. For best results, chill dough for 1–2 hours or overnight.
6. Oven Temperature Is Off
An oven that runs too cool allows cookies to spread before they set. Use an oven thermometer to verify accuracy. Most cookies bake best at 350°F (175°C). If your oven runs hot or cold, adjust accordingly.
Step-by-Step Guide to Prevent Cookie Spread
Follow this proven process to bake cookies that hold their shape and deliver perfect texture.
- Weigh or measure flour accurately. Use a scale or the spoon-and-level method to ensure consistent structure.
- Use properly softened butter. It should indent slightly when pressed but not feel oily or melty.
- Cream butter and sugar briefly. Stop once the mixture is pale and fluffy—no longer.
- Add eggs one at a time. Mix just until incorporated to avoid over-aerating.
- Chill the dough for at least 1 hour. This is non-negotiable for thick, bakery-style cookies.
- Preheat your oven with an oven thermometer. Ensure it reaches the correct temperature before baking.
- Space cookies evenly on the baking sheet. Leave at least 2 inches between each to allow for minimal, controlled spread.
- Bake one tray at a time in the center rack. This ensures even heat distribution.
- Let cookies rest on the sheet for 5 minutes after baking. They continue to set as they cool.
Do’s and Don’ts: Quick Reference Table
| Do | Don't |
|---|---|
| Chill dough for 1–2 hours (or overnight) | Bake with warm, unchilled dough |
| Use a kitchen scale for flour | Scoop flour directly from the bag |
| Verify oven temperature with a thermometer | Assume your oven is accurate |
| Use parchment paper or silicone mats | Grease the baking sheet (adds extra fat) |
| Replace old baking soda/powder | Use expired leaveners (can cause uneven rise) |
| Let cookies cool on the tray briefly | Transfer cookies immediately (they may break) |
Mini Case Study: From Flat to Fabulous
Sarah, a home baker from Portland, struggled for years with her chocolate chip cookies turning into thin, crispy disks. She followed a popular online recipe to the letter but couldn’t understand why her results never matched the photos. After tracking her process, she realized three issues: she was scooping flour directly from the bag (packing it tightly), using butter straight from the microwave (partially melted), and skipping the chilling step because “it wasn’t in the original instructions.”
She revised her method: weighing flour, using properly softened butter, and chilling the dough for 90 minutes. The result? Thick, chewy centers with crisp edges—exactly what she wanted. Her cookies now hold their domed shape and have become a hit at family gatherings.
Her breakthrough wasn’t a new recipe—it was mastering technique.
Expert Tips to Enhance Structure and Reduce Spread
Beyond basic adjustments, several advanced techniques can help you fine-tune your cookies for optimal shape and texture.
- Add cornstarch. Replacing 1–2 tablespoons of flour with cornstarch creates a softer, thicker cookie with less spread.
- Use bread flour for more gluten. Bread flour has higher protein content, which strengthens structure. Substitute up to half the all-purpose flour.
- Incorporate an egg yolk. Extra yolk adds fat and emulsifiers that improve texture and stability without increasing spread.
- Bake on insulated or light-colored pans. Dark or thin pans absorb heat faster, causing bottoms to cook too quickly and edges to spread.
- Roll dough balls taller than wide. Forming them into cylinders rather than spheres reduces surface contact with the pan, minimizing spread.
Frequently Asked Questions
Can I fix cookie dough that’s already mixed and too soft?
Yes. If the dough feels greasy or warm, cover and refrigerate for at least 1 hour. If it’s still spreading excessively, gradually work in 1–2 tablespoons of flour until it holds shape. Avoid adding too much, as this can make cookies dry.
Why do my cookies spread more on some baking sheets than others?
Different materials conduct heat differently. Thin, dark metal pans heat up quickly and can cause rapid fat melt and increased spread. Opt for heavy-gauge, light-colored aluminum or insulated baking sheets. Always line with parchment or a silicone mat—never grease the pan, as extra fat worsens spread.
Does altitude affect cookie spread?
Yes. At high altitudes, lower atmospheric pressure causes liquids to evaporate faster and leavening gases to expand more. This can lead to faster spread and drier cookies. To compensate, reduce sugar slightly, increase flour by 1–2 tablespoons per cup, and chill the dough longer. Baking time may also need adjustment.
Checklist: How to Stop Your Cookies from Spreading
Use this checklist before your next batch to ensure success:
- ☐ Weigh or properly measure flour (spoon-and-level)
- ☐ Use butter at correct temperature (softened, not melted)
- ☐ Cream butter and sugar only until fluffy (2–3 min)
- ☐ Chill dough for at least 1 hour (preferably 2+)
- ☐ Preheat oven and verify temperature with thermometer
- ☐ Line baking sheet with parchment or silicone mat
- ☐ Scoop dough into tall mounds, not flat balls
- ☐ Bake one tray at a time in center of oven
- ☐ Cool cookies on sheet for 5 minutes before transferring
Conclusion: Take Control of Your Cookies
Flat cookies don’t mean you’re a bad baker—they mean you’ve encountered a common challenge with a clear solution. By understanding the science behind spreading and applying precise techniques, you can transform your baking results. Small changes—like chilling the dough, measuring flour correctly, or verifying oven temperature—make a dramatic difference.
The perfect cookie isn’t about luck. It’s about consistency, attention to detail, and willingness to refine your process. Now that you know how to stop excessive spread, bake with confidence. Try adjusting one variable at a time, take notes, and soon you’ll have a signature cookie that’s thick, flavorful, and beautifully shaped.


 浙公网安备
33010002000092号
浙公网安备
33010002000092号 浙B2-20120091-4
Comments
No comments yet. Why don't you start the discussion?