
Baking the perfect cookie—golden around the edges, soft in the center, with a slightly crisp exterior and chewy interior—is one of the small joys of home baking. Yet, many bakers face the same frustrating issue: their cookies spread into thin, greasy puddles on the baking sheet, losing shape and texture. The good news is that excessive spreading and lack of thickness are not random failures. They stem from identifiable causes, most of which are easily corrected with minor adjustments to ingredients, technique, or equipment.
Understanding why cookies spread—and how to prevent it—empowers you to consistently bake cookies with thick, bakery-style edges and a satisfying bite. This guide breaks down the science behind cookie spread, explores the factors that influence thickness, and provides actionable solutions for better results.
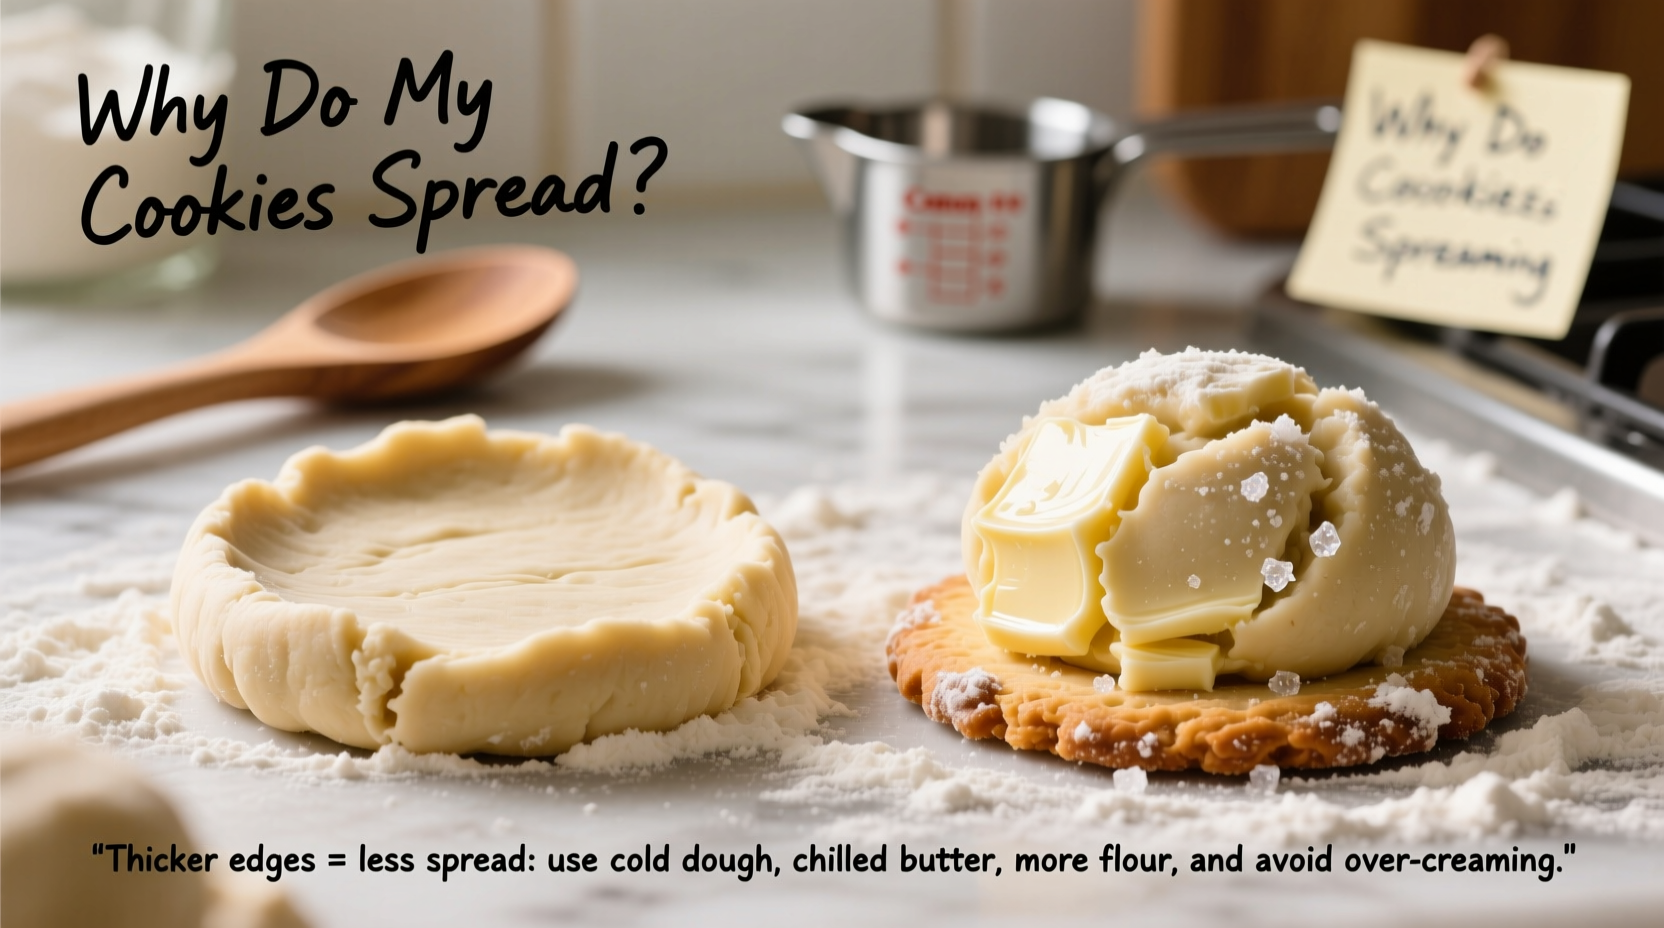
The Science Behind Cookie Spread
Cookies spread during baking due to a combination of heat, fat content, and structure (or lack thereof). When placed in a hot oven, the butter in the dough melts quickly. If the dough lacks enough structural integrity—such as from flour, eggs, or proper chilling—the melted fat causes the dough to collapse outward rather than set in place.
The balance between fat, sugar, flour, leavening agents, and moisture determines how a cookie behaves under heat. High-fat doughs, especially those made with softened or melted butter, are more prone to spreading. Similarly, excessive sugar increases liquidity and delays crust formation, allowing the dough to flatten further before setting.
Temperature plays a crucial role. Cold dough holds its shape longer because the butter takes more time to melt, giving the flour and eggs time to set the structure. Conversely, room-temperature or warm dough begins melting immediately upon contact with the hot pan, accelerating spread.
Common Causes of Excessive Cookie Spread
Several common mistakes contribute to flat, over-spread cookies. Identifying which factor applies to your process is key to fixing the problem.
1. Butter Temperature Is Too High
Using butter that’s too soft—or worse, melted—leads to immediate fat release in the oven. Even if the recipe calls for “softened” butter, it should still hold its shape when pressed, not be oily or melty.
2. Insufficient Flour or Improper Measuring
Too little flour means less structure. Many home bakers scoop flour directly from the bag, which compacts it and leads to under-measurement by volume. A cup of spooned-and-leveled flour can weigh 20% less than a scooped cup, drastically altering the dough’s consistency.
3. Overmixing After Adding Flour
While creaming butter and sugar is essential, overmixing after adding flour develops gluten, which can cause spreading. More importantly, overmixing incorporates excess air, which expands and then collapses during baking, contributing to flattening.
4. Hot Baking Sheets or Oven Temperature Inaccuracy
Placing dough on a warm tray starts the melting process prematurely. Likewise, an oven that runs too hot will melt butter before the cookie sets; one that runs too cool may delay setting, leading to prolonged spread.
5. Sugar Composition Imbalance
Granulated sugar liquefies more readily than brown sugar, which contains moisture and acidity that help retain structure. Recipes with too much granulated sugar relative to brown sugar tend to spread more.
“Temperature control is the single most important factor in controlling cookie spread. From butter to dough to baking sheet—even ambient kitchen temperature—every degree matters.” — Dr. Linda Park, Food Scientist & Culinary Researcher
How to Achieve Thicker Edges and Less Spread
Thick, defined edges are the hallmark of a well-structured cookie. These edges form when the outer layer sets quickly while the center remains soft, creating contrast in texture. Here’s how to build that ideal profile.
Chill the Dough
Refrigerating the dough firms up the butter, delaying melt and giving the cookie time to rise before spreading. For best results, chill dough for at least 1 hour. Overnight chilling enhances flavor depth and reduces spread even further.
Use the Right Butter Consistency
For creamed cookies, aim for butter at 65°F (18°C)—cool to the touch but yielding to pressure. Avoid microwaving butter; instead, cut it into cubes and let it sit at room temperature for 30–45 minutes.
Increase Flour Slightly
If your recipe consistently spreads, try increasing the flour by 1–2 tablespoons per cup. Use the spoon-and-level method: gently spoon flour into the measuring cup and level off with a knife. Do not tap or pack.
Add an Extra Egg Yolk
An extra egg yolk adds fat and emulsifiers that improve structure without making the cookie cakey. It contributes to a denser, chewier texture and helps the dough hold its shape.
Bake on Parchment-Lined, Cool Sheets
Always line baking sheets with parchment paper to ensure even browning and easy release. Never reuse a hot sheet—allow it to cool completely or run it under cold water and dry it before placing new dough on it.
Actionable Checklist for Thicker, Less-Spread Cookies
Follow this checklist before baking to maximize your chances of success:
- ✅ Weigh ingredients with a kitchen scale for accuracy (ideal)
- ✅ Use spoon-and-level method if measuring by volume
- ✅ Cream butter and sugar just until light and fluffy (1–2 minutes)
- ✅ Avoid overmixing after adding dry ingredients
- ✅ Chill dough for at least 30–60 minutes (longer for better results)
- ✅ Preheat oven fully and verify temperature with an oven thermometer
- ✅ Use cool, parchment-lined baking sheets
- ✅ Bake one sheet at a time in the center rack for even heat
- ✅ Remove cookies when edges are golden but centers still look soft
- ✅ Let cookies rest on the sheet for 5 minutes before transferring
Do’s and Don’ts: A Comparison Table
| Do | Don't |
|---|---|
| Chill dough for 1 hour before baking | Use melted butter unless the recipe specifically calls for it |
| Weigh flour (120g per cup) or spoon-and-level | Scoop flour directly from the bag |
| Use real butter with 80% fat content | Substitute margarine or low-fat spreads |
| Preheat oven and use an oven thermometer | Bake on a hot tray fresh from the dishwasher |
| Add an extra egg yolk for chewiness | Overbake trying to “crisp up” soft centers |
| Space dough balls 2–3 inches apart | Crowd the pan to save time |
Mini Case Study: From Flat to Fabulous
Sarah, an avid home baker in Portland, struggled for months with her chocolate chip cookies turning into large, thin crisps. She followed a popular online recipe to the letter but couldn’t understand why her cookies looked nothing like the photos. After tracking her process, she discovered three issues: she was using melted butter for quicker prep, scooping flour from the bag (adding ~15% less), and baking on warm trays pulled straight from the sink.
She revised her method: she softened butter properly, measured flour accurately, chilled the dough overnight, and cooled each tray between batches. The result? Thick, bakery-style cookies with crisp, caramelized edges and soft centers. Her friends thought she’d switched recipes—she hadn’t. She’d simply fixed the variables affecting spread.
Step-by-Step Guide to Baking Thicker Cookies
Follow these steps to consistently produce cookies with thicker edges and controlled spread:
- Prepare Ingredients Correctly: Bring butter to cool room temperature. Measure flour precisely using a scale or spoon-and-level method.
- Cream Butter and Sugar: Beat on medium speed for 1–2 minutes until pale and fluffy. Do not over-cream.
- Mix in Wet Ingredients: Add eggs one at a time, then vanilla. Mix just until combined.
- Incorporate Dry Ingredients: Gradually add flour, baking soda, and salt. Mix only until no streaks remain.
- Chill the Dough: Cover and refrigerate for at least 1 hour, preferably 2–24 hours.
- Preheat Oven and Prepare Sheets: Set oven to 375°F (190°C). Line two baking sheets with parchment. Keep one in the fridge while using the other.
- Portion and Space: Scoop dough into 2-tablespoon balls. Place at least 2 inches apart.
- Bake One Sheet at a Time: Center rack, 10–12 minutes, until edges are golden but centers are still soft.
- Cool Properly: Let cookies sit on the sheet for 5 minutes to set, then transfer to a wire rack.
- Store Correctly: Keep in an airtight container at room temperature for up to 5 days.
Frequently Asked Questions
Can I fix already-too-flat cookie dough?
If you realize your dough is too soft or has been sitting out too long, place it back in the refrigerator for 30–60 minutes. You can also mix in 1–2 tablespoons of flour to reinforce structure. Avoid adding flour if the dough is already chilled and firm.
Why do some recipes call for melted butter if it causes spread?
Melted butter creates a chewier, denser texture and enhances flavor distribution. However, these recipes often include more flour, cornstarch, or chilled dough steps to counteract spread. They’re designed differently than creamed-butter cookies.
Does altitude affect cookie spread?
Yes. At high altitudes, lower air pressure causes liquids to evaporate faster and leavening gases to expand more quickly. This can lead to faster spread and drier cookies. To adjust, reduce sugar by 1–2 tablespoons, increase flour by 1–2 tablespoons, and slightly reduce baking soda.
Final Thoughts: Master Your Cookies
Cookie spread isn’t a mystery—it’s physics and chemistry in action. By understanding how ingredients interact under heat and adjusting your technique accordingly, you gain full control over texture and appearance. Thick edges aren’t reserved for professional bakeries; they’re achievable in any kitchen with attention to detail.
The next time you pull a batch from the oven, notice how the edges caramelize first, forming a delicate shell around a tender center. That contrast—the hallmark of a great cookie—comes not from luck, but from intention. From accurate measuring to proper chilling, every step shapes the final result.


 浙公网安备
33010002000092号
浙公网安备
33010002000092号 浙B2-20120091-4
Comments
No comments yet. Why don't you start the discussion?