
Baking cookies is both a science and an art. When they emerge from the oven flat, thin, and barely recognizable as cookies, it’s more than just disappointing—it’s puzzling. You followed the recipe, measured carefully, and still ended up with puddles of dough instead of soft, chewy treats. Excessive spreading is one of the most common cookie-baking frustrations, but it’s also one of the most solvable. Understanding the root causes behind why your cookies spread too much allows you to make precise adjustments that consistently yield perfect results.
The Science Behind Cookie Spreading
Cookies spread when the dough melts faster than the structure can set. This happens due to a balance—or imbalance—between fat, sugar, flour, eggs, and leavening agents. As the butter heats, it liquefies. If the dough hasn’t developed enough structure through protein (from flour and eggs) or hasn’t chilled sufficiently, the melted fat pulls the dough outward across the baking sheet.
Heat transfer plays a crucial role. A hot oven may cause rapid melting before the proteins coagulate and starches gelatinize. Conversely, an oven that runs too cool may prolong the melting phase without setting the edges quickly enough. The type of fat used—butter versus shortening—also influences spread because butter contains water that turns to steam, while shortening is 100% fat and remains stable longer.
“Cookie texture hinges on temperature control—both of your ingredients and your oven. Even a few degrees off can shift the outcome from thick and chewy to flat and greasy.” — Dr. Linda Chen, Food Scientist & Baking Consultant
Common Causes of Excessive Cookie Spread
Several factors contribute to over-spreading. Often, it’s not one single mistake but a combination of small oversights that add up. Below are the most frequent culprits:
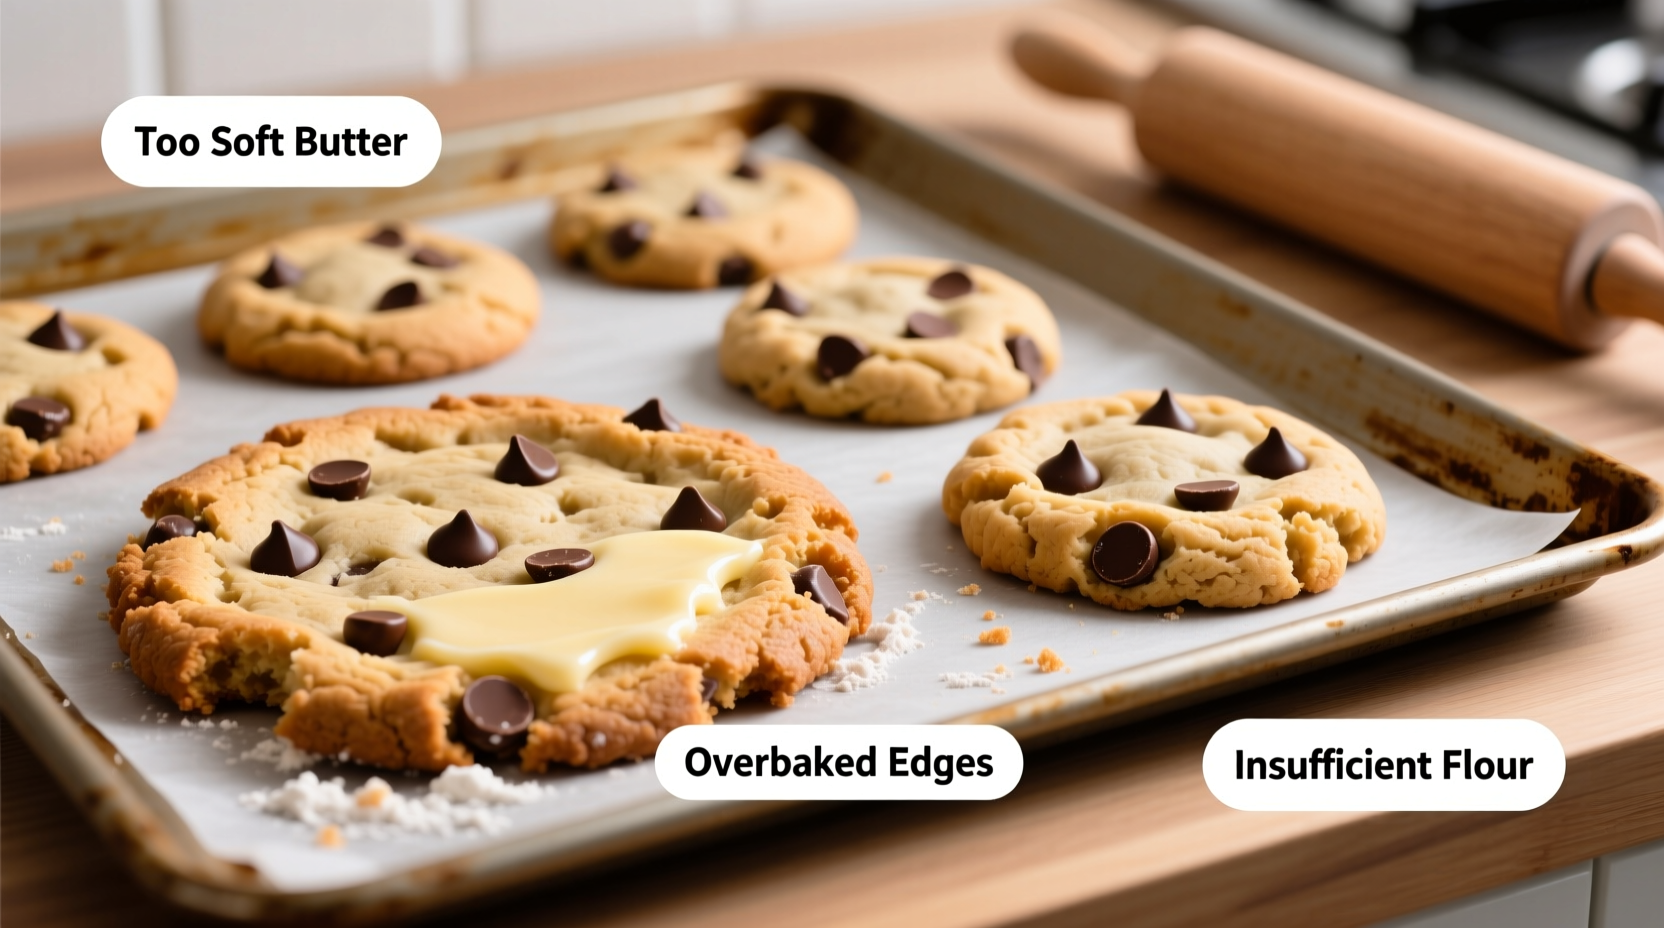
- Butter that’s too soft or melted: Starting with melted butter means the fat is already liquid, so it spreads immediately in the oven.
- Incorrect flour measurement: Too little flour reduces structure. Scooping directly from the bag compacts it, leading to inconsistent ratios.
- Oven temperature inaccuracy: Many home ovens run hotter or cooler than displayed, affecting how quickly dough sets.
- Warm dough: Room-temperature or warm dough begins melting the moment it hits the heat, accelerating spread.
- Overuse of sugar: Granulated sugar liquefies when heated; too much leads to thinner cookies.
- Leaving out chilling time: Chilling solidifies the fat, delaying melt and giving structure time to form.
- Using dark-colored or non-insulated baking sheets: These conduct heat faster, increasing bottom heat and speeding up spread.
Step-by-Step Guide to Prevent Over-Spreading
Fixing cookie spread isn’t about guesswork—it’s about systematic adjustment. Follow this sequence to improve your next batch:
- Chill your dough for at least 30 minutes (or up to 72 hours): Cold dough delays fat melting, allowing edges to set before spreading occurs.
- Use room-temperature eggs, but cold butter: Softened butter should leave a slight indentation when pressed—not oily or melted.
- Measure flour accurately: Spoon flour into the measuring cup and level it off, or better yet, use a digital scale.
- Add 1–2 tablespoons of extra flour: This boosts gluten development and structure, especially in humid environments.
- Preheat your oven fully and use an oven thermometer: Ensure accuracy; many ovens are off by 25°F or more.
- Bake on light-colored aluminum sheets: They reflect heat better than dark pans, preventing premature browning and spread.
- Space cookies properly: Leave at least 2 inches between dough balls to allow for even heat circulation.
- Rotate the pan halfway through baking: Promotes even cooking, especially in ovens with hot spots.
Do’s and Don’ts: Baking Sheet & Pan Choices
| Choice | Do | Don't |
|---|---|---|
| Pan Color | Use light-colored aluminum sheets | Avoid dark non-stick or black pans—they absorb too much heat |
| Pan Material | Opt for heavy-duty half-sheet pans (18x13 inches) | Skip warped or thin cookie trays that heat unevenly |
| Lining | Line with parchment paper or silicone mats | Never grease the pan unless specified—grease increases spread |
| Cooling | Let cookies rest on the pan for 2–3 minutes before transferring | Don’t leave them on the hot pan too long or they’ll continue cooking and harden |
Real Example: From Flat Flops to Bakery-Quality Cookies
Sarah, a home baker in Portland, struggled for months with her chocolate chip cookies turning into lacy, crispy discs. She followed a popular online recipe to the letter but couldn’t understand why her cookies never held their shape. After tracking variables, she discovered three key issues: her butter was nearly melted when she started mixing, her oven ran 35°F hotter than shown, and she was scooping flour directly from the bag, resulting in 150g per cup instead of 120g.
She adjusted by refrigerating her butter slightly before creaming, using a scale for flour, and buying an oven thermometer. She also began chilling her dough for two hours before baking. The result? Thick, soft-centered cookies with golden edges—exactly what she’d wanted. Her secret now? “I never skip the chill, and I check my oven monthly.”
Expert Adjustments for Different Cookie Types
Not all cookies should behave the same. Texture goals vary: crisp lace cookies are meant to spread, while peanut butter or thumbprint cookies need to hold shape. Here’s how to tailor your approach:
- Chocolate Chip: Chill dough 30+ minutes. Use a mix of butter and shortening for controlled spread.
- Sugar Cookies: Roll and cut chilled dough. Add 1 extra egg yolk for richness and stability.
- Oatmeal Cookies: Toast oats first to reduce moisture; include a tablespoon of cornstarch to improve structure.
- Snickerdoodles: Cream butter and sugar thoroughly but avoid over-beating. Roll in cinnamon-sugar just before baking.
- Gluten-Free Cookies: Add xanthan gum (¼ tsp per cup of flour) to mimic gluten’s binding power.
Troubleshooting Checklist
Before you bake, run through this checklist to prevent spreading issues:
- ✅ Butter is softened, not melted
- ✅ Flour is measured correctly (spooned and leveled or weighed)
- ✅ Dough has been chilled for at least 30 minutes
- ✅ Oven is fully preheated and verified with a thermometer
- ✅ Baking sheets are light-colored and lined with parchment or silicone
- ✅ Cookies are spaced 2 inches apart
- ✅ Leavening agents (baking soda/powder) are fresh (test baking soda with vinegar)
Frequently Asked Questions
Can I rescue dough that’s already too soft?
Yes. If your dough is warm or sticky, portion it onto a tray and freeze for 15–20 minutes before baking. This resets the fat temperature and improves structure.
Why do my cookies spread more the second batch?
The baking sheet retains heat from the first batch, causing the second round of dough to start melting immediately. Let the pan cool completely or use a second sheet to alternate.
Does altitude affect cookie spread?
Yes. At higher elevations, lower air pressure causes liquids to evaporate faster and leavening gases to expand more. Reduce sugar by 1–2 tablespoons, increase flour by 1–2 tbsp, and chill dough longer to compensate.
Final Tips for Consistent, Perfect Cookies
Great cookies come down to consistency and attention to detail. Keep a baking journal noting ingredient temperatures, oven settings, and outcomes. Small changes compound over time into mastery. Rotate your pans, test your tools, and don’t rush the process. Baking is iterative—each batch teaches you something new.
One often-overlooked factor is humidity. On damp days, flour absorbs moisture from the air, altering its behavior. Store flour in airtight containers and consider adding an extra tablespoon if your kitchen feels muggy. Similarly, brown sugar hardens when exposed to air, changing how it creams with butter. Always pack it firmly and refresh hardened sugar with a slice of bread overnight.
“The best bakers aren’t those who never fail—they’re the ones who diagnose every outcome and adjust with precision.” — Marcus Reed, Pastry Chef & Instructor at Lakeview Culinary Academy
Conclusion: Take Control of Your Cookie Texture
Excessive cookie spread isn’t random—it’s a signal. It tells you that fat melted too fast, structure was too weak, or temperature wasn’t managed. Now that you know the real reasons behind the problem, you’re equipped to fix it permanently. Whether you prefer soft and puffy or crisp and thin, the power is in your hands. Apply these principles consistently, keep experimenting, and soon your cookies won’t just taste amazing—they’ll look bakery-perfect, too.


 浙公网安备
33010002000092号
浙公网安备
33010002000092号 浙B2-20120091-4
Comments
No comments yet. Why don't you start the discussion?