
Plucking your eyebrows is one of the most accessible and affordable ways to groom facial hair, but many people end up frustrated by asymmetry or uneven results. What starts as a quick beauty routine can quickly spiral into over-plucked arches, mismatched tails, or brows that appear lopsided. The good news: uneven brows are not permanent, and with the right approach, you can correct and maintain balanced, flattering shapes. Understanding why asymmetry occurs—and how to fix it—is essential for anyone who wants polished, natural-looking eyebrows.
The Science Behind Eyebrow Asymmetry
Facial asymmetry is completely normal. No human face is perfectly symmetrical, and this includes the brow bones, eye placement, and even hair growth patterns. When you pluck your eyebrows without accounting for these natural variations, you risk exaggerating imbalances rather than correcting them. For example, one eyebrow may naturally sit slightly higher than the other, or one side might have denser hair growth. If you pluck both brows using the same template, you're likely to end up with visibly uneven results.
Eyebrow shaping also depends on bone structure. The orbital ridge—the bony area beneath your eyes—can vary in height and width from one side to the other. This affects where the arch should ideally peak and how much hair to remove above or below the brow line. Ignoring these structural differences leads to brows that don’t frame the face evenly, even if they appear neat in isolation.
Common Mistakes That Cause Uneven Brows
Even experienced groomers make errors that lead to unevenness. Recognizing these pitfalls is the first step toward avoiding them:
- Over-plucking one side: It’s easy to focus more on one brow, especially if one side feels coarser or appears bushier. Without checking balance regularly, you may thin one brow excessively.
- Using outdated tools: Dull tweezers can break hairs instead of removing them cleanly, leading to ingrown hairs and patchiness that disrupt symmetry.
- Shaping while emotions affect perception: Stress, fatigue, or poor lighting can distort how you see your brows. Plucking late at night or when tired often results in hasty decisions and over-correction.
- Following generic diagrams blindly: Many online guides show “ideal” brow shapes based on face shape, but they rarely account for individual asymmetries. Applying those templates uniformly can worsen imbalance.
- Ignoring growth cycles: Hair grows in phases. Some areas may be fuller simply because they’re in an active growth phase, not because they require constant thinning.
“Symmetry in brows isn’t about making both sides identical—it’s about creating visual harmony with the rest of the face.” — Lila Chen, Master Brow Artist & Educator
Step-by-Step Guide to Shaping Symmetrical Eyebrows
Creating balanced brows requires patience, precision, and a methodical approach. Follow this timeline to shape your eyebrows correctly and consistently:
- Wait for optimal conditions: Choose a time when you’re well-rested and natural daylight is available. Avoid shaping right after a shower when skin is puffy.
- Cleanse and dry your face: Remove all makeup and oils so you can see each hair clearly.
- Brush brows into place: Use a spoolie brush to comb hairs upward and outward. This reveals the true shape and any stray hairs.
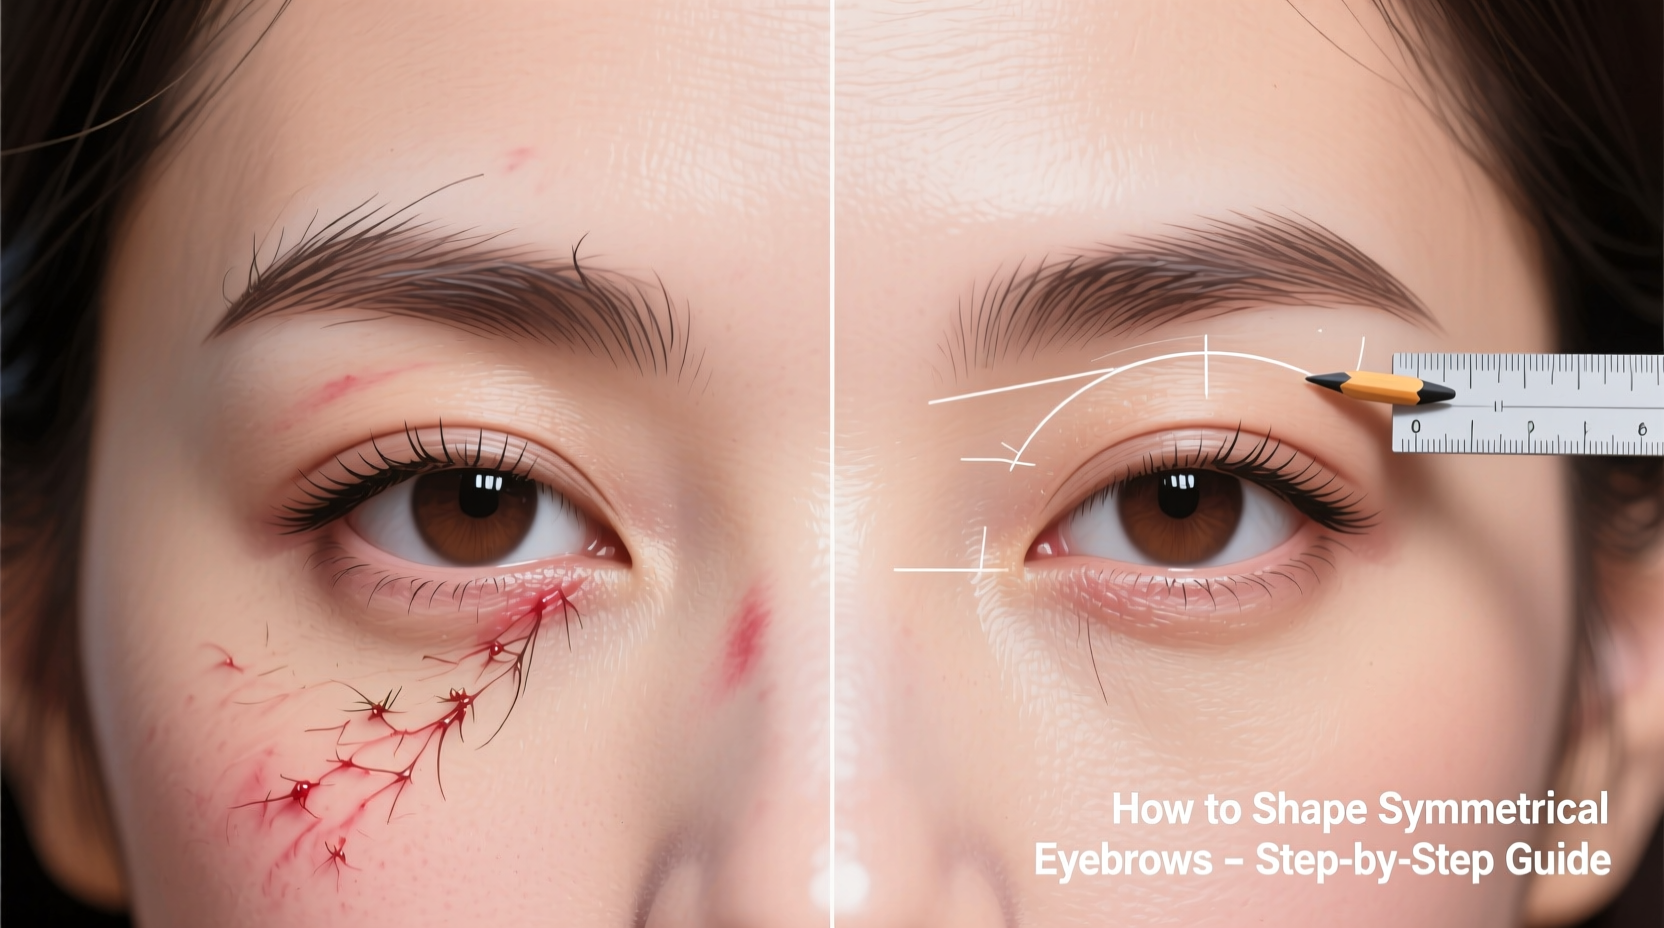
- Determine your brow points:
- Start: Align a straight edge (like a brow pencil) vertically from the nose’s inner corner to the brow. This marks where your brow should begin.
- Arch: Angle the pencil from the nose’s side through the iris’s outer edge. Where it meets the brow is the ideal arch point.
- End: Extend the pencil diagonally from the nose’s edge through the outer corner of the eye. This defines where the brow should end.
- Map both brows separately: Don’t assume symmetry. Mark each point individually on both sides. You may find the arch on one side naturally sits higher.
- Tweak gradually: Only pluck hairs outside the mapped lines. Remove 2–3 hairs at a time, then reassess. Wait at least 48 hours before further adjustments.
- Compare frequently: Step back every few minutes and look at your brows together in the mirror. Close one eye at a time to check alignment relative to each eye.
- Groom daily: Use a clear brow gel to train hairs into place and prevent stray growth from distorting shape.
Do’s and Don’ts of Eyebrow Grooming
| Do’s | Don’ts |
|---|---|
| Use sharp, slant-tipped tweezers for precise plucking | Use dull or rounded tweezers that crush hairs |
| Shape brows every 2–3 weeks during active growth | Pluck daily or whenever you notice new growth |
| Follow your natural brow bone, not trends | Try to force a high arch if your bone structure doesn’t support it |
| Use a magnifying mirror with good lighting | Trim or pluck in dim light or while moving (e.g., in a car) |
| Let brows grow out fully for 4–6 weeks if severely over-plucked | Panic and keep plucking in hopes of “fixing” sparse areas |
Real Example: Recovering from Chronic Over-Plucking
Sophia, a 28-year-old graphic designer, had been shaping her own brows since her teens. She followed YouTube tutorials religiously, aiming for the bold, high-arched look popularized by celebrities. Over time, her left brow became significantly thinner and higher than the right. Despite filling them in with pencils, the asymmetry was obvious in photos and made her feel self-conscious.
After consulting a licensed brow specialist, she learned that her right brow naturally sat lower due to a slightly wider orbital ridge. Her previous method of mirroring the left brow onto the right only exaggerated the imbalance. Under professional guidance, Sophia stopped plucking for six weeks and used a peptide-based brow serum to encourage regrowth. She returned for monthly shaping sessions where the specialist adjusted the arch height and thickness to complement her facial proportions—not conform to a trend.
Within four months, her brows were fuller, balanced, and far more flattering. The key wasn’t forcing symmetry but enhancing harmony. Today, she maintains her shape at home using the mapping technique and visits her specialist quarterly for fine-tuning.
Tools and Products That Support Symmetrical Shaping
The right tools make a significant difference in achieving consistent results:
- Slant-tweezers: Look for stainless steel, hand-forged models with precision tips. Popular brands include Tweezerman and Anastasia Beverly Hills.
- Brow stencil kits: Use temporary stencils cautiously—they should serve as a starting guide, not a rigid mold.
- Mirrors with LED lighting: Natural spectrum bulbs eliminate color distortion and shadows.
- Brow serums: Peptide-rich formulas like RevitaBrow or GrandeBrow can strengthen hairs and improve density in sparse areas.
- Spoolie brushes: Essential for brushing hairs upward to identify strays and assess fullness.
FAQ: Common Questions About Eyebrow Symmetry
Can I fix uneven brows without letting them grow out?
If the asymmetry is minor—such as slight variation in thickness or a few missing hairs—you can camouflage it with brow powder, pomade, or microblading. However, if you’ve over-plucked one side significantly, allowing hair to regrow for 4–8 weeks is the only way to restore balance naturally.
Why does one of my brows grow faster than the other?
This is normal and often due to dominant facial circulation, hormonal fluctuations, or even sleeping position. One side of the face may receive more blood flow, stimulating faster hair growth. Track changes over time rather than reacting to short-term differences.
Is it better to wax or pluck for symmetry?
Plucking gives more control and is better suited for detailed shaping. Waxing removes larger sections at once, increasing the risk of over-removal and unevenness, especially for beginners. Professionals may use threading or waxing for speed, but precision tweezing remains the gold standard for at-home symmetry work.
Checklist for Achieving Symmetrical Brows
Use this actionable checklist before every plucking session:
- Wash hands and sanitize tweezers
- Remove all makeup and oil from the brow area
- Use natural lighting or a ring light
- Brush brows upward with a spoolie
- Map start, arch, and end points on both sides independently
- Identify only the hairs outside the desired shape
- Pluck 2–3 hairs at a time, then reassess
- Compare both brows from multiple angles
- Apply a soothing product post-plucking
- Wait at least two days before additional shaping
“The goal isn’t robotic perfection. It’s balance that enhances your unique features.” — Marcus Reed, Cosmetic Dermatologist
Conclusion: Embrace Balance, Not Perfection
Uneven eyebrows after plucking are common, but they don’t have to be permanent. By understanding your natural facial symmetry, avoiding common grooming mistakes, and using a structured, patient approach, you can shape brows that enhance your appearance rather than detract from it. Remember, symmetry in beauty is about visual harmony—not mathematical precision. With the right tools, techniques, and mindset, you can achieve brows that look polished, proportional, and authentically you.


 浙公网安备
33010002000092号
浙公网安备
33010002000092号 浙B2-20120091-4
Comments
No comments yet. Why don't you start the discussion?