
Pancakes should glide off the pan with ease—golden, fluffy, and intact. Yet many home cooks face the frustrating reality of pancakes that tear apart when flipped, cling stubbornly to the surface, or leave behind a patchwork of batter residue. Even with a high-end non-stick pan, this problem persists. The instinct is to blame the cookware. But more often than not, the issue lies not in the pan itself, but in misunderstood techniques, overlooked details, and widespread myths about non-stick performance.
This article dives deep into why pancakes stick—even on so-called “non-stick” surfaces—and dismantles five persistent myths that mislead home cooks. You’ll learn the science behind sticking, discover what actually damages non-stick coatings, and gain practical strategies to achieve flawless pancakes consistently.
The Science Behind Sticking: It’s Not Just About the Pan
Sticking occurs when food bonds chemically or physically to the cooking surface. In the case of pancakes, proteins in eggs and gluten in flour can form strong attachments to metal if conditions aren’t ideal. A properly functioning non-stick coating—typically made from PTFE (like Teflon) or ceramic—creates a barrier that prevents these bonds. However, that barrier only works under specific conditions: correct heat, proper preheating, and appropriate fat usage.
Even the best non-stick pan fails if used incorrectly. For instance, turning up the heat too high can degrade the coating over time and cause immediate sticking due to rapid moisture loss and protein denaturation. Similarly, using metal utensils or abrasive cleaners weakens the surface at a microscopic level, creating sites where food can latch on.
Understanding this helps shift focus from blaming the pan to evaluating technique—a crucial first step toward consistent results.
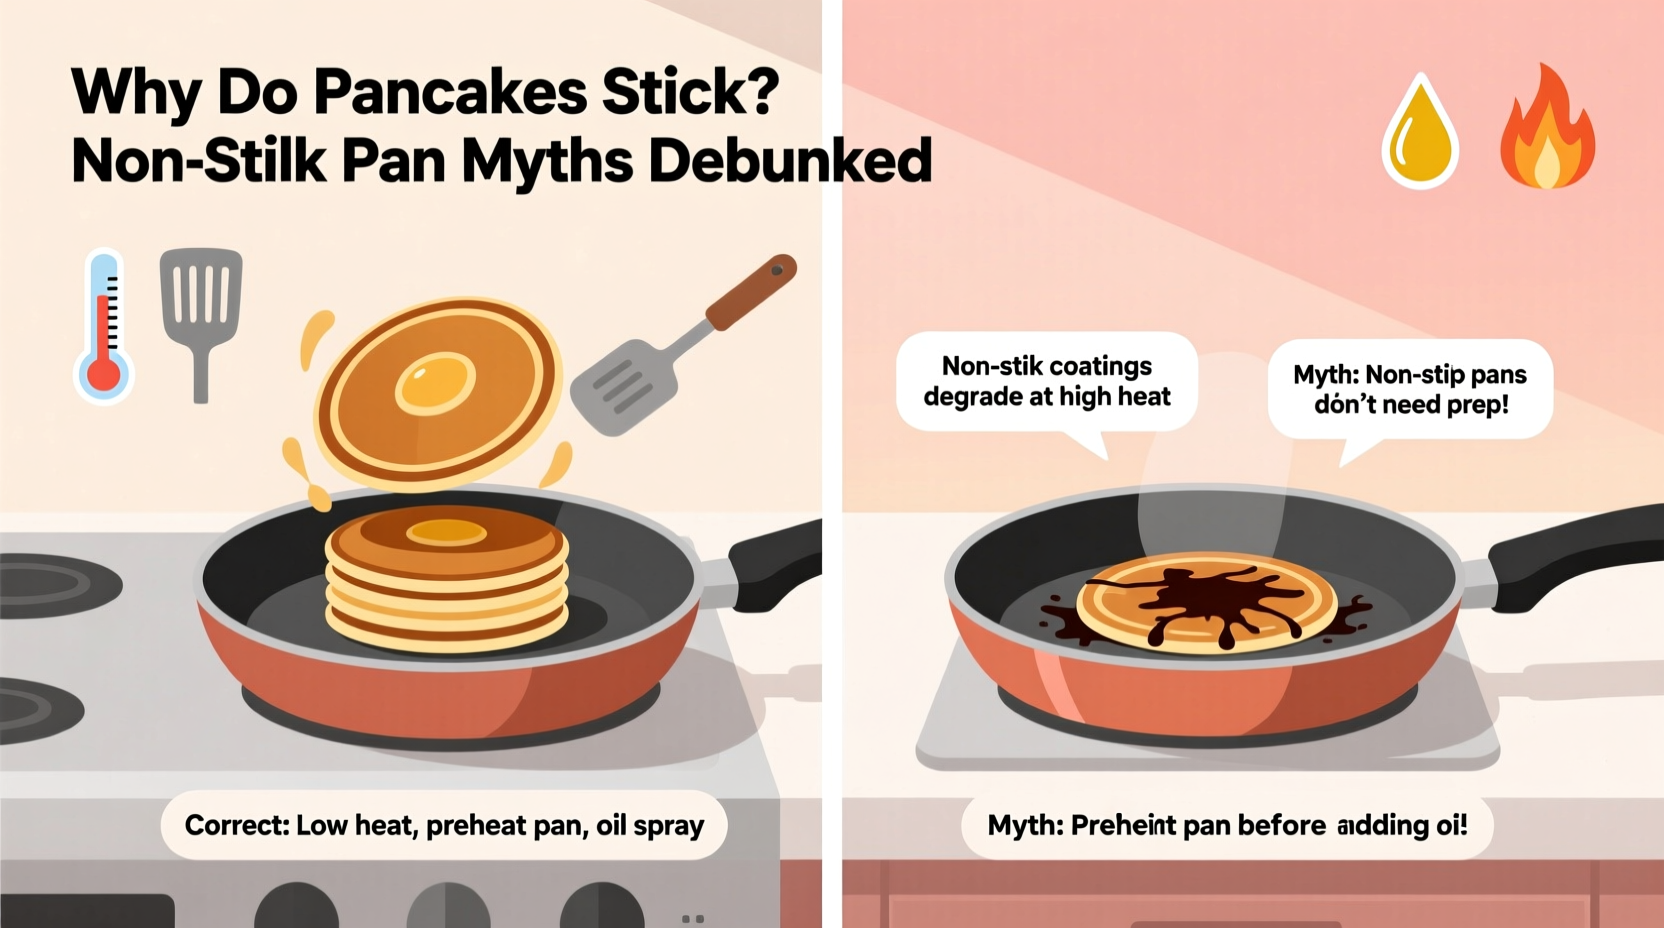
Myth #1: “Non-Stick Means No Oil Needed”
One of the most pervasive misconceptions is that non-stick pans eliminate the need for any fat. This couldn’t be further from the truth—especially when making pancakes.
While non-stick coatings reduce adhesion, they don’t make food completely immune to sticking, particularly with moist, protein-rich batters. Fat—whether butter, oil, or ghee—serves multiple roles: it enhances flavor, promotes even browning, and fills microscopic imperfections in the coating that could otherwise trap food particles.
Using no fat increases the risk of sticking, especially if the pan isn’t perfectly seasoned or has minor wear. Butter adds richness but burns easily; clarified butter or neutral oils like canola or avocado are better choices for consistent results.
“Even the best non-stick surface benefits from a thin layer of fat. It’s insurance against sticking and ensures beautiful browning.” — Chef Daniel Park, Culinary Instructor at Boston Artisan Kitchen
Myth #2: “Higher Heat = Faster Cooking = Better Results”
Many people crank up the heat, assuming that faster cooking means efficiency. In reality, high heat is one of the top causes of pancake sticking.
When a pan is too hot, the bottom of the pancake cooks and dries out almost instantly, while the inside remains raw. This rapid dehydration causes proteins to bond aggressively to the pan surface before steam can lift the pancake away. Additionally, overheating degrades non-stick coatings over time, especially above 500°F (260°C), which compromises their effectiveness permanently.
The ideal temperature for pancakes is medium to medium-low. At this range, heat transfers evenly, allowing bubbles to form steadily in the batter and the underside to develop a golden crust without scorching.
How to Test Pan Temperature
- Heat the pan over medium heat for 2–3 minutes.
- Sprinkle a few drops of water onto the surface.
- If the droplets dance and evaporate within seconds (the “Leidenfrost effect”), the pan is ready.
- If they sizzle violently and vanish immediately, it’s too hot.
- If they sit and bubble slowly, it’s not hot enough.
Myth #3: “Scratches Ruin Non-Stick Pans Immediately”
It’s widely believed that a single scratch renders a non-stick pan useless. While scratches are undesirable, they don’t instantly destroy functionality—unless they expose the underlying metal.
Most non-stick pans have multiple layers: a base coat, a primer, and one or more topcoats. Minor surface scratches may affect appearance and slightly increase sticking but won’t compromise safety or usability right away. However, deep gouges that reach the aluminum base can leach metals into food and create uneven heating zones.
The key is monitoring damage. If the coating is peeling, flaking, or exposing bare metal, it’s time to replace the pan. Until then, continue using it carefully with silicone or wooden tools.
| Damage Type | Effect on Performance | Action Required |
|---|---|---|
| Surface Scratches | Minimal; slight increase in sticking | Continue use; avoid metal utensils |
| Deep Gouges | Moderate; uneven heating, visible metal | Replace soon |
| Flaking/Peeling Coating | Severe; health risk, poor release | Discontinue use immediately |
Myth #4: “All Non-Stick Pans Are Created Equal”
Not all non-stick pans perform the same. Quality varies dramatically based on brand, coating type, number of layers, and construction.
Lower-cost pans often use a single-layer coating that wears quickly under regular use. Premium models feature reinforced ceramic or multi-layer PTFE systems bonded to heavy-gauge aluminum for superior heat distribution and durability. Some brands even incorporate diamond or titanium particles to enhance scratch resistance.
Additionally, pan shape matters. Flat-bottomed skillets with low, straight sides offer better spatula access and even heat than warped or curved griddles.
- Ceramic coatings: Eco-friendly, free of PFOA/PFAS, but less durable than PTFE.
- PTFE-based (e.g., Teflon): Excellent release, long-lasting—but must not exceed 500°F.
- Hard-anodized with non-stick: Durable base with strong coating adhesion; ideal for frequent use.
Investing in a well-reviewed, reputable brand pays off in longevity and performance. Look for lifetime warranties and third-party lab testing as indicators of quality.
Myth #5: “You Don’t Need to Clean Non-Stick Pans Right Away”
Leaving pancake residue in the pan “until later” seems harmless, but it invites problems. Starch and sugar in batter caramelize and harden as the pan cools, creating a sticky film that bonds tightly to the coating. Over time, this buildup degrades non-stick properties and becomes harder to remove without scrubbing—increasing the risk of damage.
Always clean your pan shortly after use. Wait until it’s cool enough to handle, then wash gently with warm water, mild dish soap, and a soft sponge. Avoid steel wool, abrasive powders, or dishwasher cycles, which accelerate coating breakdown.
Step-by-Step Guide to Pancake Perfection
Follow this method to minimize sticking and maximize results:
- Choose the right pan: Use a flat, well-maintained non-stick skillet or griddle.
- Preheat properly: Warm over medium heat for 2–3 minutes.
- Add fat: Melt ½ tsp of butter or oil, spreading evenly.
- Pour batter: Use a ladle or measuring cup for uniform size.
- Wait for bubbles: Cook until surface is covered with bubbles and edges look set (2–3 minutes).
- Flip once: Use a thin, flexible spatula. Flip confidently in one motion.
- Finish cooking: Cook another 1–2 minutes until golden.
- Clean promptly: Wash by hand with gentle soap and dry thoroughly.
Real Example: Sarah’s Sunday Struggle
Sarah loved making pancakes for her family every weekend. But despite using a new non-stick pan, her cakes always stuck, tearing apart when flipped. Frustrated, she nearly gave up—until she attended a local cooking demo.
The instructor observed her technique: she turned the heat to high, skipped oil because “the pan is non-stick,” and used a worn metal spatula. After switching to medium heat, adding a light coat of avocado oil, and using a silicone-edged spatula, her next batch released effortlessly.
“I realized I was fighting the pan instead of working with it,” Sarah said. “Now my pancakes are perfect, and my pan lasts longer too.”
Checklist: Prevent Pancake Sticking Like a Pro
- ✅ Preheat the pan for 2–3 minutes on medium heat
- ✅ Use a small amount of oil or butter—don’t skip fat
- ✅ Ensure batter consistency: thick but pourable (like heavy cream)
- ✅ Wait for bubbles before flipping—patience prevents tearing
- ✅ Use a thin, flexible spatula made of silicone or nylon
- ✅ Avoid overcrowding the pan
- ✅ Hand-wash the pan after cooling; never use abrasives
- ✅ Replace the pan if coating is peeling or deeply scratched
Frequently Asked Questions
Can I use cooking spray on non-stick pans?
Aerosol sprays often contain lecithin and propellants that build up a sticky residue over time, making the surface tacky and harder to clean. Instead, apply oil with a paper towel or brush for better control and less residue.
Why do my pancakes stick even with oil?
This usually points to incorrect heat levels. Too high, and the oil burns off or breaks down; too low, and the batter doesn’t sear quickly enough to form a release layer. Also, check your pan for wear—older coatings lose effectiveness even with oil.
Are scratched non-stick pans dangerous?
Minor scratches aren’t hazardous, but if the coating is flaking into food, discontinue use. Ingesting loose particles isn’t toxic in small amounts, but it indicates the pan is past its lifespan and no longer performs safely.
Final Thoughts: Master the Method, Not Just the Tool
Your non-stick pan is only as good as how you use it. Pancakes that stick are rarely a failure of the cookware—they’re a signal that technique needs refinement. From preheating to fat application, heat control to cleaning habits, every step influences the outcome.
Debunking myths empowers you to cook smarter. You don’t need the most expensive pan to make perfect pancakes—you need the right knowledge. Apply these insights consistently, treat your cookware with care, and you’ll enjoy effortless flipping and golden results week after week.


 浙公网安备
33010002000092号
浙公网安备
33010002000092号 浙B2-20120091-4
Comments
No comments yet. Why don't you start the discussion?