
Posting a photo you spent time capturing and editing only to see it appear soft, pixelated, or distorted on Instagram can be frustrating. You’re not alone—many users experience this issue, especially when switching devices, using third-party apps, or uploading under less-than-ideal conditions. The root cause often lies in Instagram’s compression algorithms, incorrect image dimensions, or overlooked app settings. Understanding how Instagram processes visuals is the first step toward consistently sharp, professional-looking uploads.
Why Instagram Compresses Your Photos
Instagram automatically compresses all uploaded images and videos to reduce server load and improve loading speeds across global networks. While necessary from a technical standpoint, this process can degrade image quality—especially if the original file is too large, improperly formatted, or already compressed. Compression reduces file size by eliminating redundant visual data, but aggressive compression leads to visible artifacts, loss of detail, and overall blurriness.
The platform uses JPEG compression for photos and H.264 for video, both of which are lossy formats. This means some image information is permanently discarded during processing. Instagram also resizes images to fit within its display framework, which can stretch or crop your photo if dimensions don’t align with recommended standards.
“Instagram prioritizes fast delivery over fidelity. That means even a perfectly shot image can lose clarity if it doesn’t meet their technical specs.” — Jordan Lee, Digital Imaging Specialist
Optimal Image Specifications for Instagram
To minimize blurriness, your photos must meet Instagram’s preferred resolution and aspect ratio guidelines. Deviating from these standards forces the app to resize or stretch your image, increasing the risk of distortion and quality loss.
| Content Type | Recommended Resolution | Aspect Ratio | Max File Size |
|---|---|---|---|
| Square Post | 1080 x 1080 px | 1:1 | 30 MB |
| Landscape Post | 1080 x 566 px | 1.91:1 | 30 MB |
| Portrait Post | 1080 x 1350 px | 4:5 | 30 MB |
| Story | 1080 x 1920 px | 9:16 | 30 MB |
| Reel Cover | 1080 x 1920 px | 9:16 | 30 MB |
Note: While Instagram accepts lower resolutions, uploading at 1080 pixels on the shortest side ensures optimal clarity without triggering excessive downscaling. Files larger than 1080px wide are downsized anyway, so there’s no benefit—and potential quality loss—from uploading ultra-high-resolution images.
Step-by-Step Guide to Prevent Blurry Uploads
Follow this sequence before every upload to ensure your photos retain their intended sharpness and detail.
- Capture in the highest quality mode – Use your phone’s native camera app and ensure HDR and HEIF/HEIC formats are disabled unless converted properly. Shoot in well-lit environments to avoid noise and motion blur.
- Edit with export control – Use editing tools like Lightroom, Snapseed, or VSCO that allow custom export settings. Save as JPEG with 90–100% quality and sRGB color profile.
- Resize to exact dimensions – Use free tools like Canva, Adobe Express, or Preview (Mac) to resize your image to one of Instagram’s supported ratios. Maintain 1080px on the shortest edge for portrait or square; 1080px width for landscape.
- Avoid third-party scheduling apps – Many social media managers (e.g., Buffer, Hootsuite) compress images during upload. When possible, use Instagram’s native app for posting.
- Upload directly through the Instagram app – Open Instagram, tap “+”, select your pre-sized image, skip auto-enhance filters, and publish without further edits in-app.
- Disable \"Data Saver\" mode – In Instagram settings, go to Data Usage and turn off “Data Saver.” This prevents additional compression when uploading over mobile networks.
Common Mistakes That Cause Blurry Instagram Photos
- Uploading from screenshots or low-res sources – Screenshots often have lower DPI and non-standard dimensions, leading to poor scaling.
- Using zoomed-in or digitally enhanced images – Digital zoom reduces effective resolution. Crop sparingly and avoid heavy sharpening that creates false detail.
- Editing in RGB instead of sRGB – Wide-gamut color spaces like Adobe RGB aren’t fully supported by Instagram and may cause color shifts or unintended compression.
- Posting via DM or Stories from gallery without resizing – Direct messages and Stories expect vertical format. Horizontal or square images get stretched or letterboxed.
- Ignoring Wi-Fi vs. cellular differences – Uploading over slow connections may trigger adaptive compression, even if the file meets specs.
Mini Case Study: From Blurry to Sharp in One Week
Sophie, a lifestyle photographer and influencer, noticed her engagement dropping despite improving her photography skills. Her images looked crisp on her iPhone but appeared hazy and flat in followers’ feeds. After testing various upload methods, she discovered two key issues: she was using a scheduling tool that compressed her files, and her portrait-oriented shots were slightly oversized (1200px tall).
She switched to manual uploads via the Instagram app, resized all images to exactly 1080 x 1350 px using Canva, and turned off Data Saver. Within days, comments like “Your photos look so much clearer now!” increased, and her average engagement rose by 27%. The change wasn’t in her content—it was in her technical execution.
Checklist: Pre-Upload Quality Assurance
Run through this checklist every time you prepare an image for Instagram:
- ✅ Shot in good lighting with minimal digital zoom
- ✅ Edited using non-destructive tools with final export at 90–100% JPEG quality
- ✅ Resized to correct aspect ratio (1:1, 4:5, or 1.91:1)
- ✅ Width set to 1080px (or height for Stories/Reels)
- ✅ Saved in sRGB color space
- ✅ File size under 30 MB
- ✅ Uploaded directly via Instagram app (not third-party tools)
- ✅ Data Saver disabled in Instagram settings
- ✅ Previewed in-app before posting
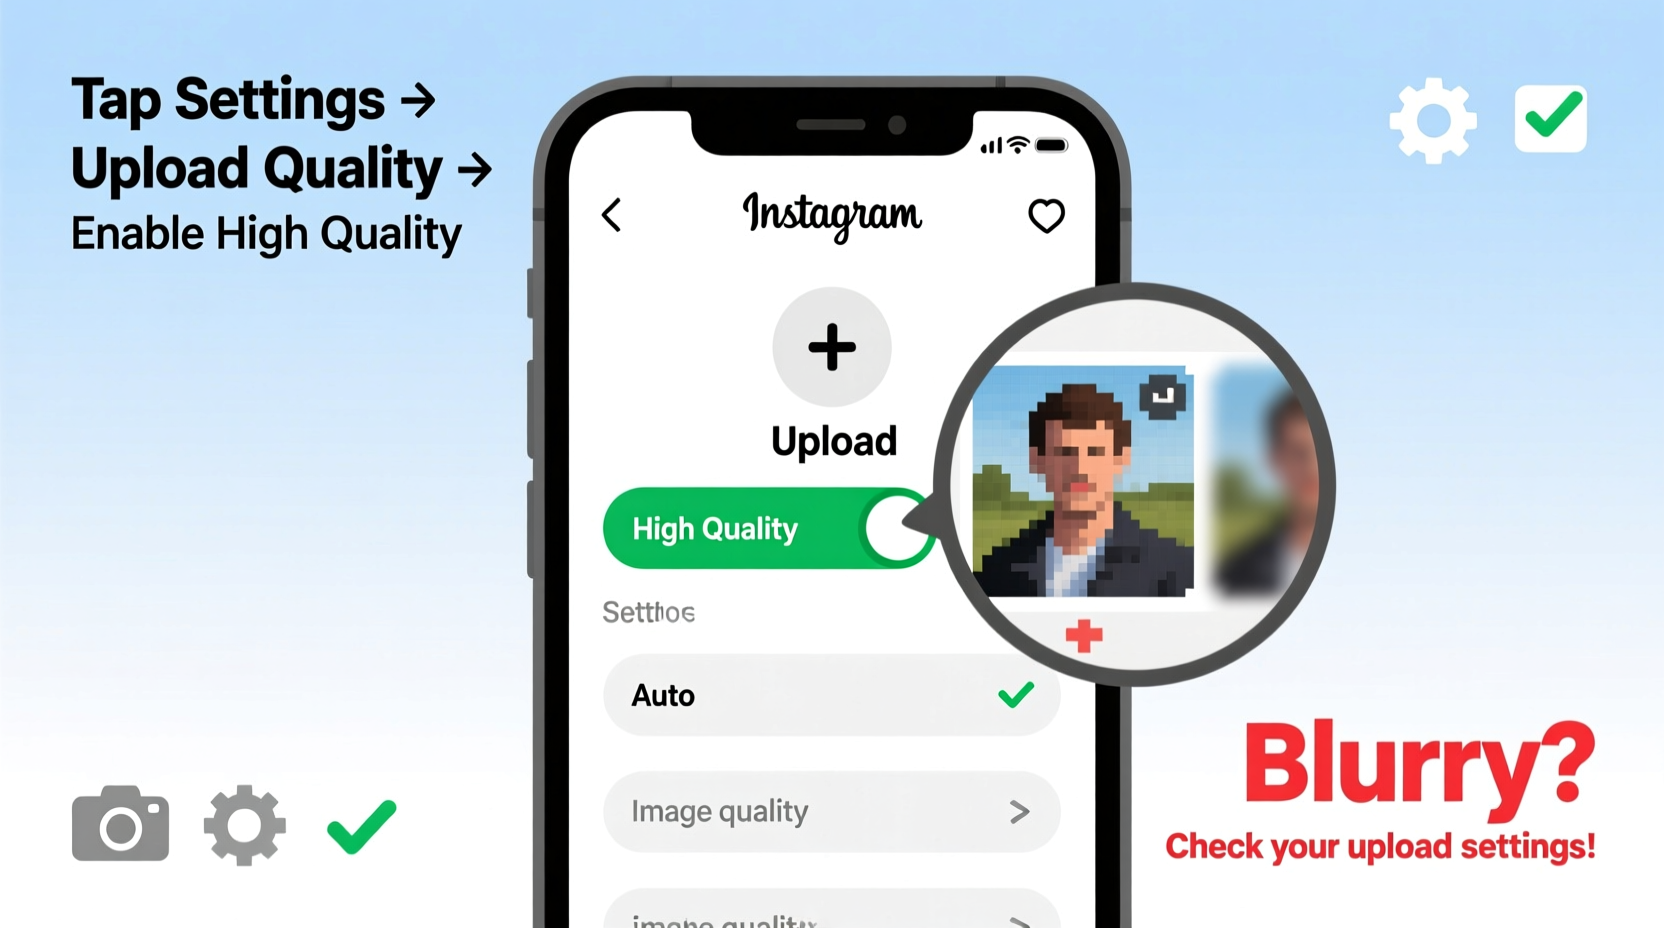
Advanced Settings to Adjust in Instagram
Beyond file preparation, Instagram has hidden settings that affect upload quality. These are often overlooked but can make a noticeable difference.
Navigate to: Settings & Privacy → Data Usage and Storage → Original Photos. Here, you’ll find options related to backup and upload behavior.
Enable “Upload at Highest Quality” if available. While this option isn’t universal (it depends on device and region), it tells Instagram to prioritize fidelity over speed during upload. Also, consider turning off “Auto Enhance” in the editor screen—this feature sometimes oversharpenens or flattens contrast, making photos look artificial or smeared.
Another useful toggle: “Save Original” in Advanced Settings. This saves a full-quality copy of each uploaded image to your device, allowing you to audit quality loss by comparing the original and published versions.
FAQ
Does Instagram downgrade photo quality even if I use the right size?
Yes, to some extent. Even perfectly sized images undergo compression. However, adhering to recommended specs minimizes the degree of degradation. Properly formatted files are less likely to be reprocessed aggressively.
Can I upload RAW photos to Instagram?
No. Instagram does not support RAW formats (like .CR2 or .NEF). You must convert and export as JPEG or PNG. Process your RAW file in editing software, then export at 1080px width (or height for vertical) in sRGB.
Why do my photos look fine on my phone but blurry on desktop?
Instagram applies different compression levels across platforms. Desktop feeds often display images at larger sizes, making compression artifacts more visible. Additionally, browser rendering can affect perceived sharpness. Always test by viewing your post on multiple devices.
Expert Insight: What Professionals Do Differently
Professional content creators and photographers don’t just take great photos—they manage the entire pipeline from capture to upload. One key practice is maintaining a consistent workflow tailored to platform requirements.
“The secret isn’t better gear—it’s understanding the destination. I export every Instagram photo at 1080px wide, sRGB, 95% quality. Consistency beats perfection.” — Marcus Tran, Visual Content Strategist
This disciplined approach ensures predictability. By standardizing output, professionals eliminate variables that lead to blurriness. They also audit their posts weekly, comparing exported files to live previews to catch quality drops early.
Conclusion
Blurry Instagram photos aren’t inevitable. They’re usually the result of mismatched dimensions, improper compression, or overlooked app settings. By aligning your workflow with Instagram’s technical expectations—resizing to 1080px, using sRGB, disabling data-saving features, and uploading natively—you regain control over how your images appear.
Quality perception impacts credibility. A sharp, vibrant post signals professionalism and attention to detail, encouraging longer viewing times and higher engagement. Small technical adjustments yield outsized results in audience response.


 浙公网安备
33010002000092号
浙公网安备
33010002000092号 浙B2-20120091-4
Comments
No comments yet. Why don't you start the discussion?