
Candles bring warmth, ambiance, and a sense of comfort to any space. But nothing ruins the experience faster than a candle that burns down the center, leaving thick walls of wax untouched along the edges—a phenomenon known as \"tunneling.\" This not only wastes wax but shortens the candle’s lifespan and diminishes its fragrance throw. Understanding why tunneling happens—and how to stop it—is essential for anyone who values their candle collection. The causes are often rooted in physics, materials, and user habits, but the solutions are simple and effective when applied consistently.
The Science Behind Candle Tunneling
When a candle is lit, the flame melts the wax near the wick, which is then drawn up through capillary action to fuel the flame. For an even burn, this melt pool should extend from the wick to the outer edge of the container or pillar within the first 1–2 hours. If it doesn’t, the wax near the edges remains solid, creating a \"memory ring.\" On subsequent burns, the melt pool follows this initial pattern, deepening the center while ignoring the perimeter—leading to tunneling.
This behavior is influenced by several factors: wax type, wick size, container diameter, burn duration, and ambient conditions. Paraffin, soy, beeswax, and coconut blends each have different melting points and flow characteristics. A wick that's too small won't generate enough heat to melt the full diameter of the candle, while one that's too large can cause excessive smoking or sooting.
“Candle tunneling is rarely about quality alone—it’s about burn discipline. The first burn sets the tone for every burn that follows.” — Lila Nguyen, Artisan Candle Maker & Founder of Hearthlight Co.
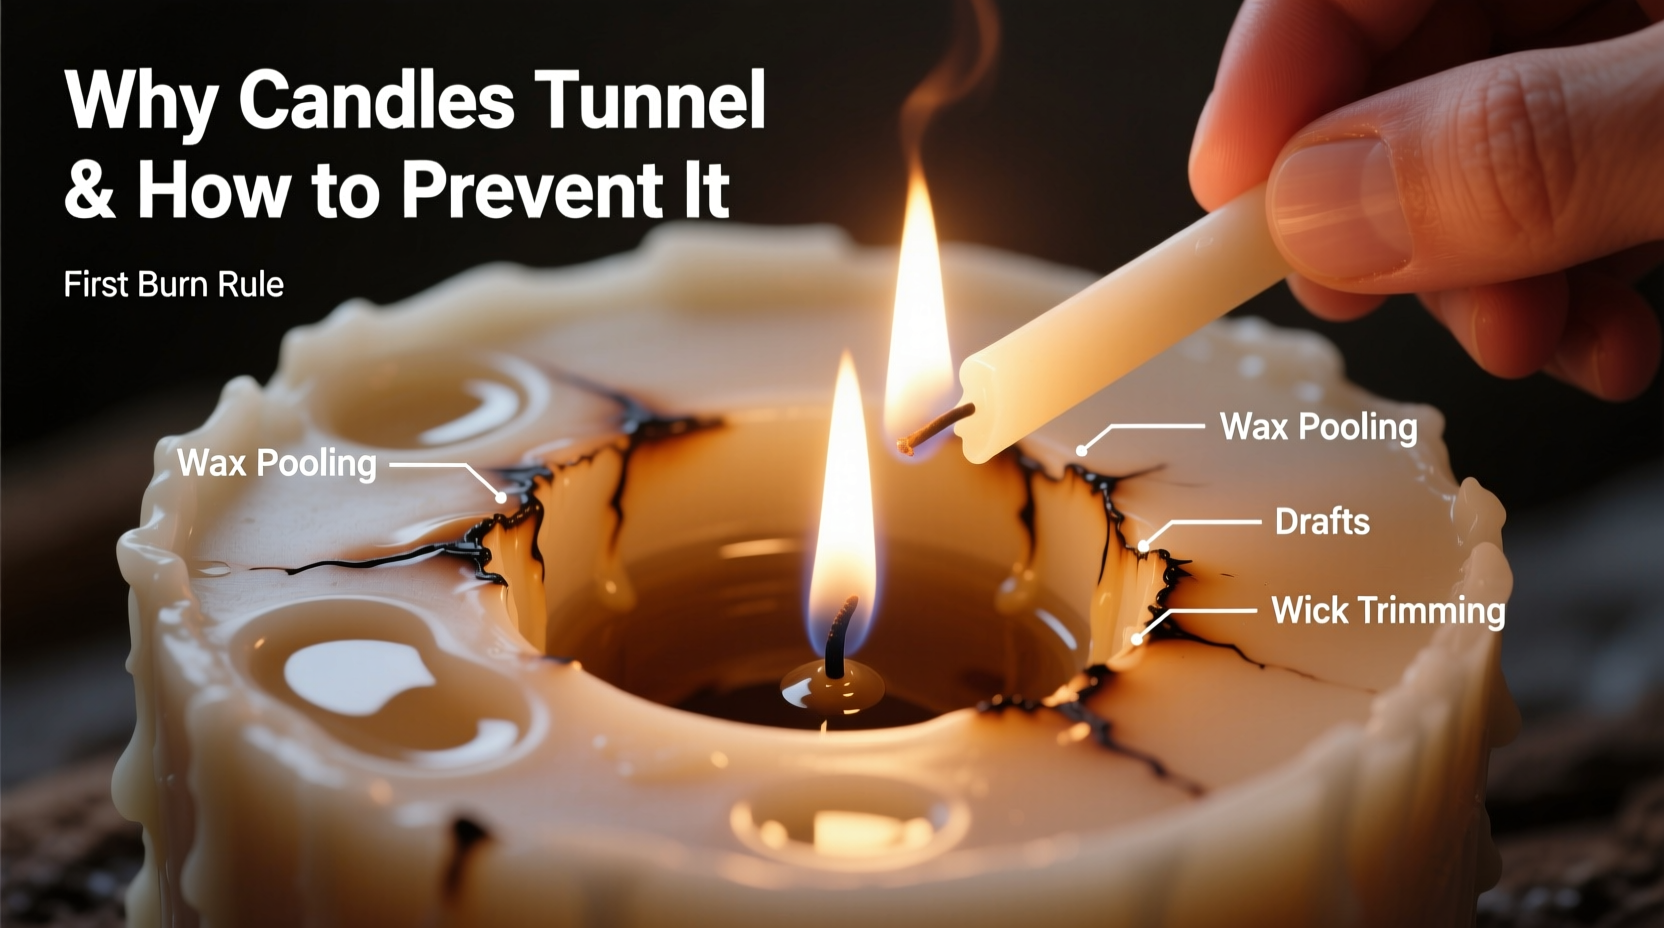
Common Causes of Uneven Burning
Tunneling doesn’t happen randomly. It’s usually the result of one or more preventable mistakes. Recognizing these causes is the first step toward correcting them.
- Inadequate first burn: Lighting a candle for less than one hour per inch of diameter prevents the wax from liquefying fully across the surface.
- Wrong wick size: Mass-produced candles sometimes use undersized wicks to reduce soot, but this compromises melt pool development.
- Poor ventilation or drafts: Airflow from fans, vents, or open windows cools one side of the candle faster, causing uneven melting.
- Frequent extinguishing: Short, repeated burns train the candle to melt only in the center.
- Container material: Thick glass or ceramic retains cold and slows lateral heat transfer, making it harder for wax to reach the edges.
How to Prevent Tunneling: A Step-by-Step Guide
Preventing tunneling isn’t complicated, but it does require consistency and awareness. Follow this timeline-based approach to ensure optimal performance from every candle.
- Trim the wick to 1/4 inch before every burn. A properly trimmed wick produces a steady flame without mushrooming or flickering, promoting even heat distribution.
- Burn long enough on the first lighting. Calculate burn time: aim for 1 hour per inch of candle diameter. For example, a 3-inch-wide candle needs at least 3 hours.
- Place the candle in a draft-free zone. Avoid areas near air conditioners, doorways, or ceiling fans where airflow disrupts consistent melting.
- Monitor the melt pool. After two hours, check if the liquid wax has reached the edges. If not, continue burning in 30-minute increments until it does.
- Extinguish safely. Use a wick dipper or snuffer instead of blowing it out—this minimizes smoke and preserves wick integrity.
- Wait before relighting. Allow the candle to cool completely (at least 2 hours) and the wax to re-solidify evenly.
- Avoid moving a burning candle. Shifting it while wax is molten can cause uneven cooling and future tunneling.
Do’s and Don’ts of Candle Maintenance
| Do | Don’t |
|---|---|
| Trim wicks before each use | Use scissors not designed for wicks (can leave debris) |
| Burn for sufficient duration initially | Burn for less than 1 hour repeatedly |
| Store candles in cool, dark places | Leave candles in direct sunlight (causes fading and softening) |
| Rotate candle position occasionally | Place near heat sources like radiators |
| Clean debris from wax pool between burns | Allow carbon buildup on wicks (causes poor flame) |
Real-World Example: Fixing a Tunneling Problem
Sarah bought a premium soy-blend candle in a wide mason jar. Excited to try it, she lit it for just 45 minutes each evening over five nights. By the sixth night, the flame was nearly buried in a deep hole, with nearly half an inch of wax clinging to the sides. Frustrated, she almost discarded it. Instead, she researched candle care and decided to attempt a recovery burn.
She wrapped the candle in aluminum foil up to the rim to reflect heat inward, ensuring the room was draft-free. She lit it and let it burn for four continuous hours. The foil helped trap heat, encouraging the outer wax to melt. Over the next three burns, applying the same method, the tunnel gradually filled, and the candle began burning evenly. Sarah now follows proper burn times and has extended the candle’s life by over 15 hours.
Recovering a Already-Tunneled Candle
If your candle is already tunneled, don’t give up. With patience, you can rehabilitate it.
- Stop using it temporarily. Let the candle cool completely.
- Remove excess wax buildup. Use a spoon or dull knife to gently scoop out loose debris from the well, but avoid scraping the container walls.
- Create a heat-retaining wrap. Loosely cover the sides with aluminum foil, folding it over the top edge to focus heat downward into the tunnel.
- Light and monitor. Burn for 3–4 hours, checking that the melt pool expands toward the edges.
- Repeat as needed. Some candles require 2–3 recovery burns to reset their memory.
Note: Never leave a candle unattended during recovery, especially when using foil. Ensure the flame remains stable and the foil doesn’t touch the wick.
Choosing Candles That Resist Tunneling
Not all candles are created equal. When shopping, consider these features to minimize tunneling risk:
- Single wick in medium-sized containers (2.5–3.5 inches): Easier to achieve full melt pools.
- Natural wax blends (soy-coconut, beeswax): Tend to burn cleaner and more evenly than paraffin.
- Centered, cotton or wood wicks: Properly sized wicks support consistent flame spread.
- Transparent containers: Allow you to see wax levels and monitor tunneling early.
Brands that prioritize burn testing often indicate recommended burn times on labels. Look for phrases like “full melt pool achieved in 3 hours” or “single cotton wick for even burn.” These are signs of thoughtful design.
“The best candle isn’t just about scent strength—it’s about engineering. Wick, wax, and vessel must work together.” — Marcus Reed, Formulation Chemist at Luminary Labs
FAQ: Common Questions About Candle Tunneling
Can I fix a severely tunneled candle?
Yes, most tunneled candles can be recovered using the foil method and extended burn sessions. However, if the wick becomes submerged or unstable, it may no longer stay lit. In such cases, repurposing the remaining wax (e.g., melting for wax melts) is a good alternative.
Does wax type affect tunneling?
Absolutely. Soy wax has a lower melting point and tends to adhere better to containers, which can increase tunneling risk if not burned properly. Beeswax burns hotter and more evenly but is denser. Paraffin flows easily but can produce more soot. Blends like soy-coconut offer a balance of clean burn and good melt pool spread.
Is tunneling a sign of a defective candle?
Not necessarily. Even high-quality candles will tunnel if misused. However, if a candle fails to form a full melt pool after multiple correct burns, the wick may be undersized or the formulation flawed. Contact the manufacturer—many reputable brands will replace defective products.
Essential Candle Care Checklist
Keep this checklist handy to maintain every candle you own:
- ✅ Trim wick to 1/4 inch before lighting
- ✅ Burn for 1 hour per inch of diameter on first use
- ✅ Ensure melt pool reaches edges before extinguishing
- ✅ Avoid drafts and air currents
- ✅ Extinguish with a snuffer or dipper
- ✅ Wait 2+ hours before relighting
- ✅ Clean wax pool of debris between burns
- ✅ Store unused candles in cool, dark place
- ✅ Use foil wrap to recover tunneled candles
- ✅ Replace candles with damaged or off-center wicks
Conclusion: Make Every Candle Last
Tunneling doesn’t have to be inevitable. With a little knowledge and consistent habits, you can enjoy every ounce of your favorite candles. The key lies in respecting the science of combustion and honoring the candle’s “memory” from the very first flame. Whether you’re lighting a $10 store-bought jar or a hand-poured artisan creation, proper care ensures better scent throw, cleaner burns, and longer enjoyment.


 浙公网安备
33010002000092号
浙公网安备
33010002000092号 浙B2-20120091-4
Comments
No comments yet. Why don't you start the discussion?