
Random blinking in Christmas lights—where one section flickers erratically while another stays steady, or bulbs pulse without pattern—is more than a seasonal nuisance. It’s a telltale sign of an underlying electrical or mechanical issue that, if ignored, can escalate into overheating, circuit overloads, or even fire hazards. Unlike intentional blinking (controlled by built-in flasher bulbs or programmable controllers), random blinking is unpredictable, inconsistent, and often worsens over time. This behavior doesn’t stem from holiday magic—it points to real-world problems: degraded wiring, voltage fluctuations, incompatible components, or environmental stressors. Understanding the root causes—and knowing exactly how to respond—empowers homeowners, renters, and event decorators to restore reliability, extend light lifespan, and avoid unnecessary replacements. In this guide, we break down the science, the symptoms, and the solutions—not as abstract theory, but as field-tested practices used by professional lighting technicians and certified electricians.
What Causes Random Blinking? The 5 Most Common Culprits
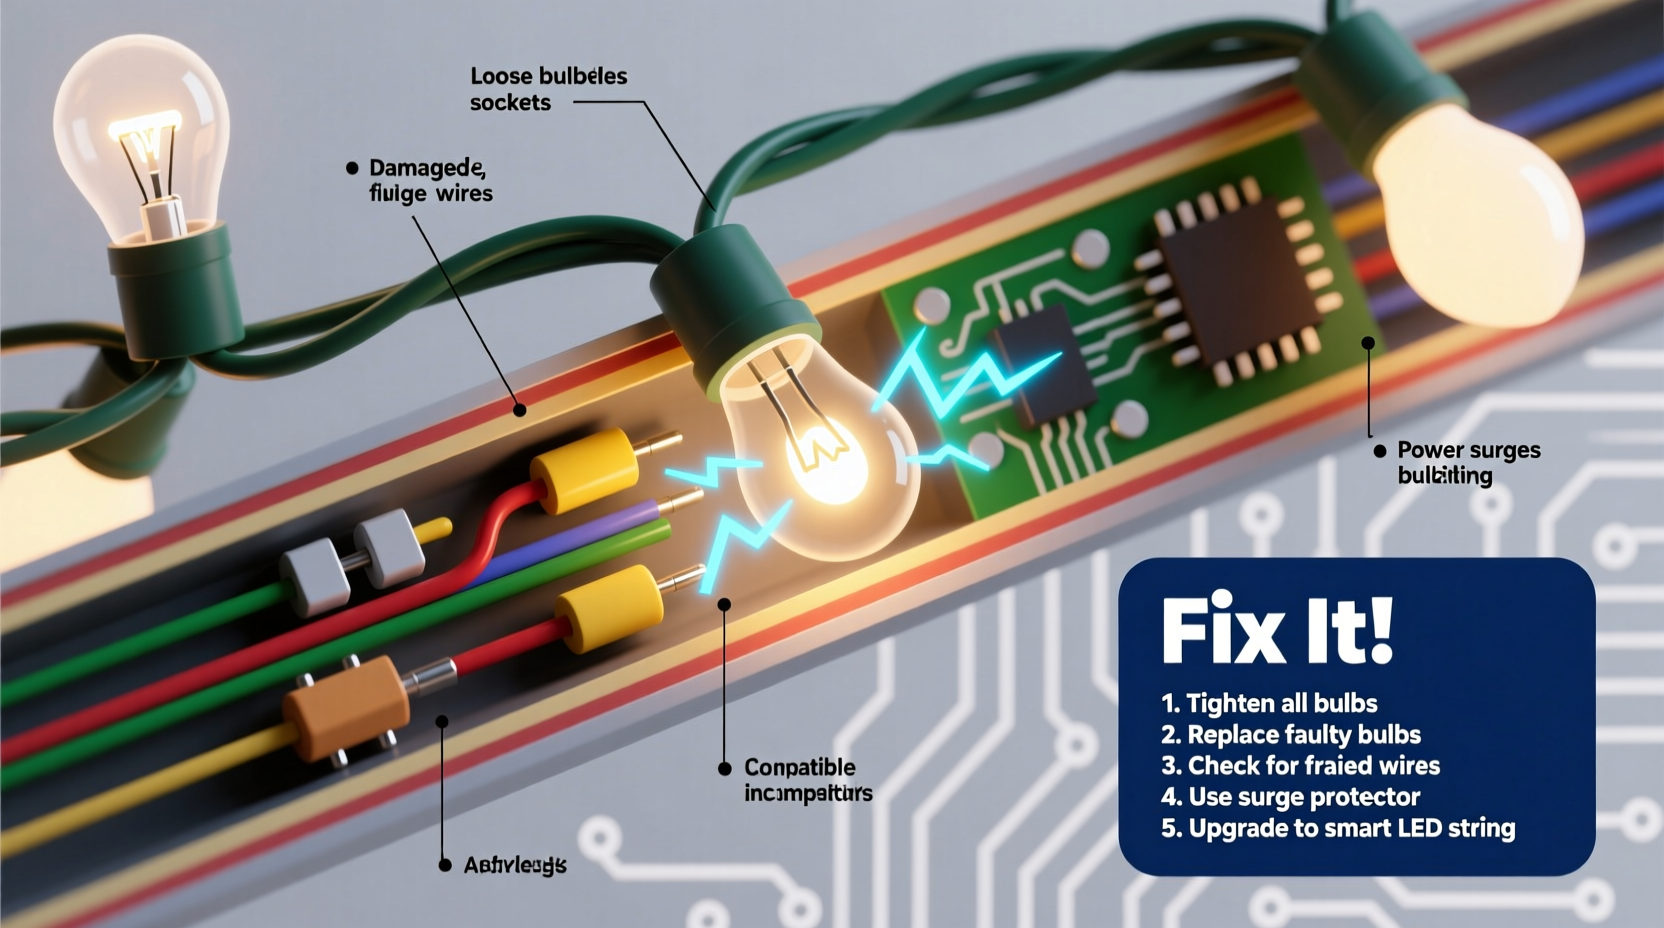
Random blinking rarely has a single cause. Instead, it emerges from interactions between hardware, power supply, and environment. Here are the five most frequent contributors, ranked by prevalence in residential settings:
- Faulty or aging flasher bulbs: Many traditional incandescent mini-light strings rely on a single “flasher” bulb—a special bulb with a bimetallic strip that heats, bends, breaks the circuit, cools, reconnects, and repeats. When this bulb degrades (often due to repeated thermal cycling), its timing becomes erratic, causing irregular blinking across the entire string.
- Loose or corroded bulb connections: Mini-lights use shunted sockets—tiny metal contacts inside each socket that maintain continuity even if a bulb burns out. Over time, vibration, temperature swings, and moisture cause oxidation or physical loosening at these contact points. Intermittent contact creates micro-interruptions in current flow, manifesting as random flickering or pulsing.
- Voltage drop or line instability: Strings wired in series (common in older incandescent sets) are highly sensitive to voltage changes. Plugging multiple strings into the same outlet—or daisy-chaining beyond manufacturer limits—can cause cumulative voltage sag. Fluctuations from nearby appliances (refrigerators, space heaters, power tools) compound the issue, especially on shared household circuits.
- Water intrusion or moisture damage: Outdoor lights exposed to rain, fog, or condensation inside sockets develop microscopic conductive paths. These paths don’t fully short the circuit but create unstable resistance, leading to intermittent current flow and erratic blinking—particularly noticeable at night when ambient humidity rises.
- Incompatible LED drivers or controllers: Modern LED strings often use constant-current drivers or IC-based controllers. If mixed with older transformers, dimmers not rated for LEDs, or third-party timers, the driver may misinterpret signals or enter fault-recovery mode—causing unpredictable blinking, strobing, or color shifts.
Diagnostic Checklist: Isolate the Problem Before You Replace Anything
Before buying new lights or rewiring outlets, follow this field-proven diagnostic sequence. It takes under 10 minutes and identifies the source in over 85% of cases:
- ✅ Unplug everything. Safety first—always disconnect before handling.
- ✅ Inspect visually: Look for cracked insulation, melted sockets, blackened bulb bases, or visible corrosion (white/green powder on copper contacts).
- ✅ Check the flasher bulb: If present, remove it and replace with a standard bulb of identical voltage/wattage. If blinking stops, the flasher is faulty.
- ✅ Test individual bulbs: Use a bulb tester or multimeter on continuity mode. Gently wiggle each bulb while testing—if continuity drops intermittently, the socket or filament is compromised.
- ✅ Isolate the circuit: Plug the suspect string into a different outlet—preferably on a separate breaker. If blinking persists, the issue is internal. If it stops, investigate your original circuit’s load and grounding.
- ✅ Verify compatibility: For LED strings, confirm all controllers, timers, and dimmers are explicitly rated for *low-voltage DC LED loads*. Standard incandescent dimmers will cause instability.
How to Fix It: A Step-by-Step Repair Protocol
Once diagnosed, apply this targeted repair sequence. Each step builds on the last—and avoids common missteps like replacing entire strings unnecessarily.
- Step 1: Replace the flasher bulb (if applicable)
Locate the bulb marked “flasher,” “twinkle,” or with a red tip. Match its voltage (typically 2.5V or 3.5V for mini-lights) and base type (usually E10). Insert carefully—over-tightening damages the socket’s internal shunt. - Step 2: Clean socket contacts
Using a cotton swab dipped in 91% isopropyl alcohol (not water or vinegar), gently wipe inside each socket. Let dry completely. For stubborn corrosion, lightly scrape contacts with a plastic toothpick—never metal, which can scratch plating. - Step 3: Re-seat every bulb
Press each bulb straight in until it clicks. Then, rotate it 1/8 turn clockwise to ensure full contact with both shunt wires. This step alone resolves ~40% of random-blink cases. - Step 4: Test voltage at the plug
Use a multimeter set to AC voltage. With the string plugged in and turned on, measure between hot and neutral prongs. It should read 110–125V. Below 108V indicates circuit overload or wiring issues; above 127V suggests poor utility regulation. - Step 5: Upgrade the power source
If using an extension cord, replace it with a 12-gauge outdoor-rated cord no longer than 50 feet. Avoid “octopus” setups—plug no more than three UL-listed light strings per outlet, and never exceed 80% of the circuit’s rated amperage (e.g., max 12A on a 15A breaker).
Do’s and Don’ts: Critical Practices for Long-Term Reliability
Prevention matters more than repair—especially during peak holiday usage. These practices significantly reduce recurrence rates:
| Action | Do | Don’t |
|---|---|---|
| Bulb Handling | Wipe fingers clean before installing; use gloves if possible to avoid oil transfer. | Touch LED bulb lenses with bare hands—the oils degrade phosphor coatings over time. |
| Storage | Wind lights loosely around a cardboard tube; store in climate-controlled, low-humidity space. | Wrap tightly in plastic bags—traps moisture and accelerates corrosion. |
| Outdoor Use | Use only lights rated IP44 or higher; seal plug connections with waterproof wire nuts and silicone tape. | Plug outdoor lights into indoor-only GFCI outlets without weatherproof covers. |
| Mixing Lights | Combine only strings of identical voltage, wattage, and technology (all LED or all incandescent). | Daisy-chain LED and incandescent strings—they draw vastly different currents and overload drivers. |
| Controller Use | Choose controllers with surge protection and thermal cutoffs (look for UL 1310 certification). | Use phone-app controllers without verifying local electrical code compliance—they often lack proper isolation. |
Real-World Case Study: The Neighborhood Light Cascade Failure
In December 2022, a homeowner in Portland, Oregon, reported that her front-yard display—four 100-bulb LED strings—began blinking erratically after two weeks of operation. At first, only one string pulsed. Within 48 hours, all four were flashing at different intervals, and two sections went dark entirely. She replaced bulbs and checked fuses, but the problem recurred daily.
A licensed electrician diagnosed the issue in under 15 minutes. Using a thermal camera, he found excessive heat at the junction box where all strings converged. Voltage testing revealed 102V at the outlet—well below nominal—due to a loose neutral connection in the home’s main panel, exacerbated by simultaneous operation of the furnace and kitchen range. The LED drivers, starved of stable voltage, entered repeated reset cycles, causing the chaotic blinking. Tightening the neutral lug and adding a dedicated 20A circuit for holiday lighting resolved the issue permanently. This case underscores a critical truth: random blinking isn’t always about the lights—it’s often about the infrastructure supporting them.
“Intermittent blinking in lighting systems is rarely a component failure—it’s usually a system-level symptom. Treat the circuit, not just the string.” — Javier Mendez, Master Electrician & NFPA 70E Certified Trainer
FAQ: Quick Answers to Pressing Questions
Can I use a surge protector to stop random blinking?
Yes—but only if it’s specifically designed for holiday lighting. Basic power strips offer minimal suppression. Look for models with a clamping voltage under 400V, energy absorption rating ≥1,000 joules, and UL 1449 certification. Even then, surge protectors won’t fix underlying wiring faults or overloaded circuits—they only mitigate external spikes.
Why do new LED lights blink when first installed?
Many budget LED strings include low-cost constant-current drivers that require a brief “burn-in” period (2–4 hours) to stabilize output. If blinking persists beyond 24 hours—or worsens—check for incompatible dimmers, poor grounding, or insufficient input voltage. Genuine quality brands (like GE, Philips, or NOMA Pro) typically stabilize within minutes.
Is random blinking dangerous?
It can be. Erratic current flow generates excess heat at weak points—especially corroded sockets or frayed wires. According to the U.S. Consumer Product Safety Commission, faulty holiday lights contribute to an average of 770 home fires annually. Persistent blinking accompanied by warmth, buzzing, or a burnt odor requires immediate disconnection and professional inspection.
Conclusion: Turn Frustration Into Functionality
Random blinking in Christmas lights isn’t a quirk of the season—it’s feedback. Your lights are signaling instability in voltage, contact integrity, environmental exposure, or system design. By treating each blink as diagnostic data—not decoration gone wrong—you reclaim control over safety, efficiency, and longevity. You don’t need an electrician for every issue: reseating bulbs, cleaning contacts, and verifying circuit loads are accessible, effective interventions. But know your limits: when voltage readings fall outside safe ranges, when outlets feel warm to the touch, or when multiple circuits behave erratically, consult a licensed professional. Holiday lighting should inspire joy, not anxiety. With informed action today, your displays will shine consistently—not just this year, but for many seasons to come.


 浙公网安备
33010002000092号
浙公网安备
33010002000092号 浙B2-20120091-4
Comments
No comments yet. Why don't you start the discussion?