
It’s a familiar holiday frustration: you string up your lights, plug them in, and—half the strand glows while the other half stays stubbornly dark. No burnt smell. No tripped breaker. Just a clean, abrupt cutoff where illumination ends. This isn’t random failure—it’s physics, circuit design, and decades of manufacturing trade-offs playing out on your porch or tree. Understanding *why* sections go dark—and precisely how to diagnose and restore them—saves time, money, and seasonal sanity. Unlike incandescent bulbs that fail individually without affecting neighbors, most modern mini-light strands are wired in series, making them inherently vulnerable to cascading section failure. This article breaks down the engineering realities behind sectional blackouts, walks through proven diagnostic techniques (no multimeter required for basic fixes), and delivers practical, tool-agnostic repair strategies you can apply tonight.
The Series Circuit Trap: Why One Bulb Can Kill a Whole Section
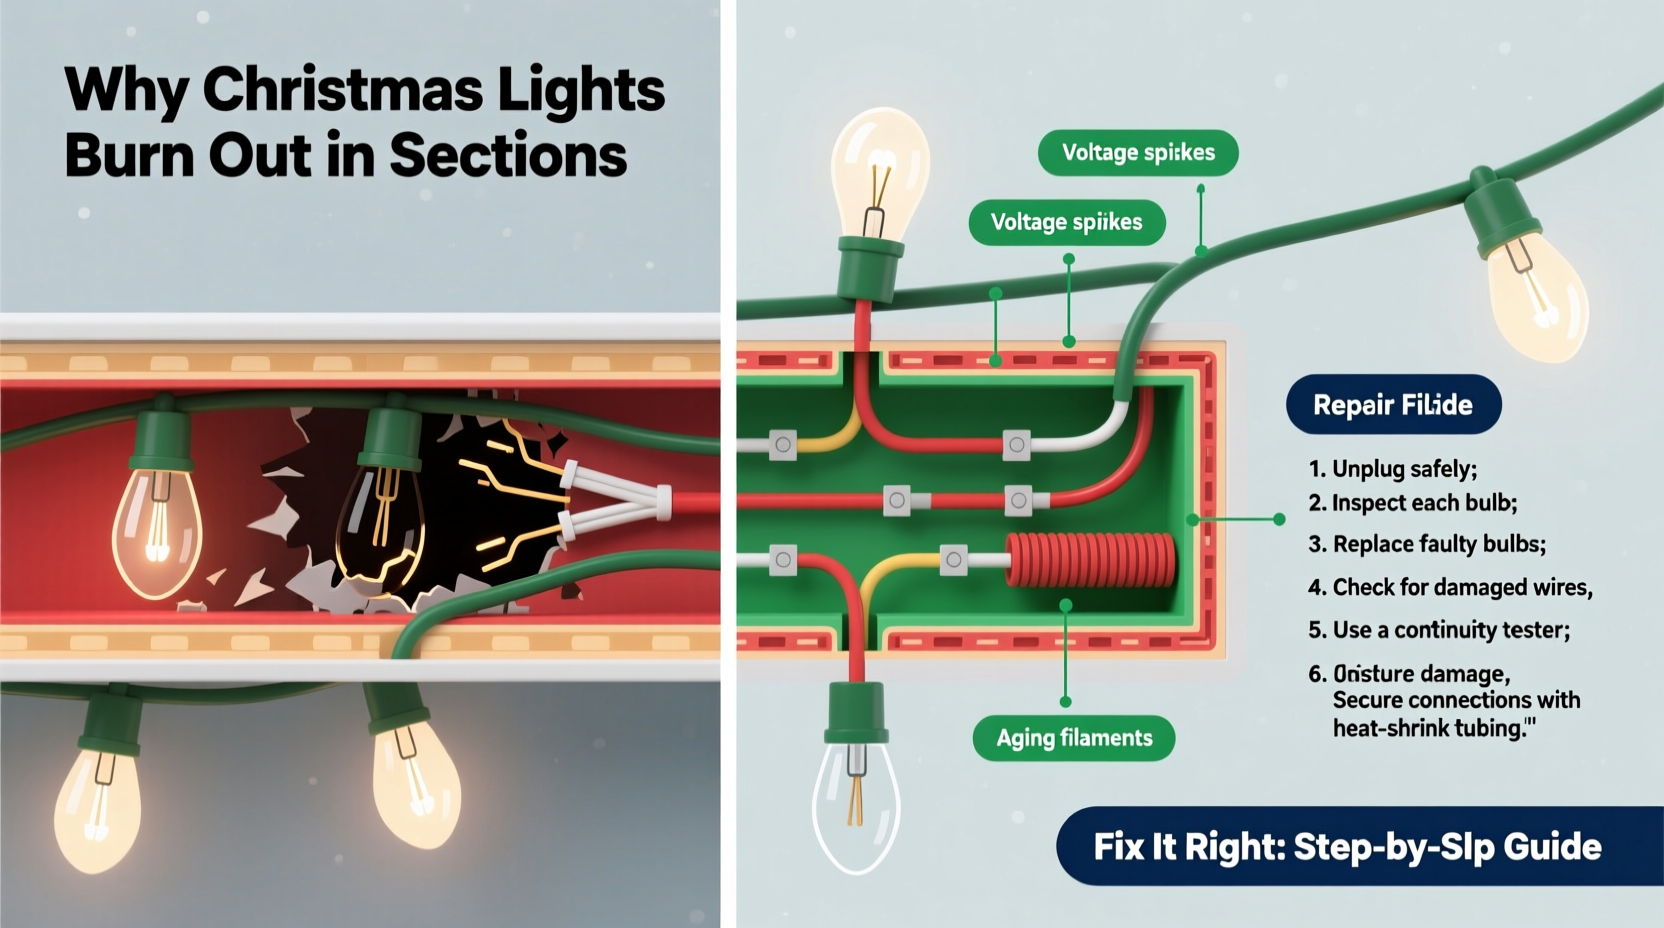
Most traditional incandescent and many LED mini-light strings use a series wiring configuration. In this setup, electricity flows through each bulb in sequence—like beads on a single thread—before returning to the power source. If one bulb’s filament breaks *and* its internal shunt fails to activate, the circuit opens. Current stops. Every bulb downstream goes dark. But crucially, not every bulb in the strand fails at once—and not every open circuit kills the entire string. That’s because manufacturers divide longer strands into smaller, electrically isolated sections—typically 25, 50, or 100 bulbs per segment—each with its own shunt-equipped bulbs and sometimes even independent fusing.
Each bulb contains a tiny parallel wire called a shunt: a coiled nickel-iron alloy strip wrapped around the bulb’s base contacts. When the filament is intact, current flows through the filament. But when the filament burns out, the resulting voltage surge across the dead bulb heats the shunt, causing its insulating coating to melt and allowing current to “jump” across the gap—bypassing the dead bulb and keeping the rest of the section lit. A failed shunt means no bypass—and a dark section.
Four Primary Causes of Sectional Failure (and How to Spot Each)
Sectional blackouts rarely stem from a single cause. More often, they result from overlapping vulnerabilities. Here’s how to distinguish them:
- Shunt Failure: The most common culprit. One or more bulbs in the dark section have open filaments *and* non-functional shunts. The section goes dark, but adjacent sections remain lit. Often accompanied by a faint “ping” sound when plugging in—a sign of arcing at a failed contact.
- Voltage Drop Across Long Runs: Strands exceeding manufacturer-recommended lengths (often 210–250 feet total for plug-and-play sets) suffer cumulative resistance. The last section receives insufficient voltage (< 110V on a 120V circuit), causing dimming or complete dropout—even if all bulbs are functional. This worsens with daisy-chained extensions.
- Bad Socket Contacts or Corroded Wires: Moisture, temperature swings, and physical stress crack solder joints or corrode copper wires inside sockets. A loose connection interrupts current flow—not at the bulb, but at the socket itself—creating a hard break that mimics shunt failure.
- Fuse or Controller Failure (LED Strings): Many LED strings include an inline thermal fuse or microcontroller-based driver. If overheated or overloaded, these components cut power to specific output channels—darkening only part of the strand while others glow normally. Unlike incandescent shunt issues, this often affects multiple sections simultaneously and may be accompanied by flickering or color shifts before full failure.
Step-by-Step Diagnostic & Repair Workflow
Don’t replace the whole strand yet. Follow this field-tested sequence—designed for home users with minimal tools—to isolate and resolve the issue:
- Unplug and inspect visually. Look for cracked bulbs, melted sockets, frayed insulation near the plug or end connector, or signs of water intrusion (white powder residue = corrosion). Discard any visibly damaged bulbs or sockets.
- Confirm section boundaries. Trace the wire from the plug. Note where the dark section begins and ends. Most strands have subtle markings—color-coded wires, molded ridges, or printed labels—indicating section divisions. Identify whether the dark zone aligns precisely with these boundaries (points to internal section fault) or cuts across them (suggests wiring or controller issue).
- Test the first bulb in the dark section. Using needle-nose pliers or a bulb tester (a $5 battery-powered tool), gently remove the first bulb after the last working one. Insert a known-good replacement bulb. If the section lights, the original bulb had a failed shunt. If still dark, move to the next bulb and repeat—up to three bulbs deep. Stop if lighting returns.
- Check for continuity with a multimeter (optional but definitive). Set to continuity mode. Touch one probe to the metal screw shell of the first dark-section bulb socket and the other to the same point on the next socket. No beep? Broken wire or bad contact between sockets. A beep confirms continuity—but doesn’t guarantee shunt function.
- Bypass suspected faulty sockets. If continuity testing reveals an open, carefully clip the wire just before and after the suspect socket. Strip ¼ inch of insulation and twist the two ends together, securing with a wire nut or electrical tape. Re-test. If the section lights, replace that socket assembly.
Do’s and Don’ts for Long-Term Reliability
Prevention matters as much as repair. These practices directly reduce sectional failure rates year after year:
| Action | Do | Don’t |
|---|---|---|
| Storage | Coil loosely in original box or a ventilated plastic bin; store indoors away from attics and garages. | Wrap tightly around cardboard tubes or hang vertically—this stresses wire junctions and deforms sockets. |
| Installation | Use outdoor-rated extension cords; limit daisy-chaining to 3–5 sets max (check package label). | Plug into overloaded power strips or multi-outlet adapters—voltage sag accelerates shunt fatigue. |
| Maintenance | Wipe bulbs and sockets with a dry microfiber cloth before storing; check for corrosion annually. | Use solvents, glass cleaner, or compressed air—alcohol dries out plastic housings; air forces moisture deeper. |
| Repair | Replace bulbs only with identical voltage/wattage/size specs (e.g., 2.5V 0.3A warm white). | Mix bulb types (e.g., incandescent + LED) or substitute higher-voltage bulbs—this overloads shunts and triggers cascade failure. |
Real-World Case Study: The Porch Light Puzzle
Janice in Portland strung 12 pre-lit wreaths (each with 50-bulb incandescent strands) along her front porch railing. After Thanksgiving, she noticed the last four wreaths—those farthest from the outlet—were completely dark, while the first eight glowed normally. She assumed a blown fuse and replaced the plug-in fuse. No change. She swapped bulbs randomly. Still dark. Frustrated, she called an electrician—who measured 102V at the last wreath’s input. The root cause? A 150-foot daisy chain of low-gauge extension cords, compounded by a corroded outdoor GFCI outlet. Voltage dropped below 108V—the minimum needed to reliably activate aging shunts. Solution: She replaced the final 50 feet with 12-gauge outdoor cord and cleaned the outlet contacts with electrical contact cleaner. All wreaths lit instantly. Her takeaway: “It wasn’t the lights—it was the path they had to travel.”
Expert Insight on Modern LED Strand Design
While incandescent shunt failure remains widespread, newer LED technology introduces different failure modes—and smarter solutions. Dr. Lena Torres, Senior Electrical Engineer at HolidayLume Technologies, explains:
“Modern LED strings often use constant-current drivers with segmented outputs—so a single driver failure may only affect 2–3 sections, not the whole string. But cheaper imports skip robust thermal management. When LEDs overheat, their forward voltage drifts, confusing the driver’s regulation logic. That’s why you’ll see ‘zombie sections’—dim, flickering, or intermittently dark zones. It’s not a bulb issue; it’s thermal derating. Always check for enclosed mounting locations and ambient temperatures above 95°F.” — Dr. Lena Torres, Senior Electrical Engineer, HolidayLume Technologies
Troubleshooting Checklist
- ✅ Unplugged the strand before inspection or handling
- ✅ Identified exact start/end points of the dark section
- ✅ Checked for visible damage: cracked bulbs, melted sockets, frayed wires
- ✅ Tested/replaced the first 3 bulbs in the dark section with known-good spares
- ✅ Verified voltage at the dark section’s input (if multimeter available)
- ✅ Inspected extension cords for gauge rating and length compliance
- ✅ Cleaned socket contacts with isopropyl alcohol and a soft brush (for older strands)
- ✅ Confirmed no incompatible bulbs (e.g., mixing 2.5V and 3.5V) were installed
FAQ
Can I cut and rewire a section that keeps failing?
Yes—but only if you understand the strand’s voltage architecture. Cutting a 120V series string creates an unsafe, unterminated live wire. Instead, use a certified splice kit designed for your strand type (e.g., LightKeeper Pro’s “Quick Fix” connector), which includes built-in shunts and insulation. Never splice with tape or bare wire twists.
Why do replacement bulbs sometimes make the problem worse?
Using bulbs with incorrect specifications changes the total resistance of the section. A higher-wattage bulb draws more current, overheating adjacent shunts and accelerating their failure. A lower-wattage bulb reduces current, preventing downstream shunts from heating enough to activate during a future burnout—causing the next failure to go dark instead of bypassing.
Is there a way to test shunt functionality without special tools?
Indirectly—yes. With the strand plugged in and powered, gently tap each bulb in the dark section with a wooden chopstick. A faint “click” followed by momentary lighting indicates a sticky shunt activating under vibration. If tapping does nothing, the shunt is likely fused open or missing entirely. Replace that bulb immediately.
Conclusion
Sectional Christmas light failure isn’t magic—it’s measurable, predictable, and eminently fixable. You don’t need an electrical degree to restore a dark section. What you need is clarity on how series circuits behave, recognition of the four core failure patterns, and confidence to methodically test and replace. Every bulb you successfully revive extends the life of your investment, reduces seasonal waste, and preserves the quiet joy of watching light return—not just to your tree, but to your sense of control. This year, approach your lights not as disposable decor, but as small-scale electrical systems worthy of thoughtful care. Start with one dark section tonight. Test the first bulb. Watch what happens. Share your success—or your stumper—in the comments below. Because when we demystify the wires behind the wonder, the holidays shine a little brighter for everyone.


 浙公网安备
33010002000092号
浙公网安备
33010002000092号 浙B2-20120091-4
Comments
No comments yet. Why don't you start the discussion?