
Every holiday season, thousands of households encounter the same frustrating puzzle: a strand of Christmas lights goes dark—not entirely, but mysteriously, with only half the string lit or none at all. Often, the culprit isn’t a burnt-out bulb or a broken wire. It’s a tiny, overlooked component tucked inside the plug: the fuse. Unlike modern LED strings with built-in circuit protection, many traditional incandescent light sets rely on replaceable fuses as their first—and sometimes only—line of defense against electrical overloads. Understanding why fuses exist in these lights, recognizing when they’ve failed, and knowing exactly how to replace them safely and effectively separates a 10-minute fix from an abandoned string tossed into the attic.
The Engineering Reason: Why Fuses Exist in Christmas Light Sets
Christmas light strings—especially older or higher-wattage incandescent models—are wired in series or series-parallel configurations. In a series circuit, current flows through each bulb sequentially; if one bulb fails open (filament breaks), the entire circuit breaks and all bulbs go dark. But more critically, if a bulb fails *shorted*—a rare but dangerous failure mode where the filament collapses and bridges the contacts—the current bypasses that bulb’s resistance. This reduces total circuit resistance, causing current to surge beyond design limits. Without intervention, this can overheat wires, melt insulation, or even ignite nearby materials.
Fuses act as sacrificial weak links. They’re rated for a specific current—typically 3A or 5A for standard 120V household light sets—and contain a thin metal strip calibrated to melt and break the circuit the moment current exceeds safe thresholds. This prevents thermal runaway, protects the wiring, and reduces fire risk. Not all lights have them: most modern LED mini-light strings use low-voltage DC drivers or electronic current-limiting chips instead. But nearly all UL-listed incandescent C7, C9, and commercial-grade light sets manufactured before 2015—and many still sold today—include two fuses in the male plug housing.
“Fuses in light sets aren’t redundancy—they’re intentional, code-compliant overcurrent protection. Removing them or substituting with higher-rated fuses voids UL certification and creates a documented hazard.” — James R. Lefebvre, P.E., Electrical Safety Consultant & Former UL Lighting Standards Committee Member
How to Identify a Blown Fuse: Signs Beyond “Lights Are Off”
A dead strand doesn’t always mean a blown fuse—but it’s the fastest and safest first check. Here’s how to diagnose accurately:
- Partial illumination: If only the first half of a multi-section string lights up (e.g., sections A and B glow, but C and D are dark), the fuse protecting the downstream section is likely blown.
- No power at the plug: Use a non-contact voltage tester near the outlet and then at the female end of the light string. If voltage reads at the outlet but not at the female socket—even with the switch on—the fuse is almost certainly open.
- Visible damage: Remove the fuse cap (usually a small sliding or screw-on cover on the plug’s narrow side) and inspect both fuses. A blown fuse shows a visibly broken or discolored metal strip, often with a grayish film or blackened glass tube.
- Smell or discoloration: A faint acrid odor near the plug or brown/charred discoloration on the fuse holder indicates thermal stress—a strong sign of overload and fuse activation.
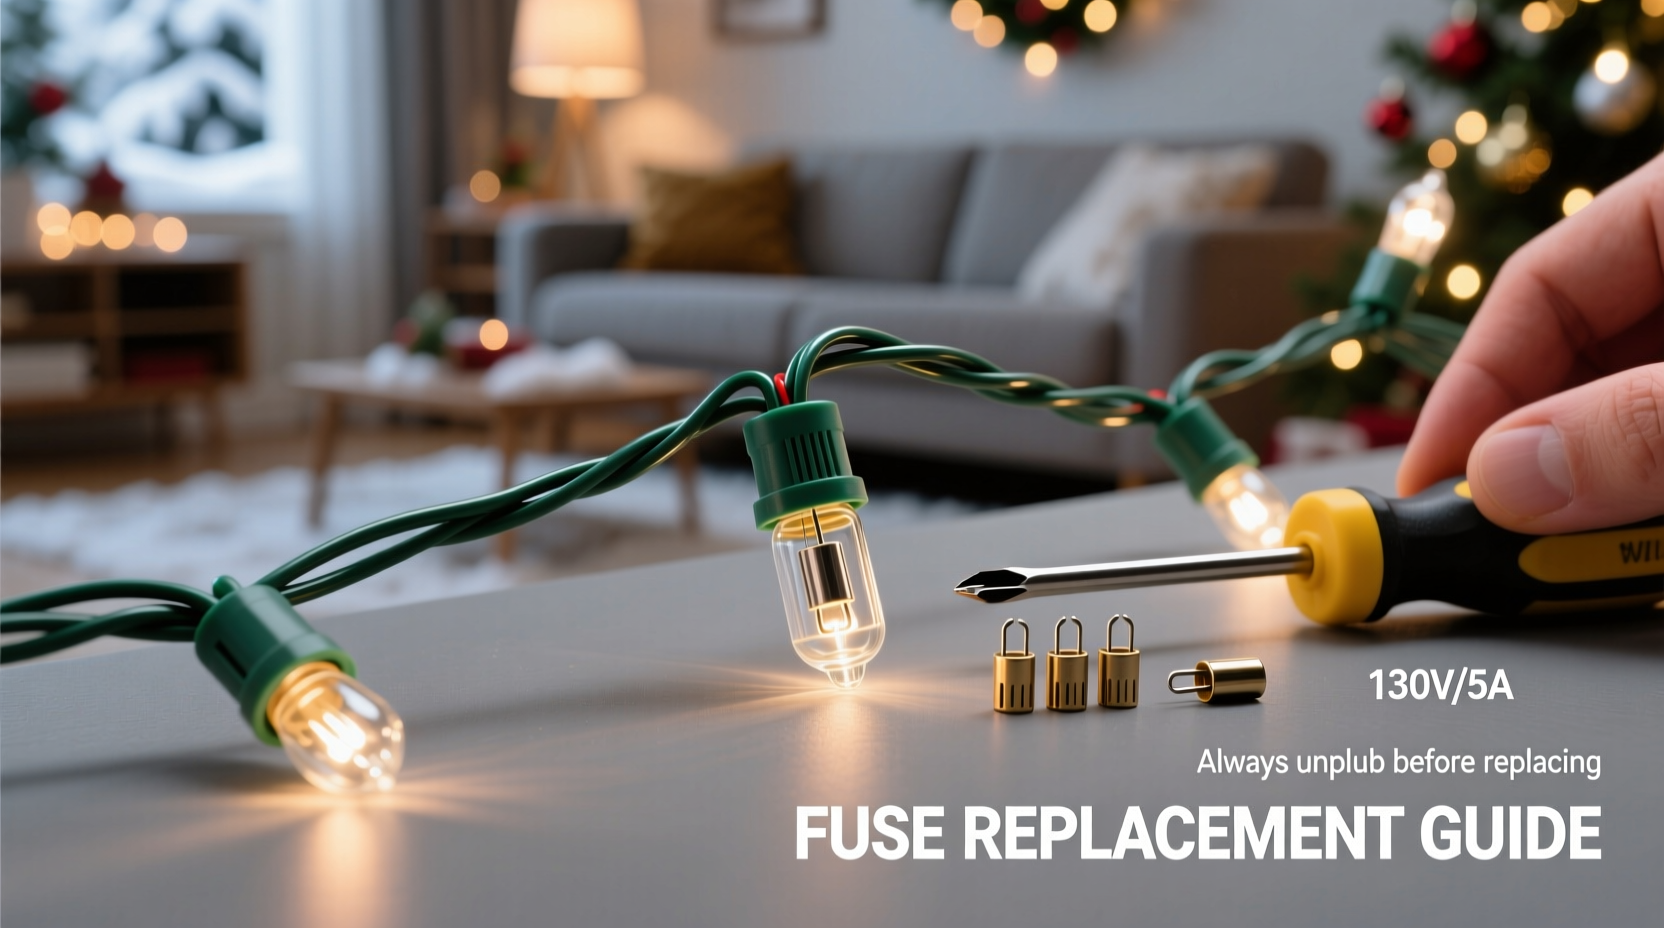
Step-by-Step: Replacing a Fuse Safely and Correctly
Replacing a fuse seems simple—but skipping a single step risks equipment damage, shock, or fire. Follow this verified sequence precisely:
- Unplug the strand completely from the wall outlet and any extension cords or power strips.
- Locate the fuse compartment: On most standard plugs, it’s a small rectangular slide cover on the narrow side of the male plug (the side that inserts into the outlet). Some models use a tiny Phillips-head screw to secure the cover.
- Remove the cover carefully using fingernails or a plastic spudger—never metal tools—to avoid shorting internal contacts.
- Extract both fuses: Most plugs hold two identical fuses side-by-side. Use needle-nose pliers with insulated grips to gently lift them straight out. Note orientation: fuses are not polarized, but consistent placement avoids confusion.
- Verify exact replacement specs: Check the fuse rating printed on the old fuse (e.g., “3AG 3A 125V”). Never substitute with a higher amperage (e.g., 5A instead of 3A) or different physical size (e.g., “3AB” instead of “3AG”). Mismatches compromise safety.
- Insert new fuses firmly into their slots until fully seated. Ensure no bent leads or debris obstruct contact.
- Reattach the cover securely—but don’t overtighten screws, which can crack the plastic housing.
- Plug in and test: Connect directly to a known-good outlet (not via a power strip). If lights remain dark, the issue lies elsewhere—bulb, shunt, or wiring.
Fuse Replacement Do’s and Don’ts
| Action | Do | Don’t |
|---|---|---|
| Choosing a replacement | Match amperage (e.g., 3A), voltage rating (125V), and physical type (3AG glass tube) | Use automotive blade fuses, soldered fuses, or “universal” kits without verifying specs |
| Handling | Hold fuses by the ceramic or glass ends; avoid touching metal contacts with bare fingers | Drop fuses on hard surfaces (can crack glass or loosen internal elements) |
| Troubleshooting | Test the outlet with another device first; rule out GFCI trips or tripped breakers | Assume the fuse is faulty without visual inspection—some fuses fail intermittently |
| Storage | Keep spare fuses in their original packaging with ratings clearly labeled | Store loose fuses in mixed containers where ratings become illegible |
| After replacement | Check for warm spots along the cord or plug within 5 minutes of powering on | Leave the strand unattended while testing—especially near flammable trees or drapes |
Real-World Case Study: The Overloaded Porch Display
In December 2022, Sarah K., a homeowner in Portland, OR, strung eight 100-bulb incandescent C7 light sets across her porch railing. She daisy-chained six strands together using a heavy-duty outdoor-rated extension cord. On the third night, the entire display went dark. She checked bulbs, swapped outlets, and tested voltage—nothing worked. Then she remembered her father showing her how to check fuses decades earlier. She opened the plug on the first strand and found both 3A fuses blackened and shattered. She replaced them with correct 3AG 3A fuses—but within 90 seconds of re-powering, the new fuses blew again.
She measured the total load: each 100-bulb set drew 0.33A (39.6W). Six sets = 1.98A—well under the 3A fuse rating. But her extension cord was coiled tightly under a deck box, trapping heat. Ambient temperature dropped below freezing, increasing wire resistance. More critically, she’d unknowingly used a 16-gauge cord rated for only 10A—fine for one strand, but marginal for six. Voltage drop caused the bulbs to draw slightly more current to maintain brightness, pushing the circuit to its thermal limit. Her solution? She reduced the chain to four strands per circuit, uncoiled the cord fully, and added a second outlet circuit. No more blown fuses—and her display ran flawlessly through New Year’s.
FAQ: Your Top Fuse Questions Answered
Can I replace a fuse with aluminum foil or a paperclip?
No—absolutely never. Foil or metal substitutes eliminate overcurrent protection entirely. This turns the light string into an unregulated resistive heater. UL tests show such “fixes” can raise plug temperatures above 150°C (302°F) in under 3 minutes, melting insulation and igniting nearby pine boughs or vinyl siding. It’s illegal, dangerous, and violates every residential fire code.
Why do some light sets have two fuses instead of one?
Dual fuses provide redundancy and balanced protection. One fuse guards the hot leg, the other the neutral—ensuring complete circuit interruption even if arcing occurs on either conductor. It also allows manufacturers to meet stricter UL 588 requirements for “fail-safe” interruption under fault conditions. If one blows, the second may still be intact—but always replace both to ensure matched performance and prevent cascade failure.
My LED lights have a fuse—but they barely draw any power. Why?
Even low-wattage LED strings include fuses when designed for direct 120V AC input (common in commercial “wide-angle” or retrofit bulbs). While individual LEDs consume little power, poor-quality drivers or voltage spikes from lightning-induced surges can cause instantaneous current spikes. The fuse protects against those transient events—not steady-state operation. If your LED string’s fuse blows repeatedly, suspect a failing driver or moisture intrusion in the plug, not normal operation.
When a Fuse Isn’t the Problem: What to Check Next
If replacing the correct fuses doesn’t restore function, the issue lies deeper. Rule out these common causes in order:
- Bulb shunts: Incandescent mini-lights contain tiny wire shunts inside each bulb base. When a filament breaks, the shunt is designed to activate—creating a bypass path so the rest of the string stays lit. But if the shunt fails (corrosion, manufacturing defect), that bulb opens the circuit. Test with a bulb tester or swap suspected bulbs one-by-one.
- Socket corrosion: Moisture or salt air causes greenish copper oxide buildup in sockets, breaking contact. Clean gently with electrical contact cleaner and a soft brass brush—never sandpaper.
- Wire nicks or pinch points: Inspect the cord where it enters the plug or bends sharply. A hairline cut in insulation can ground the hot wire against the neutral or chassis.
- Controller or timer faults: If using a smart controller or mechanical timer, bypass it temporarily. Many timers have internal fuses or tripping mechanisms independent of the light string.
Conclusion: Respect the Fuse—It’s There to Protect You
A fuse is not a design flaw—it’s quiet, unglamorous engineering doing vital work. That tiny glass tube represents decades of fire-safety research, real-world incident analysis, and regulatory rigor. Replacing it correctly isn’t just about restoring twinkle to your tree; it’s about honoring the intention behind the product: to bring joy, not risk. Take five minutes this season to stock genuine replacement fuses (3AG 3A and 5A are the most common), learn where your plug’s fuse compartment lives, and teach one family member how to check them. Keep a small LED flashlight and insulated pliers in your holiday storage bin—not as accessories, but as essential safety tools. Because when the lights go out, the right response isn’t frustration or improvisation. It’s knowledge, precision, and respect for the small things that keep your home safe.


 浙公网安备
33010002000092号
浙公网安备
33010002000092号 浙B2-20120091-4
Comments
No comments yet. Why don't you start the discussion?