
It’s a familiar holiday frustration: you plug in your string of Christmas lights, and only the first 25 bulbs glow—while the rest remain stubbornly dark. No flickering, no dimming, no warning—just a clean, abrupt cutoff point. This isn’t random failure. It’s physics in action—and more specifically, it’s an open circuit in a series-wired light string. Understanding *why* this happens—and how to diagnose and resolve it—isn’t just about saving time or money. It’s about reclaiming control over a tradition that too often feels like a guessing game. Modern mini-light strings (especially those manufactured before 2015 and many budget LED variants) rely on series circuit design for efficiency and cost savings. That design makes them vulnerable to single-point failure—but also highly diagnosable, once you know what to look for.
How Series Wiring Creates the “Half-Working” Phenomenon
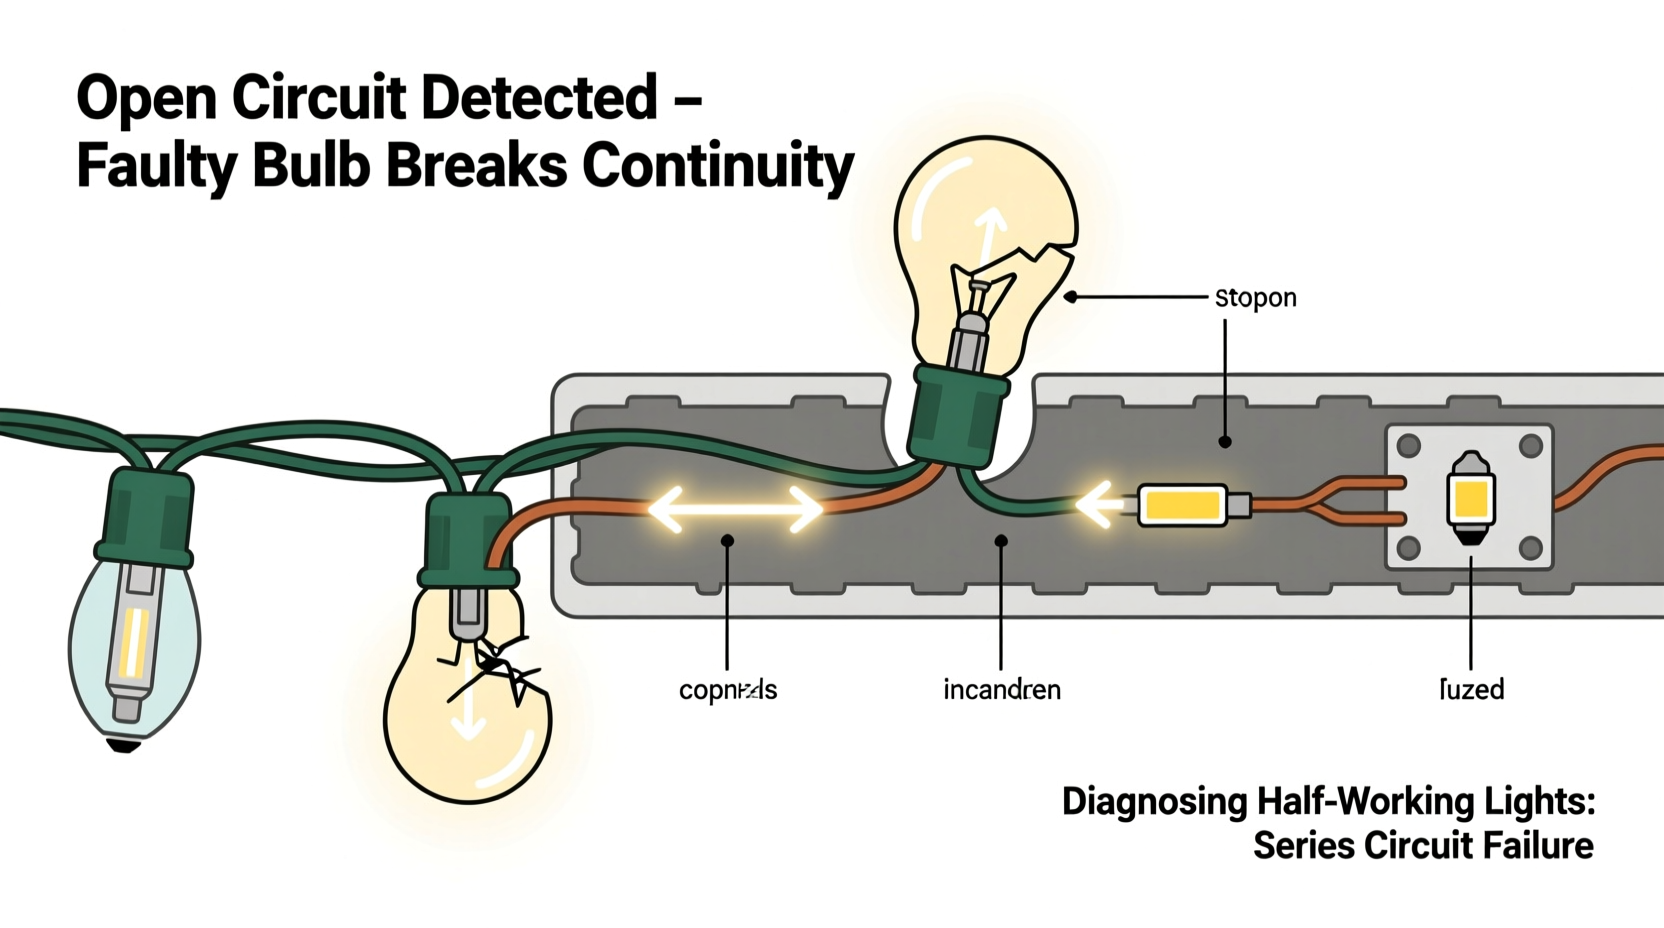
Most traditional incandescent and many entry-level LED Christmas light strings use a series circuit configuration. In this setup, electricity flows through each bulb in sequence—like runners passing a baton in a relay race. Current must pass through bulb #1 to reach bulb #2, then bulb #3, and so on, all the way to the end of the string. There is no parallel path. If one bulb’s filament breaks, its internal shunt fails, or a wire connection loosens *anywhere* along that chain, the circuit opens. Electricity stops flowing entirely beyond that point.
This explains the “half-working” behavior precisely: if the open occurs after the 24th bulb in a 50-bulb string, the first 24 illuminate normally (they’re upstream of the break), and the remaining 26 stay dark (they’re downstream, with no current). The cutoff isn’t gradual—it’s binary and location-specific. Importantly, the break doesn’t need to be a burnt-out bulb. It could be a corroded socket contact, a fractured wire inside the insulation, a loose crimp at a connector, or even a failed fuse in the plug housing. All produce the same symptom: partial illumination.
The Critical Role of Shunts (and Why They Sometimes Fail)
Manufacturers install tiny bypass devices called shunts inside each bulb’s base to mitigate the fragility of series wiring. When a filament burns out, the increased resistance and heat are designed to melt a solder bond inside the shunt, closing an alternate path for current. This allows the rest of the string to stay lit—even with a dead bulb.
But shunts aren’t foolproof. They fail for several reasons:
- Aging and corrosion: Moisture ingress or years of thermal cycling can oxidize shunt contacts, preventing them from activating.
- Overvoltage events: Power surges (e.g., from lightning or grid switching) can vaporize the shunt wire instead of melting it cleanly.
- Manufacturing variance: Low-cost strings sometimes use undersized or inconsistent shunt materials.
- Physical damage: A crushed or bent bulb base can misalign the shunt mechanism.
When a shunt fails to activate, the bulb becomes an open circuit—and the entire downstream string goes dark. This is why replacing only visibly blackened bulbs rarely solves the problem: the real issue is often a silent, non-shunting failure in a bulb that looks intact.
Step-by-Step Diagnostic Protocol: Finding the Open
Effective diagnosis requires methodical elimination—not trial-and-error bulb swapping. Follow this sequence to isolate the fault efficiently:
- Unplug the string and inspect the plug fuse. Many light sets have two small, slide-out fuses housed in the male plug. Use needle-nose pliers to remove them and check for a broken filament under bright light. Replace with identical-rated fuses (usually 3A or 5A).
- Plug into a known-good outlet and verify voltage at the plug. Use a non-contact voltage tester or multimeter. If no power reaches the plug, the issue is external (extension cord, GFCI trip, outlet).
- Identify the exact cutoff point. Note the last bulb that illuminates. Carefully remove it—not just unscrew, but fully extract from the socket—and inspect the metal base for discoloration, pitting, or bent contacts.
- Test the suspect bulb with a continuity tester or multimeter on Ω mode. Place probes on both metal contacts at the bulb’s base. A functional bulb (with intact filament *or* activated shunt) reads near zero ohms. An open reads “OL” or infinite resistance. If the bulb tests open, replace it—but proceed to step 5 regardless.
- Test the socket itself. With the bulb removed, insert the multimeter probes into the socket’s two contact points (use insulated probes; avoid shorting). A good socket shows continuity (<1Ω) between contacts *only when a bulb is installed and shunted*. But more reliably: insert a known-good bulb into the suspect socket. If it doesn’t light *and* the next bulb downstream also stays dark, the socket’s internal wiring or spring contact is faulty.
- Check inter-string connectors. If using multiple strings daisy-chained, unplug the first non-working string from the last working one. Test voltage at the female end of the working string. If voltage is present, the issue lies in the connector or the next string’s input fuse or first socket.
Common Failure Points Beyond Burnt Bulbs
While burnt bulbs get the blame, real-world diagnostics reveal other frequent culprits—often overlooked because they don’t involve visible damage:
| Failure Location | Why It Causes Partial Failure | How to Confirm |
|---|---|---|
| Plug-in fuse holder contacts | Oxidation or spring fatigue prevents full contact with fuse ends, creating high-resistance junctions that heat and open under load. | Remove fuse, clean contacts with electrical contact cleaner and a brass brush, reseat firmly. |
| Wire nicks under insulation | Flexing during storage can sever one conductor inside the dual-wire cord, breaking the return path mid-string. | Use multimeter continuity mode: probe from plug prongs to each socket contact at the cutoff point. One side will show open. |
| Damaged rectifier (in AC-driven LEDs) | Many LED strings use a half-wave rectifier to convert AC. If it fails open, only half the waveform powers the string—causing every other bulb or segment to dim or go dark. | Requires oscilloscope or AC/DC voltage comparison at output terminals. Often manifests as consistent 50% dimming, not total darkness. |
| Corroded socket springs | Moisture exposure causes copper springs to form non-conductive green patina, breaking contact even with a good bulb installed. | Visually inspect for green residue; clean with vinegar-soaked cotton swab and dry thoroughly. |
Mini Case Study: The “Third-String Mystery”
Janice, a property manager in Chicago, managed holiday lighting for six apartment building lobbies. Each year, she reused the same set of commercial-grade 100-light incandescent strings. In December 2023, three strings exhibited identical behavior: the first 33 bulbs lit; bulbs 34–100 remained dark. She replaced all visibly dark bulbs—no change. She checked fuses—both were intact. Frustrated, she brought one string to a local electrician.
The technician didn’t start with bulbs. He clipped the cord 6 inches from the plug and exposed the wires. Using a multimeter, he found continuity from the hot prong to the first socket—but no continuity from the neutral prong beyond socket #33. He then cut the cord at socket #33 and tested each wire segment. The neutral wire showed an open 2 inches inside the insulation, right where the cord bent sharply around a metal shelving bracket during storage. A microscopic copper fracture—undetectable without instrumentation—had formed under repeated stress. Replacing that 18-inch section restored full function. Janice realized her storage method—coiling tightly around metal edges—was the root cause. She switched to wide-diameter cardboard reels and added strain relief at all bend points. Zero repeat failures in 2024.
Expert Insight on Modern String Reliability
“Series wiring hasn’t disappeared—it’s been engineered smarter. Today’s reliable LED strings use hybrid designs: groups of 3–5 LEDs in series, then those groups wired in parallel. That contains failures. But cheap imports still cut corners—skipping shunts, using copper-clad aluminum wire prone to cold-flow failure, or omitting thermal fuses. If your string costs less than $0.10 per bulb, assume it’s built for one season.” — Mark Delaney, Lighting Engineer, UL Solutions
Preventive Maintenance Checklist
Extend string life and avoid mid-season failures with these proactive steps:
- ✅ Before storage: Wipe cords with a dry microfiber cloth to remove salt residue (if used outdoors) and dust.
- ✅ Coil gently: Use the over-under method or a dedicated light reel—never wrap tightly around your arm or a narrow spool.
- ✅ Store cool and dry: Avoid attics (heat degrades insulation) and basements (humidity corrodes contacts). Ideal: climate-controlled closet in original box with silica gel packs.
- ✅ Test before decorating: Plug in each string for 10 minutes indoors. Watch for flickering, dimming, or warm spots along the cord—early warnings of resistance buildup.
- ✅ Label replacements: Use masking tape on plugs to note year purchased and voltage rating. Prevents mixing incompatible strings.
FAQ
Can I repair a broken wire inside the cord myself?
Yes—but only if you have experience with low-voltage soldering and proper heat-shrink insulation. Cut out the damaged section, strip 1/4 inch of insulation from each wire end, twist and solder the matching conductors (hot-to-hot, neutral-to-neutral), then seal each joint with adhesive-lined heat-shrink tubing rated for 125°C. Never use electrical tape alone; it degrades under heat and UV exposure.
Why do newer LED strings sometimes go completely dark—not half?
Many modern LED strings use constant-current drivers and integrated circuit controllers. A single failed capacitor, blown MOSFET, or corrupted firmware chip can halt the entire system. These aren’t user-serviceable. Look for strings with replaceable driver modules (often labeled “power supply” in the plug) if repairability matters.
Is it safe to connect more than three strings together?
No—unless explicitly rated for it. Most UL-listed light strings are certified for a maximum of three sets daisy-chained. Exceeding this risks overheating the first string’s wiring and plug, tripping breakers, or causing fire hazards. Always check the label on the plug: it states the maximum number and total wattage allowed.
Conclusion
Christmas lights that only half work aren’t broken beyond repair—they’re sending a precise diagnostic signal. That abrupt cutoff point is data, not disappointment. It tells you exactly where the open circuit resides: upstream of darkness, downstream of light. Armed with a multimeter, patience, and an understanding of series fundamentals, you transform frustration into mastery. You stop replacing bulbs blindly and start troubleshooting intentionally. You recognize that a $5 string failing after one season isn’t bad luck—it’s a design choice you can now evaluate critically. And you protect your investment—not just financially, but emotionally—by preserving the warmth and rhythm of light that defines the season. Don’t wait for next December. Pull out last year’s strings tonight. Test them. Document what works and what doesn’t. Clean the sockets. Store them properly. Turn seasonal ritual into enduring reliability.


 浙公网安备
33010002000092号
浙公网安备
33010002000092号 浙B2-20120091-4
Comments
No comments yet. Why don't you start the discussion?