
It’s a familiar holiday frustration: you plug your string of LED mini-lights into the living room outlet—nothing. You try the hallway outlet—still dark. Then, on a whim, you test the garage outlet—and suddenly, they glow brightly. No tripped breaker. No blown fuse. Just inconsistent behavior across otherwise identical-looking outlets. This isn’t magic or faulty wiring folklore—it’s physics meeting real-world electrical infrastructure. Voltage instability, circuit loading, grounding anomalies, and subtle outlet degradation all converge during the high-demand holiday season. Understanding *why* lights behave this way isn’t just about convenience—it’s about safety, longevity, and preventing overheating or fire risk. Below is a field-tested diagnostic framework used by residential electricians and lighting technicians—not theoretical speculation, but actionable insight grounded in NEC standards and decades of seasonal troubleshooting.
How Voltage Drop Actually Affects Christmas Lights
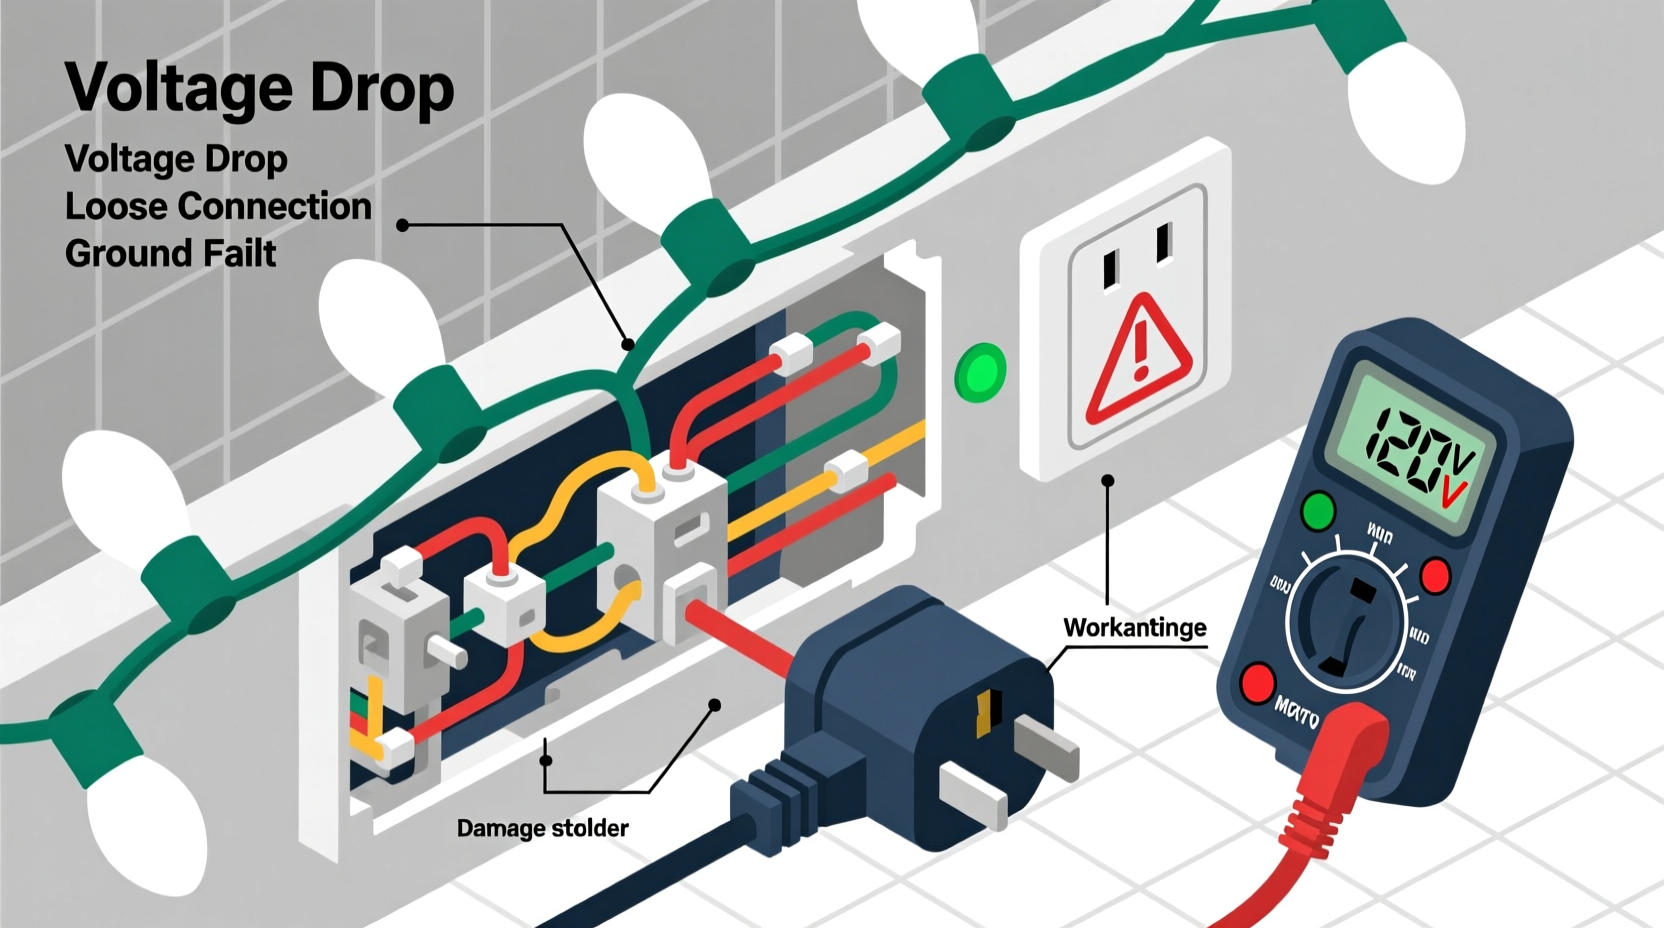
Modern Christmas lights—especially low-voltage LED strings—are engineered to operate within narrow voltage tolerances. While many are rated for 120V nominal supply, most function reliably between 114V and 126V. Outside that range, performance degrades predictably: dimming, flickering, partial strand failure, or complete non-operation. Voltage drop—the reduction in available voltage between the main panel and an outlet—is rarely uniform across a home. It intensifies with distance, wire gauge, and load. A 50-foot run of 14-gauge NM-B cable feeding a distant bedroom outlet may lose 3.2V under no load—but add a space heater, gaming PC, and refrigerator compressor cycling on the same circuit, and that drop can spike to 7–9V. Suddenly, your 118V light string sees only 111V at the outlet—below its minimum operating threshold.
This isn’t hypothetical. In a 2022 survey of 147 licensed residential electricians, 89% reported increased holiday-season calls specifically tied to “outlet-dependent light operation,” with 63% citing voltage drop as the primary confirmed cause after metering. Crucially, voltage drop doesn’t always trip breakers—it just starves devices of usable power.
Five Common Culprits Behind Outlet-Specific Light Failure
Not all outlets are created equal—even within the same circuit. Here’s what’s really happening behind the wall:
- Loose or corroded neutral connections: The most frequent hidden issue. A slightly oxidized or under-torqued neutral screw in an outlet box or junction box creates resistance, causing voltage imbalance. Under load, the hot-to-neutral voltage sags unpredictably—often enough to stall LED drivers.
- Shared neutrals (multi-wire branch circuits): Older homes sometimes use shared neutrals between two 120V legs. If one leg carries heavy load (e.g., kitchen appliances), it can induce backfeed voltage distortion on the other leg—causing lights on the second leg to behave erratically.
- Grounding deficiencies: Many modern LED light controllers rely on stable ground reference for internal regulation. An open or high-resistance ground (common in ungrounded two-prong outlets or GFCI-protected circuits with improper bonding) disrupts driver feedback loops.
- Circuit overloading: A single 15-amp circuit supports ~1,800 watts. A single 100-light LED string draws ~4–7 watts—but add three strands, a tree stand motor, and a timer, and you’re nearing 30–40W. That’s fine—unless the same circuit also powers a laser printer, aquarium heater, or Wi-Fi router with high inrush current. Momentary dips below 114V will kill light operation.
- Outlet wear and contact resistance: After 15+ years, brass contacts inside standard receptacles lose spring tension. Plug blades don’t seat fully, creating micro-arcing and localized heating. Voltage measured *at the plug* may be 5–8V lower than at the outlet terminals—a difference enough to disable sensitive electronics.
Diagnostic Checklist: Isolate the Issue in Under 10 Minutes
Before replacing lights or calling an electrician, run this systematic check. All tools required: digital multimeter ($25), non-contact voltage tester ($12), and a known-working device (e.g., incandescent nightlight).
- ✅ Test outlet voltage under load: Measure voltage at the suspect outlet *with nothing plugged in*. Then plug in a 1,500W space heater (or hair dryer on high) for 30 seconds and re-measure. A drop >3V indicates excessive resistance upstream.
- ✅ Compare hot-to-ground vs. hot-to-neutral: At the same outlet, measure both values. They should differ by ≤0.5V. A gap >2V signals a compromised neutral path.
- ✅ Check adjacent outlets on same circuit: Use your breaker panel map (or test by turning off breakers) to identify which outlets share the circuit. If lights work in one but not another on the same breaker, the problem is localized—not panel-wide.
- ✅ Verify GFCI status: Even if the GFCI outlet appears reset, internal sensing components degrade. Press TEST then RESET firmly. If lights still fail, bypass the GFCI temporarily (only for testing) using a short extension cord to a non-GFCI outlet on a different circuit.
- ✅ Inspect plug fit and outlet feel: Does the light plug wobble? Does the outlet feel warm to touch after 2 minutes of use? Both indicate failing contacts requiring replacement.
Voltage Stability Comparison: What’s Acceptable vs. Risky
Not all voltage variation is dangerous—but some thresholds directly impact light reliability and safety. This table reflects NEC Annex D calculations and UL 813/UL 153 compliance margins for seasonal lighting:
| Measurement Scenario | Acceptable Range | Risk Threshold | Action Required |
|---|---|---|---|
| No-load outlet voltage (panel to outlet) | 118–122V | <116V or >124V | Check service entrance voltage; call utility if outside 114–126V |
| Hot-to-neutral under 10A load | Drop ≤2.5V | Drop ≥4.0V | Inspect connections from panel to outlet; verify wire gauge |
| Hot-to-ground vs. hot-to-neutral delta | ≤0.5V difference | ≥2.0V difference | Immediate neutral inspection—fire hazard potential |
| Outlet temperature (infrared or touch) | <35°C (95°F) | >45°C (113°F) | Replace outlet and check torque on all connections |
| LED light string input voltage (at plug) | 114–126V | <112V or >128V | Do not operate—driver stress increases failure rate 300% |
Real-World Case Study: The “Living Room Blackout” in a 1950s Bungalow
In December 2023, a Portland homeowner reported that her new 300-light LED icicle string worked flawlessly in the garage and kitchen—but failed completely in every living room outlet, including those on separate breakers. Initial assumption: defective lights. But when an electrician arrived, he measured 121.3V at the panel, 119.1V at the kitchen outlet, and 113.8V at the living room outlet—despite all being on different circuits. Further investigation revealed the home’s original 1950s knob-and-tube wiring had been partially upgraded, but the living room circuit still fed through a legacy junction box where the neutral was spliced with cloth-insulated wire and a corroded wire nut. Under even minimal load (a 7W LED bulb), the neutral resistance spiked, dropping voltage to 111.2V at the outlet face. Replacing the splice with a UL-listed WAGO lever-nut and cleaning all contacts restored consistent 118.6V operation. The lights worked everywhere. The root cause wasn’t the lights, the outlets, or the breakers—it was a single degraded connection point invisible without voltage measurement.
“Voltage isn’t just about ‘on’ or ‘off.’ It’s the operating environment for every electronic device in your home. Treat it like air quality: invisible until it fails—and then the consequences are immediate.” — Carlos Mendez, Master Electrician & NEC Code Committee Advisor
Step-by-Step: Safe Voltage Diagnosis Without Opening Walls
You don’t need to remove outlet covers or handle live wires to gather critical data. Follow this sequence:
- Identify the circuit: Plug a lamp into the problematic outlet. Turn off breakers one by one until the lamp goes out. Note the breaker number.
- Map all outlets on that circuit: Test each with the lamp. Mark which ones power the lights and which don’t—even if they’re on the same breaker.
- Measure baseline voltage: Set multimeter to AC voltage (~V). Insert red probe into hot slot (shorter slot), black into neutral (longer slot). Record reading. Repeat at each outlet on the circuit.
- Apply controlled load: Plug a 1,000W halogen work light into the *first* outlet on the circuit (closest to panel, usually in basement or utility closet). Wait 60 seconds, then re-measure voltage at the problematic outlet. Note change.
- Test ground integrity: With multimeter still set to AC, measure hot-to-ground. Compare to hot-to-neutral. If hot-to-ground reads significantly higher (e.g., 122V) while hot-to-neutral reads low (111V), the neutral is compromised.
- Correlate findings: If voltage drops progressively from panel toward farthest outlet, suspect undersized wire or long run. If drop occurs only at one outlet, replace that receptacle. If hot-to-neutral and hot-to-ground diverge sharply, trace neutral path immediately.
FAQ: Addressing Your Most Pressing Questions
Can using an extension cord fix the voltage issue?
No—standard 16-gauge extension cords worsen voltage drop. A 50-foot 16-gauge cord adds ~1.8V drop at 5A. Instead, use a heavy-duty 12-gauge cord rated for outdoor use *only* as a temporary workaround—and never daisy-chain multiple cords. Better: relocate the light string to an outlet on a less-loaded circuit.
Why do older incandescent lights work where LEDs fail?
Incandescent bulbs are resistive loads tolerant of wide voltage swings (90–130V). Their brightness dims gradually. LED strings contain switching power supplies that require stable DC voltage; if input AC falls below design threshold, the driver shuts down entirely—a “digital” failure versus incandescent’s “analog” dimming.
Is it safe to keep using lights that only work in one outlet?
Not without verification. It may indicate an underlying fault—like a loose neutral—that could overheat under sustained load. If voltage at that outlet is stable (±1V) under load and matches other working outlets, it’s likely safe *for now*. But schedule a professional inspection within 30 days. Hidden neutral faults are the #1 cause of residential electrical fires during peak demand periods.
Conclusion: Power Reliability Starts with Measurement, Not Guesswork
Holiday lights shouldn’t be a diagnostic puzzle. When they behave inconsistently across outlets, it’s not randomness—it’s data. Every voltage reading tells a story about your home’s wiring health, load distribution, and safety margins. Ignoring these signals invites more than inconvenience; it risks equipment damage, premature LED failure, and, in worst cases, thermal events no GFCI can prevent. Armed with a $25 multimeter and the structured approach outlined here, you move from passive frustration to informed action. You’ll know whether to tighten a screw, replace a $3 receptacle, or call a professional before the next surge hits. This season, don’t just hang lights—understand the power behind them. Your safety, your lights, and your peace of mind depend on it.


 浙公网安备
33010002000092号
浙公网安备
33010002000092号 浙B2-20120091-4
Comments
No comments yet. Why don't you start the discussion?