
Every holiday season, millions of homes light up with festive strands of Christmas lights. But nothing dampens the cheer faster than noticing half a strand glowing brightly while the other sags into dimness or darkness. You plug in your favorite string, expecting brilliance, only to find inconsistent brightness—some bulbs shining strong, others barely flickering. This isn’t just an aesthetic flaw; it’s a sign of underlying electrical behavior that can be diagnosed and often corrected. Understanding why some Christmas lights stay bright while others dim is essential for both safety and seasonal enjoyment.
The difference in brightness among bulbs on the same strand usually comes down to how the lights are wired, the quality of components, and how they’ve been maintained over time. While modern LED strings offer better efficiency and consistency, even they aren't immune to performance drops. By exploring the science behind these variations and applying proven troubleshooting techniques, you can extend the life of your lights and ensure radiant displays year after year.
How Christmas Lights Are Wired: Series vs. Parallel Circuits
The foundation of any lighting issue lies in the circuit design. Most traditional incandescent Christmas lights use a **series circuit**, where each bulb is connected one after another in a single loop. In this setup, electricity flows through each bulb sequentially. If one bulb burns out or becomes loose, the entire circuit breaks, and the rest of the strand goes dark. More critically, in a series circuit, voltage is shared across all bulbs. For example, in a 100-bulb strand running on 120 volts, each bulb receives about 1.2 volts. Any variation—such as a missing bulb or increased resistance—can shift voltage distribution, causing others to either overwork (and burn out) or underperform (appearing dim).
In contrast, **parallel circuits** allow each bulb to connect independently to the power source. This means each receives the full voltage and operates separately. A failure in one bulb doesn’t affect the others. High-end decorative strings, especially newer LED models, often use parallel or hybrid wiring to maintain consistent brightness and reliability.
Many modern mini-light strands use a combination approach called “shunted” or “dual-wire” designs. These incorporate features like shunt wires inside each bulb socket that bypass a dead filament, keeping the rest of the strand lit. However, even with this technology, poor connections or degraded wiring can still lead to dimming.
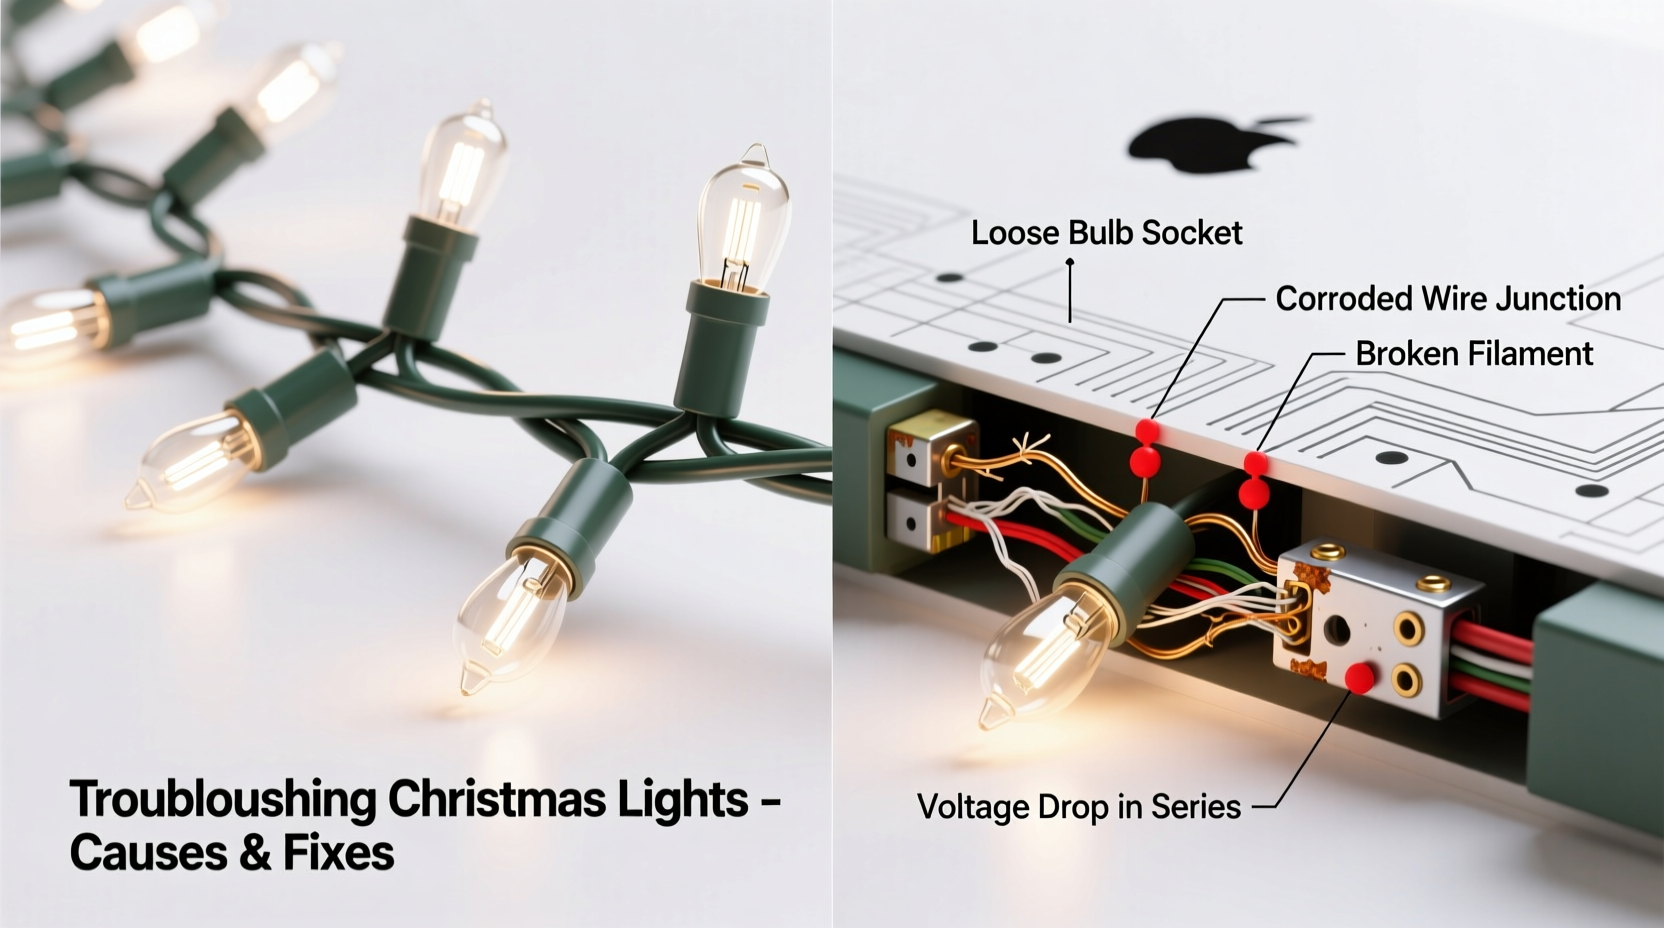
Common Causes of Dimming Christmas Lights
Dimming doesn’t happen randomly—it’s a symptom of specific problems. Identifying the root cause is the first step toward resolution.
- Voltage drop due to long runs: Connecting multiple strands end-to-end increases total load. Even if within manufacturer limits, cumulative resistance in thin wires causes voltage to decrease along the length, resulting in progressively dimmer bulbs toward the end.
- Loose or corroded bulbs: A bulb not fully seated in its socket creates high resistance, reducing current flow. Oxidation on metal bases—especially in older sets stored in damp areas—has the same effect.
- Damaged or frayed wiring: Physical wear, rodent damage, or repeated bending can compromise internal conductors, increasing resistance and lowering available power.
- Overloaded outlets or extension cords: Using undersized or low-quality extension cords restricts current delivery, especially when powering multiple strands from one outlet.
- Aging LEDs with failing drivers: Unlike incandescents, LEDs rely on internal drivers to regulate current. As these degrade, output diminishes unevenly across a strand.
- Mismatched light types: Mixing different brands, voltages, or technologies (e.g., LED with incandescent) on the same circuit leads to inconsistent brightness and potential overheating.
“Voltage imbalance is the silent killer of Christmas lights. What starts as slight dimming often precedes complete failure.” — Greg Thompson, Electrical Technician & Holiday Lighting Installer
Troubleshooting Steps to Restore Brightness
Restoring uniform brightness requires systematic testing and correction. Follow this step-by-step guide to diagnose and resolve dimming issues.
- Unplug the strand and inspect visually. Look for cracked sockets, discolored wires, or bulbs that appear darker or blackened inside. Replace any visibly damaged bulbs with identical replacements.
- Check bulb seating. Gently press each bulb into its socket. Many dimming problems stem from poor contact. Use a soft cloth to wipe bulb bases if corrosion is visible.
- Test with a known-good outlet. Plug the strand into a different circuit to rule out insufficient power from the original outlet.
- Use a multimeter to test voltage at both ends. Set your multimeter to AC voltage. Measure input voltage at the plug (should be ~120V). Then test at the far end of the strand. A reading below 100V indicates significant voltage drop.
- Separate long chains. If using multiple connected strands, disconnect them and test individually. Reconnect no more than the manufacturer recommends—usually three incandescent or five LED strands max.
- Replace old extension cords. Use heavy-gauge (16 AWG or lower), outdoor-rated cords no longer than 25 feet. Avoid daisy-chaining extension cords.
- Clean connectors. Dirt and moisture in male/female plugs increase resistance. Wipe contacts with isopropyl alcohol and a cotton swab.
- Try a different power source. If using a timer or smart plug, bypass it temporarily. Some low-cost controllers cannot handle full lighting loads.
Mini Case Study: The Flickering Front Yard Display
Mark, a homeowner in Ohio, installed a 150-bulb incandescent strand along his porch railing. Each year, the far end grew dimmer until only the first third glowed. He replaced bulbs repeatedly but saw no improvement. After consulting a local electrician, he discovered two issues: first, he was linking six strands together—double the recommended limit. Second, his 50-foot extension cord was a lightweight indoor type (18 AWG), causing severe voltage drop. By switching to three shorter runs powered by separate heavy-duty cords, Mark restored full brightness across all strands. His display now lasts the entire season without fading.
Do’s and Don’ts of Christmas Light Maintenance
| Action | Why It Matters |
|---|---|
| Do: Store lights on reels or cardboard spools. | Prevents wire kinks and internal breaks caused by tight wrapping around sharp edges. |
| Don’t: Leave lights plugged in unattended or overnight. | Increases fire risk, especially with older incandescent sets that generate heat. |
| Do: Label each strand after testing. | Saves time next year—knowing which ones work prevents re-testing everything. |
| Don’t: Mix LED and incandescent lights on the same run. | They draw different currents; mixing can cause LEDs to flicker or overheat. |
| Do: Inspect fuses in plug ends annually. | Blown fuses are a common cause of partial outages; spare fuses are often stored in the plug cap. |
| Don’t: Use water to clean active strands. | Moisture can seep into sockets and cause shorts or corrosion. Use a dry microfiber cloth instead. |
When to Upgrade: Signs Your Lights Are Beyond Repair
Not every dimming problem can be fixed. Some strands have reached the end of their useful life. Watch for these red flags:
- Bulbs consistently fail within weeks of installation.
- Frequent tripping of circuit breakers when lights are turned on.
- Visible melting or brittleness in wire insulation.
- Warmth or buzzing from the plug or transformer.
- More than 20% of bulbs are replaced in a single season.
If multiple signs appear, replacement is safer and more cost-effective than continued repairs. Modern LED strings consume up to 90% less energy, last 25 times longer, and provide uniform brightness thanks to regulated drivers and better construction.
FAQ: Common Questions About Dimming Christmas Lights
Why do my Christmas lights get dimmer the longer they’re on?
This often happens with incandescent bulbs. As filaments heat up, resistance increases slightly, reducing current flow. But if dimming worsens over minutes, it may indicate a failing connection or overheating component. LEDs should maintain brightness; gradual dimming suggests driver degradation.
Can cold weather make Christmas lights dimmer?
No—cold temperatures actually improve LED efficiency. However, thermal contraction in winter can loosen connections in cheaply made strands, leading to intermittent contact and perceived dimming. Ensure all bulbs are snug before hanging outdoors.
Is it safe to keep using dim Christmas lights?
It depends. Slight dimming due to long runs may be harmless. But if accompanied by heat, flickering, or damaged wires, it poses a fire hazard. Err on the side of caution: replace questionable strands, especially indoors or near flammable materials.
Conclusion: Shine Brighter This Season
Christmas lights should spark joy, not frustration. The difference between bright, reliable illumination and a patchy, dim display often comes down to understanding electrical basics and practicing diligent maintenance. From checking bulb contact to avoiding overloaded circuits, small actions yield dramatic improvements. Whether you're reviving an old favorite strand or designing a new display, prioritize quality connections, proper loading, and regular inspection.
As lighting technology advances, upgrading to modern LED systems offers lasting benefits: consistent brightness, energy savings, and greater durability. But even the best lights need care. Treat them well, store them properly, and test them yearly. Your holiday spirit deserves to shine at full strength.


 浙公网安备
33010002000092号
浙公网安备
33010002000092号 浙B2-20120091-4
Comments
No comments yet. Why don't you start the discussion?