
Outdoor lighting systems equipped with timer functions offer convenience, energy efficiency, and enhanced security. However, many homeowners notice a troubling pattern: their automated lights stop turning on or off at the right times when temperatures drop. This issue is especially common in regions that experience prolonged cold spells or sudden winter storms. While it may seem like a random glitch, there’s usually a clear technical explanation rooted in physics, electronics, and environmental conditions. Understanding why timers fail in the cold enables you to diagnose problems faster, choose more resilient components, and maintain reliable operation throughout the winter months.
The Role of Temperature in Electronic Performance
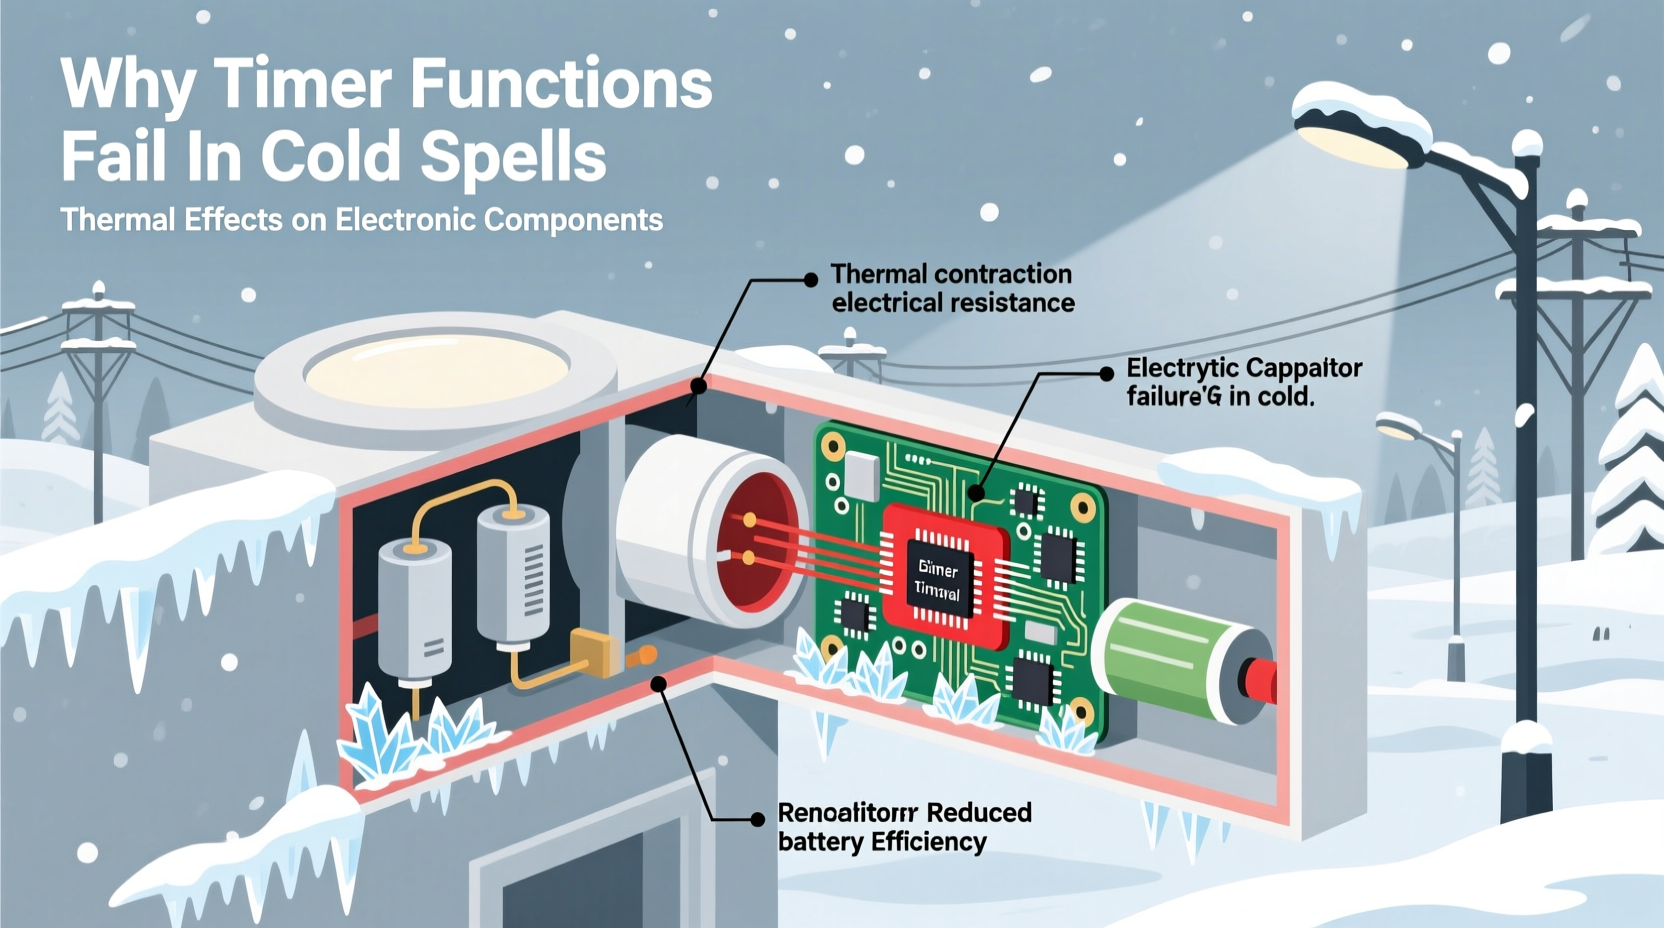
Electronics are designed to operate within specific temperature ranges. Most consumer-grade lighting timers—whether mechanical, digital, or smart—are rated for use between 32°F (0°C) and 104°F (40°C). When ambient temperatures fall below freezing, several internal mechanisms begin to behave unpredictably.
Batteries, capacitors, and crystal oscillators—all critical components in timing circuits—are particularly sensitive to cold. For instance, lithium coin cells used in backup memory can lose up to 50% of their capacity at -10°C (14°F). Similarly, electrolytic capacitors may stiffen or leak under thermal stress, leading to inconsistent power delivery. These changes disrupt the precise electrical pulses needed to keep time accurately.
“Temperature extremes don’t just slow down electronics—they alter fundamental chemical and physical behaviors inside components.” — Dr. Lena Torres, Electrical Systems Engineer, Northeast Institute of Technology
In outdoor installations, where timers are exposed directly to wind, snow, and ice, the problem intensifies. Even if the timer is housed in a weatherproof box, rapid temperature fluctuations cause condensation, which can lead to corrosion or short circuits over time.
Common Timer Types and Their Cold-Weather Vulnerabilities
Not all timers react to cold the same way. The design and technology behind each type determine its resilience in low temperatures. Below is a comparison of the most common timer types used in residential and commercial lighting systems.
| Timer Type | How It Works | Cold-Weather Risks | Typical Operating Range |
|---|---|---|---|
| Mechanical Dial Timers | Uses a spring-wound motor and rotating dial | Lubricants thicken; gears bind or stall | 40°F – 100°F (4°C – 38°C) |
| Digital Plug-In Timers | Microcontroller with quartz clock crystal | Clock drift due to crystal frequency shift; battery failure | 32°F – 104°F (0°C – 40°C) |
| Smart Timers (Wi-Fi/Zigbee) | Network-connected device with real-time clock | Freezing affects internal sensors and battery-backed RAM | 30°F – 113°F (-1°C – 45°C) |
| Astronomical Timers | Calculates sunrise/sunset based on GPS and date | Firmware errors if internal clock resets due to cold | 23°F – 122°F (-5°C – 50°C) |
As shown, even models marketed as “all-weather” have limits. Mechanical timers suffer from physical resistance in moving parts, while digital units face electronic instability. Smart devices, though advanced, rely on consistent internal timekeeping—which fails when batteries weaken or capacitors discharge prematurely in the cold.
Real-World Example: A Homeowner's Winter Lighting Failure
In January 2023, Sarah M., a homeowner in northern Minnesota, reported that her front porch lights—programmed to turn on at dusk and off at midnight—began turning on randomly at 3 a.m. or not at all. She had installed a digital plug-in timer two years earlier, which worked flawlessly through spring, summer, and fall.
After checking connections and replacing the bulbs, she contacted an electrician. Upon inspection, the technician found that the timer’s backup battery was completely drained and the internal circuit board showed minor moisture damage. The unit was mounted in an exterior garage outlet box, exposed to drafts and overnight frost.
The solution? Replacing the timer with a cold-rated astronomical model and installing it inside the garage wall, away from direct exposure. A low-voltage control wire now activates the outdoor light fixture. Since the change, the system has operated without issue—even during a week-long cold snap with temperatures below -20°F (-29°C).
This case illustrates how environmental placement and component selection directly impact reliability. A small upgrade in location and hardware prevented recurring frustration.
Step-by-Step Guide to Preventing Cold-Related Timer Failures
Preventing timer malfunctions in cold weather doesn’t require expensive equipment—just thoughtful planning and maintenance. Follow this six-step process to ensure dependable performance year-round.
- Assess Your Timer’s Location: Determine whether it’s indoors, in a protected enclosure, or fully exposed. Outdoor-mounted timers need extra protection.
- Check Manufacturer Specifications: Review the operating temperature range listed in the manual. If it doesn’t go below 32°F (0°C), it’s not suitable for harsh winters.
- Inspect Backup Batteries: Many digital timers use CR2032 or similar batteries to retain settings during power outages. Replace them annually before winter begins.
- Use Weatherproof Enclosures: Install timers in NEMA-rated electrical boxes with gaskets. Add silica gel packs to reduce internal moisture.
- Switch to Cold-Tolerant Models: Look for timers rated for at least -20°F (-29°C), especially if you live in USDA zones 4 or colder.
- Test Before the First Freeze: Program your lights and monitor them for three consecutive nights. Adjust placement or replace vulnerable units early.
Implementing these steps proactively reduces the likelihood of unexpected failures when you need outdoor lighting the most—during dark winter evenings.
Do’s and Don’ts of Winter Timer Maintenance
To reinforce best practices, here’s a quick-reference table summarizing what to do—and what to avoid—when managing timer-controlled lights in cold climates.
| Action | Do | Don't |
|---|---|---|
| Installation Location | Mount inside garages, basements, or climate-controlled utility rooms | Leave timers exposed on exterior walls or open outlets |
| Power Supply | Use surge protectors with battery backup | Plug directly into unregulated outdoor outlets |
| Winter Preparation | Seal enclosures with silicone caulk and add desiccants | Ignore signs of condensation or rust |
| Component Upgrades | Replace aging timers every 3–5 years | Continue using outdated or recalled models |
| Troubleshooting | Reset and reprogram after extended outages | Assume the bulb or wiring is faulty without testing the timer |
Frequently Asked Questions
Can cold weather permanently damage a light timer?
Yes. Prolonged exposure to subzero temperatures can cause irreversible damage to solder joints, capacitors, and integrated circuits. Repeated freeze-thaw cycles increase the risk of micro-cracks and delamination in circuit boards. If a timer has been frozen and no longer holds time, it likely needs replacement.
Why do my lights come on at the wrong time only in winter?
This is typically due to clock drift caused by a weakened backup battery or inaccurate internal oscillator performance in the cold. Digital timers rely on precise frequency signals to track time. When those signals slow down due to low temperature, the timer falls behind schedule. Resetting the clock or replacing the battery often resolves the issue temporarily—but upgrading to a cold-rated model provides a long-term fix.
Are smart timers more reliable in cold weather?
Not necessarily. While some smart timers sync with internet time servers daily, reducing drift, their internal components are still vulnerable to extreme cold. Additionally, Wi-Fi signal strength can degrade in winter due to atmospheric conditions and snow accumulation on routers or antennas. For best results, install smart timers indoors and use them to control outdoor circuits remotely.
Expert Recommendations for Long-Term Reliability
Industry professionals emphasize prevention over repair. According to Mark Delaney, a certified lighting systems consultant with over 20 years of field experience:
“The most reliable winter lighting setups aren’t the most advanced—they’re the simplest and best-protected. I recommend hardwiring a cold-rated astronomical timer inside the home and using it to trigger external relays. You get precision timing without exposing electronics to the elements.” — Mark Delaney, CLC, Lighting Solutions Group
He also advises against relying solely on smartphone apps for outdoor lighting control during winter. Network outages, app glitches, and phone battery issues compound the risks posed by cold weather. A dedicated, properly installed timer remains the gold standard for consistency.
Conclusion: Ensuring Reliable Light Control All Winter Long
Cold-weather timer failures are not inevitable quirks—they are predictable engineering challenges rooted in material science and environmental exposure. By understanding how low temperatures affect electronic components, selecting appropriate hardware, and installing systems with foresight, you can maintain full control over your outdoor lighting regardless of the forecast.
Whether you're safeguarding a single porch light or managing a complex landscape lighting scheme, the principles remain the same: protect the timer from the cold, use components rated for your climate, and perform seasonal checks. Small investments in quality and placement pay off in reliability, safety, and peace of mind.


 浙公网安备
33010002000092号
浙公网安备
33010002000092号 浙B2-20120091-4
Comments
No comments yet. Why don't you start the discussion?