
Vintage Christmas lights—especially those from the 1940s through the early 1980s—carry a warmth modern LEDs rarely replicate. Their soft amber glow, gentle flicker, and nostalgic charm make them heirlooms, not just decorations. But many collectors and homeowners discover a frustrating reality: after storage or even a single season outdoors, the sockets—the small ceramic or Bakelite housings where bulbs twist in—develop orange-brown corrosion around the brass or copper contacts. That rust isn’t just cosmetic. It degrades conductivity, causes intermittent flickering, increases fire risk, and ultimately renders the string unusable. Understanding why this happens isn’t about nostalgia—it’s about preservation, safety, and extending the functional life of irreplaceable lighting.
The Science Behind Socket Rust: More Than Just “Old Age”
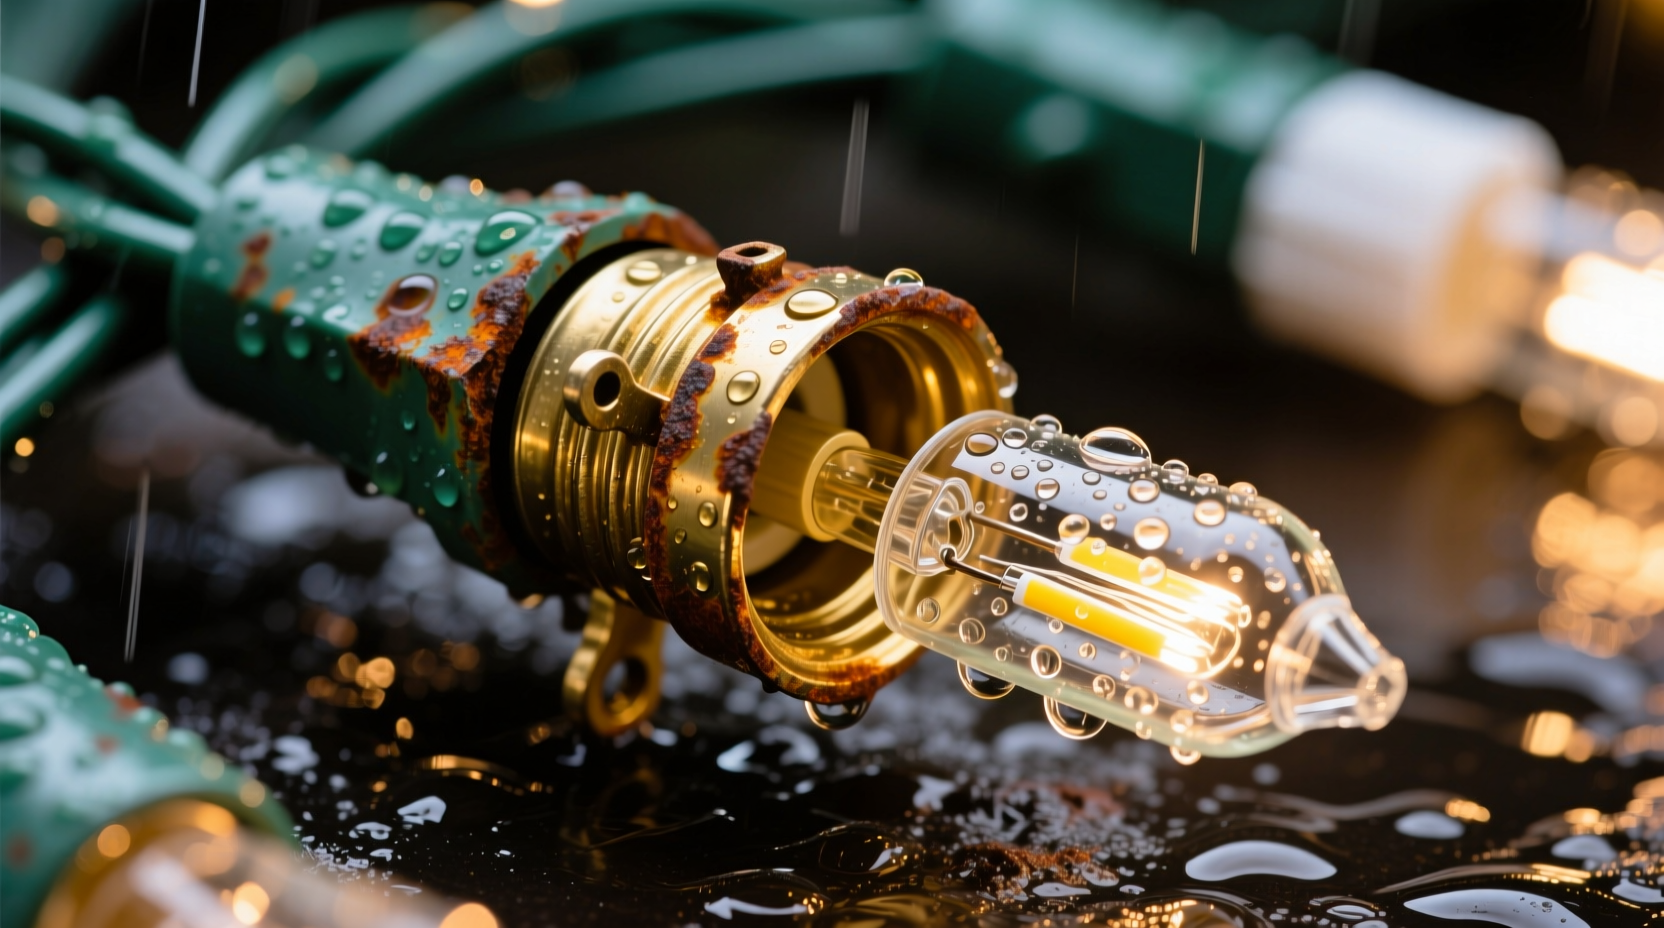
Rust on vintage light sockets is almost always electrolytic corrosion, not simple oxidation. Unlike iron rusting in dry air, socket corrosion requires three elements: an anode (a metal that gives up electrons), a cathode (a metal that accepts them), and an electrolyte (a conductive liquid film). In vintage strings, all three are routinely present.
Early sockets used brass or copper contacts mounted into ceramic, phenolic resin (Bakelite), or molded rubber bases. Over decades, the insulation material degrades: Bakelite becomes porous and hygroscopic; rubber cracks and leaches plasticizers that attract moisture; ceramic develops microfractures. When humidity rises—even indoors during damp seasons—these materials absorb ambient water vapor. That thin film becomes the electrolyte. Meanwhile, dissimilar metals often coexist: tin-plated copper wires, brass screw shells, nickel-plated contact springs, and sometimes even aluminum wire remnants from mid-century repairs. This creates microscopic galvanic cells. Electrons flow from the more active metal (e.g., zinc or tin) to the less active one (e.g., brass), accelerating corrosion at the anode site.
Temperature cycling worsens it. When lights heat up during operation, moisture trapped inside the socket base expands, forcing it deeper into crevices. When they cool, condensation forms—especially if stored while still slightly warm. And unlike modern sealed LED sockets, vintage designs lack gaskets, conformal coatings, or moisture barriers. They were built for seasonal use, not decades of passive storage in attics or garages.
Why Modern Lights Don’t Suffer the Same Fate
Contemporary light strings avoid this issue through deliberate engineering choices—not just material upgrades. A comparison reveals critical differences:
| Feature | Vintage Strings (Pre-1985) | Modern Strings (Post-2000) |
|---|---|---|
| Socket Material | Ceramic, Bakelite, or vulcanized rubber—porous with age | PVC, polypropylene, or thermoplastic elastomers—hydrophobic and stable |
| Contact Metal | Bare brass or copper; minimal plating; prone to galvanic pairing | Tin- or nickel-plated brass with uniform coating; often gold flash on premium lines |
| Wire Insulation | Rubber or cloth—degrades into sticky, moisture-absorbing residue | UV-stabilized PVC or silicone—resists cracking and moisture wicking |
| Sealing | None—open-bottom design allows vapor ingress | Integrated strain relief + potting compound or ultrasonic welding at base |
| Operating Voltage | Often 120V per bulb; higher current = more resistive heating = more condensation cycles | Low-voltage (e.g., 12–24V DC) or shunted LED circuits; minimal heat generation |
This isn’t obsolescence—it’s targeted mitigation. Today’s manufacturers treat moisture as a primary failure mode, not an afterthought.
7 Proven Prevention Strategies (Tested by Collectors & Conservators)
Preventing socket rust doesn’t require replacing your vintage set. It demands consistent, low-effort stewardship. These methods are drawn from decades of hands-on restoration work by lighting historians, museum conservators, and long-time holiday decorators.
- Store in climate-controlled, low-humidity environments. Ideal conditions: 35–50% relative humidity, 60–70°F, no temperature swings. Basements and attics—common storage spots—often exceed 65% RH in summer and drop below 30% in winter, both of which accelerate degradation. Use a hygrometer to monitor; add silica gel desiccant packs (rechargeable type) inside storage containers.
- Never store lights while warm or damp. Allow strings to cool completely after use. Wipe down with a dry microfiber cloth to remove condensation or outdoor residue (salt spray, pollen, tree sap). If used outdoors, rinse gently with distilled water (not tap—chlorine and minerals accelerate corrosion), then air-dry for 48 hours in a warm, ventilated room before boxing.
- Use vapor-barrier packaging—not plastic bags. Standard zip-top bags trap moisture. Instead, place strings in acid-free tissue paper inside rigid, lidded plastic bins. Insert 2–3 units of 5g rechargeable silica gel (blue indicator type) per bin. Seal tightly. Avoid cardboard boxes—they absorb and retain humidity.
- Apply a protective contact lubricant sparingly. Use only dielectric grease (e.g., NO-OX-ID A-Special or MG Chemicals 846) on exposed metal contacts *before* storage. It displaces moisture, inhibits oxidation, and remains non-conductive. Do NOT use petroleum jelly—it attracts dust, dries out over time, and can degrade rubber insulation.
- Inspect and clean contacts annually. Before each season, examine sockets with a 10x magnifier. Use a soft brass brush (not steel wool) dipped in isopropyl alcohol (90%+) to gently scrub contacts. Follow with compressed air to remove residue. Test continuity with a multimeter.
- Replace degraded insulation—not just bulbs. If wire insulation is cracked, brittle, or sticky, cut out the damaged section and splice in modern, UL-listed SPT-2 lamp cord using waterproof wire nuts *and* heat-shrink tubing rated for outdoor use. Vintage wire cannot be safely re-insulated.
- Limit outdoor exposure time. Vintage lights were never rated for permanent outdoor installation. If used outside, limit run time to 4–6 hours nightly and bring indoors when not in use—even during the season. Use GFCI-protected outlets exclusively.
A Real-World Case Study: The 1952 Sears “Festive Glow” String
Janice M., a collector in Portland, Oregon, owned a complete set of original 1952 Sears “Festive Glow” C7 lights—100 bulbs on green cloth-wrapped wire, housed in ivory Bakelite sockets. Stored in her garage for 17 years, the set developed severe socket corrosion by 2021: 42% of sockets showed visible rust, and 19 bulbs wouldn’t illuminate despite correct wattage. She brought it to lighting conservator David R. at the Pacific Northwest Holiday Archive.
David’s assessment revealed two root causes: First, Portland’s marine-influenced climate kept garage humidity between 68–82% year-round—well above the safe threshold. Second, Janice had stored the lights coiled tightly in a cardboard box lined with newspaper (acidic) and sealed with duct tape (trapping residual moisture). He disassembled the string, cleaned each socket with ultrasonic cleaning in deionized water and mild citric acid solution, then passivated contacts with sodium benzoate. Each socket received a microdot of dielectric grease. Wires were tested for insulation breakdown; 3 segments were replaced. The restored string now operates flawlessly and is stored in a climate-controlled cabinet at 42% RH with silica gel monitoring. Janice inspects it every March and October—preventing recurrence.
Expert Insight: What Conservators Prioritize
“People focus on bulbs—but the socket is the heart of the circuit. Once corrosion breaches the contact surface, resistance spikes, heat builds, and insulation fails faster. Prevention isn’t about perfection; it’s about interrupting the moisture cycle *before* the first oxide layer forms. One season of proper storage does more than five years of reactive cleaning.” — David R. Lien, Lighting Conservator, Pacific Northwest Holiday Archive & Former Senior Technician, Smithsonian Institution Conservation Lab
FAQ: Your Most Pressing Questions Answered
Can I use vinegar or baking soda to clean rusted sockets?
No. Acidic or alkaline solutions damage delicate plating and etch brass, accelerating future corrosion. Mechanical cleaning with a brass brush and isopropyl alcohol is safer and more effective for light surface corrosion. For heavy pitting, replacement is the only safe option.
Are rust inhibitors like WD-40 safe for vintage sockets?
No. WD-40 is a water-displacing solvent—not a corrosion inhibitor. It leaves a thin, hygroscopic film that attracts dust and degrades rubber insulation over time. It also conducts electricity poorly, increasing arcing risk. Use only dielectric grease formulated for electrical contacts.
My sockets look fine but the lights flicker. Could rust be the cause?
Yes—even invisible corrosion increases electrical resistance. Microscopic oxide layers create intermittent connections, especially as the socket warms and expands. A multimeter continuity test showing >0.5 ohms resistance across contacts indicates problematic oxidation, even without visible rust.
Step-by-Step: Preparing Vintage Lights for Long-Term Storage (Under 20 Minutes)
- Unplug and cool: Disconnect from power. Let lights sit uncoiled in a dry room for 2+ hours.
- Dry thoroughly: Wipe entire string with lint-free cloth. Pay attention to socket bases and wire junctions.
- Inspect: Check for cracked insulation, bent contacts, or discoloration. Flag damaged sections.
- Clean contacts: Dip soft brass brush in 90%+ isopropyl alcohol. Gently scrub socket contacts. Blow debris away with compressed air.
- Apply protection: Using a toothpick, apply a rice-grain-sized dot of dielectric grease to each contact point.
- Coil loosely: Wind string in a figure-eight pattern (reduces tension) around a 12-inch cardboard tube.
- Box and seal: Place coil in rigid plastic bin with 3 units of 5g rechargeable silica gel. Seal lid tightly.
- Label: Write date, humidity reading, and “Last inspected” on tape affixed to bin.
Conclusion: Preserve the Glow, Not Just the Memory
Vintage Christmas lights aren’t relics to be displayed behind glass—they’re functional artifacts meant to be experienced. Their warmth, their rhythm, their very imperfection connects us to generations past. But that connection depends on respect for the materials and physics that make them work. Rust on a socket isn’t inevitable decay; it’s a signal—a quiet warning that moisture has breached the system. Address it proactively, and you transform preservation from a reactive chore into a meaningful ritual. You extend not just the life of a string of lights, but the continuity of tradition itself.
Start this season with one string. Apply the storage protocol. Monitor humidity. Feel the difference when you plug it in next November—the steady, unwavering glow, free of hesitation or buzz. That’s not nostalgia. That’s stewardship.


 浙公网安备
33010002000092号
浙公网安备
33010002000092号 浙B2-20120091-4
Comments
No comments yet. Why don't you start the discussion?