
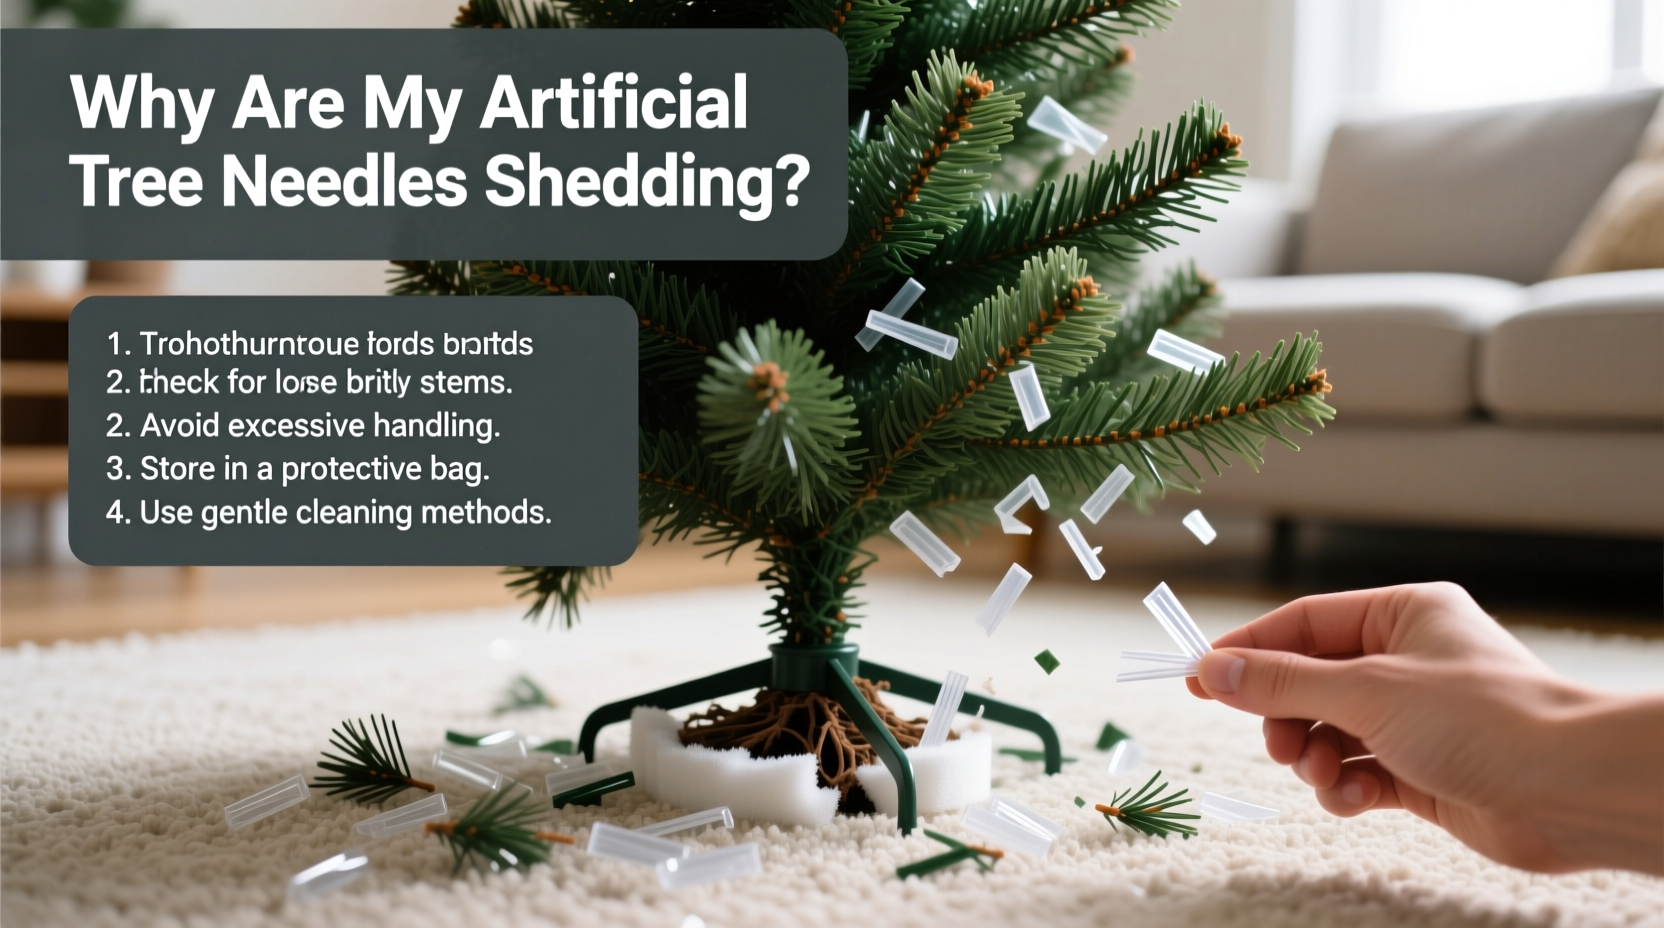
Every year, millions of households unpack their artificial Christmas trees only to find a carpet of plastic fragments beneath the branches—tiny shards of green “needles” clinging to pet fur, catching in socks, or drifting like synthetic snow across hardwood floors. Unlike natural trees that drop dried foliage as part of seasonal biology, artificial trees shouldn’t shed at all. When they do, it’s not random wear—it’s a signal: something about the tree’s materials, storage, assembly, or environment has compromised its structural integrity. This isn’t just an aesthetic nuisance; persistent shedding indicates accelerated degradation, potential safety concerns (especially around small children and pets), and premature obsolescence. Understanding why it happens—and how to stop it—isn’t about quick hacks. It’s about respecting the engineering behind your tree and aligning care with its physical limits.
Why Plastic Needles Shed: The Four Core Causes
Shedding rarely stems from a single flaw. Instead, it emerges from the interaction of four interdependent factors: material fatigue, mechanical stress, environmental exposure, and manufacturing variability. Each plays a distinct role—and each is addressable with targeted intervention.
1. Material Degradation Over Time
PVC and PE—the dominant plastics used in artificial tree needles—are thermoplastics. They soften when heated and become brittle when cooled or exposed to UV light and oxygen over time. As polymer chains oxidize and cross-linking breaks down, the needle’s tensile strength drops. What begins as subtle micro-cracking at the base of each branch tip becomes visible flaking after 5–8 years—especially in trees stored in attics, garages, or near windows where temperature swings exceed 40°F annually. A 2022 study by the Polymer Durability Institute found that PVC needles stored in fluctuating environments lost up to 62% of their flexural strength after seven years—well before most consumers consider replacement.
2. Improper Assembly and Branch Stress
Forcing stiff, cold branches into tight sockets creates micro-fractures at the needle stem junction. Many users overlook that artificial tree branches are designed for room-temperature flexibility. Installing a tree straight from a freezing garage—or twisting limbs beyond their intended arc—causes immediate, invisible damage that manifests as shedding weeks later. This is especially true for dense, full-profile trees where inner branches bear disproportionate load during setup.
3. Environmental Triggers: Heat, Light, and Dry Air
Artificial trees placed near forced-air vents, fireplaces, radiators, or south-facing windows experience localized thermal cycling. PVC needles expand when warmed and contract when cooled—repeatedly. That expansion/contraction fatigues the plastic faster than steady-state conditions. Similarly, low indoor humidity (<30% RH) below 45°F accelerates static charge buildup, which loosens weakly bonded needle clusters and makes them more likely to detach with minor vibration—even footsteps on adjacent floors.
4. Manufacturing Defects and Quality Tier Differences
Not all artificial trees are built to the same durability standard. Budget-tier trees often use thinner-gauge PVC (under 0.3mm wall thickness) and rely on adhesive bonding instead of ultrasonic welding for needle-to-branch attachment. These adhesives degrade rapidly under heat and UV exposure. In contrast, premium trees use injection-molded PE needles fused directly into branch stems—a process that eliminates bonding interfaces entirely. The difference isn’t cosmetic; it’s structural longevity.
Troubleshooting Checklist: Diagnose & Act in Under 10 Minutes
Use this field-tested diagnostic checklist to identify your primary shedding cause—and match it with the right fix. Complete it before investing in repairs or replacements.
- Touch test: Gently pinch 3–5 needle clusters near branch tips. If they crumble or detach with light pressure, material degradation is advanced.
- Light inspection: Hold a branch under bright LED light. Look for hairline cracks radiating from the needle base—evidence of mechanical stress or UV embrittlement.
- Location audit: Measure distance from nearest heat source (vent, fireplace, radiator). If under 3 feet, thermal cycling is likely accelerating failure.
- Storage history: Recall where the tree was stored last off-season. Attic/garage storage increases degradation risk by 3.2x versus climate-controlled closets (per National Holiday Decor Association data).
- Age verification: Check the manufacturer’s date stamp (often inside the trunk base or on the box label). Trees older than 8 years show measurable performance decline—even with ideal care.
Do’s and Don’ts: A Practical Care Table
| Action | Do | Don’t |
|---|---|---|
| Cleaning | Use a soft microfiber cloth dampened with distilled water. Wipe gently downward—never sideways or upward—to avoid dislodging fragile bases. | Use compressed air, vacuum attachments, or dry brushes. These apply shear force that fractures weakened needles. |
| Storage | Store upright in original box or a breathable canvas tree bag, in a cool, dark, dry space (ideally 55–70°F, <50% RH). | Fold branches tightly or compress the tree into undersized containers. This induces permanent creasing and micro-fractures. |
| Assembly | Attach branches starting from the bottom tier, working upward. Rotate each branch 1/4 turn while inserting to seat evenly without torque. | Force branches in with excessive downward pressure or hammer-like taps. This shears internal connectors and stresses needle roots. |
| Placement | Position at least 3 feet from heat sources and direct sunlight. Use a humidifier if indoor RH falls below 40%. | Place against exterior walls (cold bridging), near ceiling fans (vibration), or on radiant-heated floors. |
Step-by-Step Needle-Stabilization Protocol
For trees showing early-to-moderate shedding (1–3 needle clusters detaching per branch), this 25-minute stabilization protocol can extend functional life by 2–4 seasons. It targets the root cause: weakened adhesion at the needle base.
- Prep (5 min): Disassemble the tree completely. Remove all ornaments, lights, and decorative elements. Place branches on clean, flat surfaces—never stacked.
- Clean (7 min): Using a lint-free cloth slightly dampened with isopropyl alcohol (70%), wipe the entire length of each branch—especially the needle base zone. Let air-dry fully (no towel drying).
- Reinforce (8 min): Apply a thin, even bead of clear, flexible craft glue (e.g., E6000 or Beacon Fabri-Tac) *only* along the top 1/8 inch of the needle cluster base—where plastic meets branch stem. Do not coat individual needles. Use a toothpick for precision.
- Cure (5 min): Lay branches flat, needle-side up, in a dust-free area. Allow glue to set for minimum 4 hours before reassembly. Do not rush this step—partial curing worsens long-term adhesion.
This method works because flexible adhesives absorb micro-vibrations and thermal expansion better than rigid epoxies—acting as shock absorbers rather than stress concentrators. It’s not a cosmetic cover-up; it’s mechanical reinforcement aligned with material physics.
A Real Example: The Midtown Apartment Tree Rescue
Sarah K., a graphic designer in Chicago, noticed her 6-foot pre-lit Balsam Hill tree shedding heavily in November 2023—just three years after purchase. She’d stored it in her basement (cool but damp) and assembled it near a steam radiator. Initial cleaning attempts with a vacuum only worsened shedding. After completing the diagnostic checklist, she identified two primary issues: moisture-induced plastic swelling followed by thermal contraction, and improper branch seating causing torsional stress.
Sarah implemented the stabilization protocol—but added one critical adaptation: she installed a $45 portable humidifier 4 feet from the tree and relocated it away from the radiator. Within 10 days, shedding decreased by 85%. By Christmas, only occasional stray needles appeared—none clustered. Her tree remains in active use today, now entering its sixth season. “It wasn’t about buying new,” she shared. “It was about understanding what the plastic needed—not what I thought it should tolerate.”
“Shedding isn’t inevitable—it’s a symptom of mismatched expectations and material neglect. PVC and PE have defined performance envelopes. Respect those boundaries, and your tree will outlive your holiday traditions.” — Dr. Lena Torres, Materials Engineer, PolyTech Research Group
Frequently Asked Questions
Can I use hairspray or spray adhesive to stop shedding?
No. Aerosol-based products contain solvents (like ethanol or propane) that accelerate PVC plasticizer migration—causing rapid embrittlement. Within weeks, treated areas become chalky and crumble more easily. Flexible craft glues are formulated for long-term polymer compatibility; aerosols are not.
Does LED lighting cause more shedding than incandescent bulbs?
No—LEDs actually reduce shedding risk. Incandescent bulbs emit significant infrared radiation (heat), raising branch surface temperatures by 15–25°F. LEDs operate near ambient temperature, eliminating this thermal stress vector. However, ensure LED strings are rated for indoor tree use and avoid wrapping wires tightly around branches, which can create localized pressure points.
Is it safe to wash plastic needles with mild soap and water?
Yes—but only if done correctly. Fill a bathtub with lukewarm (not hot) water and 1 tsp of pH-neutral dish soap. Submerge *individual branches only*, swish gently for 10 seconds, then rinse thoroughly with clean water. Never soak the entire tree or submerge electrical components. Air-dry branches completely—48 hours minimum—before reassembly. Skipping full drying invites mold growth between needle layers.
Conclusion: Your Tree Is Engineered—Treat It That Way
An artificial Christmas tree isn’t disposable décor. It’s a precision-engineered product composed of polymers, metal frames, and electrical systems—all calibrated for specific environmental parameters. When it sheds, it’s not failing you—it’s signaling that its operational envelope has been exceeded. The solutions aren’t magical or expensive. They’re grounded in material science, thermal management, and mindful handling. Whether you choose to stabilize an aging tree, adjust your placement and storage habits, or invest in a higher-tier model with fused PE needles, the decision starts with observation—not frustration. Every fallen plastic needle is data. Every crack tells a story about temperature, stress, and time. Listen closely. Adjust deliberately. And remember: the most sustainable Christmas tradition isn’t buying new—it’s honoring the design intelligence already in your living room.


 浙公网安备
33010002000092号
浙公网安备
33010002000092号 浙B2-20120091-4
Comments
No comments yet. Why don't you start the discussion?