
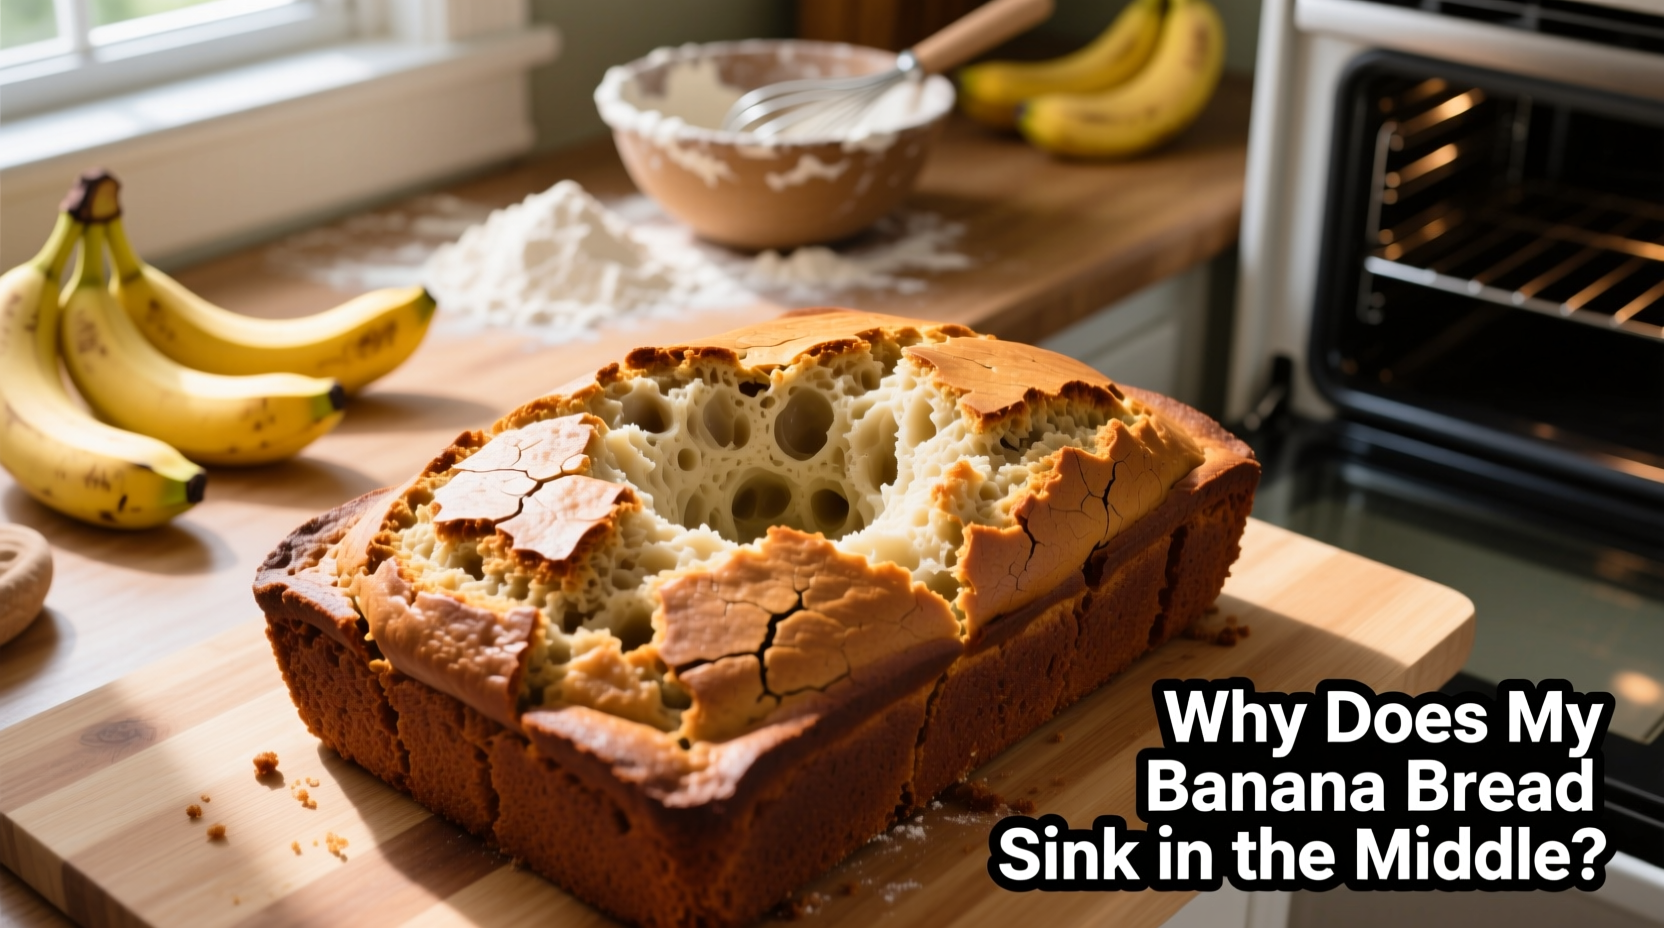
Banana bread is one of the most beloved quick breads—moist, fragrant, and forgiving with overripe fruit. Yet even experienced bakers often face the same frustrating outcome: a beautifully golden crust giving way to a sunken center. The loaf rises during baking, only to collapse as it cools, leaving a dense trench down the middle. This isn’t just cosmetic—it affects texture, moisture distribution, and overall enjoyment.
The sinking center is rarely due to one single mistake. Instead, it’s usually the result of a combination of subtle missteps in ingredient balance, mixing technique, oven conditions, or timing. Understanding the science behind banana bread structure helps pinpoint where things go wrong—and how to fix them for good.
The Science Behind Banana Bread Structure
Banana bread relies on chemical leavening agents—typically baking soda or baking powder—to rise. Unlike yeast breads, which ferment slowly, quick breads depend on an immediate reaction between wet and dry ingredients to produce carbon dioxide bubbles. These bubbles expand in the oven’s heat, lifting the batter into a light, airy crumb.
For this process to work properly, three elements must be balanced:
- Leavening agent activity: Enough gas must be produced at the right time.
- Structural integrity: Gluten development and egg proteins must set quickly enough to support the rising loaf.
- Oven temperature consistency: Heat must be sufficient to “set” the structure before the center collapses.
When any of these components fail, the center may not solidify before the air bubbles pop or cool, leading to a structural collapse. But more than just chemistry is at play—ingredient ratios, moisture levels, and even pan size influence the final shape.
Common Causes of a Sunken Center (and How to Fix Them)
1. Overmixing the Batter
One of the most frequent culprits is overmixing after adding flour. When flour meets liquid and agitation, gluten begins to form. A small amount is necessary for structure, but too much creates a chewy, elastic network that traps air unevenly. During baking, these overstretched pockets can burst, causing the center to fall.
Mix the batter just until the flour disappears. Use a spatula and fold gently. If lumps remain, that’s acceptable—overly smooth batter doesn’t guarantee better results.
2. Inaccurate Oven Temperature
An oven that runs too cool won’t set the bread’s structure quickly enough. The outside may look done while the center remains undercooked and unsupported. Conversely, an oven that’s too hot can cause the top to brown prematurely, creating a crust before the interior has finished rising.
Use an independent oven thermometer to verify your oven’s actual temperature. Most banana bread recipes perform best at 350°F (175°C). Preheat thoroughly—never place the loaf in a cold or warming oven.
3. Too Much Moisture or Fruit
Bananas are naturally high in water. Adding extra mashed banana beyond the recipe’s intent—or using overly juicy fruit—increases moisture content. Excess liquid delays protein coagulation and starch gelatinization, both critical for setting the bread’s structure.
If you tend to add extra bananas “to use them up,” adjust other liquids accordingly. Reduce milk, yogurt, or oil slightly to compensate. Alternatively, drain excess liquid from mashed bananas by letting them sit in a fine-mesh strainer for 10–15 minutes.
4. Expired or Imbalanced Leavening Agents
Baking soda and baking powder lose potency over time. Baking soda requires acid (like buttermilk, yogurt, or vinegar) to activate; if your recipe lacks sufficient acid, the soda won’t work effectively. Baking powder contains its own acid, but still degrades after 6–12 months.
Test your leaveners:
- Baking soda: Mix ¼ tsp with vinegar. It should fizz immediately.
- Baking powder: Mix ½ tsp with hot water. It should bubble vigorously.
Replace any that don’t react.
5. Opening the Oven Too Early
Peeking into the oven during the first 25–30 minutes of baking can cause a sudden drop in temperature. This destabilizes the delicate air cells forming in the batter. Even a brief draft can trigger collapse, especially if the structure hasn’t yet set.
Resist the urge to open the door. Use the oven light and window instead. Wait until at least the 25-minute mark before checking doneness.
“Temperature stability is crucial in quick breads. A fluctuation of just 25 degrees during early baking can compromise the entire structure.” — Dr. Linda Chen, Food Scientist and Baking Researcher
Do’s and Don’ts: A Quick Reference Table
| Do | Don’t |
|---|---|
| Use room-temperature eggs and butter for even mixing | Use cold ingredients that can seize the batter |
| Measure flour correctly—spoon and level, don’t scoop | Scoop flour directly from the bag, which compacts it |
| Preheat oven fully and use an oven thermometer | Assume your oven is accurate without testing |
| Fill loaf pan no more than ⅔ full | Overfill the pan, increasing risk of overflow and sinking |
| Cool bread in pan for only 10–15 minutes before transferring | Leave bread in pan too long, trapping steam and softening the base |
A Step-by-Step Guide to Flawless Banana Bread
Follow this method to minimize the risk of collapse and ensure consistent results:
- Prepare Ingredients Properly
Bring eggs, butter, and dairy to room temperature. Mash bananas thoroughly and measure precisely. Drain excess liquid if needed. - Measure Accurately
Use a kitchen scale for flour when possible (standard is ~120g per cup). If using cups, spoon flour into the measuring cup and level with a knife—do not pack or tap. - Cream Butter and Sugar Thoroughly
Mix until light and fluffy—about 3–5 minutes. This incorporates air, aiding lift during baking. - Add Eggs One at a Time
Beat each fully into the mixture before adding the next. This ensures emulsification and stability. - Combine Dry Ingredients Separately
Whisk flour, leavening agents, salt, and spices in a separate bowl. This prevents clumping and ensures even distribution. - Fold Wet and Dry Together Gently
Add dry ingredients to wet in two or three batches. Stir with a spatula just until combined. A few streaks of flour are acceptable. - Line and Grease the Pan Correctly
Use a 9x5-inch loaf pan. Line with parchment paper for easy removal, or grease and flour thoroughly. - Fill No More Than ⅔ Full
Excess batter increases baking time and raises collapse risk. Bake extras as muffins. - Bake at 350°F (175°C) Without Opening
Set timer for 55 minutes, but begin checking at 50. Insert a toothpick into the center—it should come out with moist crumbs, not wet batter. - Cool Properly
Let bread rest in pan for 10–15 minutes, then transfer to a wire rack. Cooling completely prevents condensation and structural weakness.
Real Example: Sarah’s Sinking Loaf Saga
Sarah had been making banana bread every Sunday for six months. Each time, her family praised the flavor—but every loaf sank dramatically in the middle. She doubled the bananas for extra moistness and added chocolate chips for fun. She also used a vintage loaf pan she loved, despite it being slightly larger than standard.
After researching, she realized several issues: her baking soda was expired, she was scooping flour (adding nearly 25% more than intended), and she opened the oven twice during baking. She also didn’t preheat the oven fully, assuming “it would catch up.”
She adjusted her method: replaced the leavener, measured flour correctly, preheated properly, stopped opening the oven, and reduced bananas from 1¼ cups to 1 cup. Her next loaf rose evenly, held its shape, and stayed intact when cooled. The flavor remained rich, but the texture improved dramatically.
Sarah now shares her “fix list” with fellow home bakers who struggle with similar issues.
Essential Checklist for Success
Before you mix your next batch, run through this checklist:
- ✅ Bananas are ripe but not fermented or excessively watery
- ✅ Flour is measured correctly (spooned and leveled or weighed)
- ✅ Baking soda and powder are fresh and active
- ✅ Oven is fully preheated to 350°F (175°C)
- ✅ Oven thermometer confirms accurate temperature
- ✅ Batter is mixed just until combined—no overmixing
- ✅ Loaf pan is standard size (9x5 inches) and filled no more than ⅔ full
- ✅ Oven door remains closed until at least 25 minutes into baking
- ✅ Toothpick test shows clean or crumb-free result before removing
- ✅ Bread cools in pan only briefly before transfer to wire rack
Frequently Asked Questions
Can I fix banana bread that has already sunk?
Once the bread has cooled and collapsed, the structure cannot be restored. However, you can repurpose it: slice and toast it, turn it into bread pudding, or crumble it for trifles. The flavor is usually unaffected.
Does altitude affect banana bread rising?
Yes. At higher elevations (above 3,000 feet), lower air pressure causes gases to expand faster and liquids to evaporate more quickly. This can lead to earlier rising and subsequent collapse. Adjustments include reducing baking powder by ⅛–¼ tsp, increasing oven temperature by 15–25°F, and adding 1–2 tbsp extra liquid to prevent drying.
Why does my banana bread dome before sinking?
A pronounced dome forms when the outer edges set faster than the center, forcing the still-rising middle upward. If the center hasn’t developed enough structure by the time the dome peaks, it collapses during cooling. Using an oven-safe loaf pan strip or lowering the oven temperature slightly can promote even baking.
Final Thoughts: Consistency Over Perfection
Baking is both art and science. While a sunken banana bread might not win a beauty contest, it’s often still delicious. But understanding the reasons behind the collapse empowers you to make informed adjustments—not just for this recipe, but for all quick breads.
The goal isn’t perfection on the first try, but progress through mindful practice. Track your changes: note ingredient amounts, oven behavior, and mixing time. Small refinements compound into reliable results.
Next time you pull a golden, level-topped loaf from the oven, you’ll know exactly why it worked—and that knowledge is the real reward.


 浙公网安备
33010002000092号
浙公网安备
33010002000092号 浙B2-20120091-4
Comments
No comments yet. Why don't you start the discussion?