
A leaking blender is more than just a kitchen annoyance—it’s a sign of wear, improper assembly, or component failure that can compromise both performance and safety. When liquid seeps from the base of your blender jar during use, it often points to compromised seals or damaged parts in the blending mechanism. While many assume the pitcher itself is cracked, the real culprit is frequently found in the seal system located between the blade assembly and the container. Understanding how these components work—and knowing which seals to inspect—can save you time, prevent messes, and extend the life of your appliance.
How Blender Seals Work: The Hidden System Keeping Leaks at Bay
At first glance, a blender appears simple: a motor base, a pitcher, and a blade. But beneath the surface, especially where the blade meets the jar, lies a precision-engineered sealing system designed to contain high-speed liquids under pressure. Most modern blenders use a combination of gaskets, O-rings, and locking mechanisms to create a watertight barrier. When functioning correctly, this system prevents any liquid from escaping through the bottom, even when processing thick smoothies or hot soups.
The primary seal sits directly under the blade assembly and is typically made of food-grade silicone or rubber. This seal fits snugly between the blade housing and the threaded portion of the blender jar. As the blade is tightened into place, the compression of the seal ensures no gaps exist for liquid to escape. Over time, however, repeated exposure to heat, friction, and cleaning agents degrades these materials, leading to warping, cracking, or misalignment.
“Most blender leaks aren’t due to cracks in the jar but rather failed seals or improper reassembly after cleaning.” — Carlos Mendez, Appliance Repair Technician with 15+ years of experience
Common Seals That Fail and How to Identify Them
Not all blender models use identical sealing systems, but most share similar components. Below are the most common seals responsible for leaks and how to recognize signs of failure.
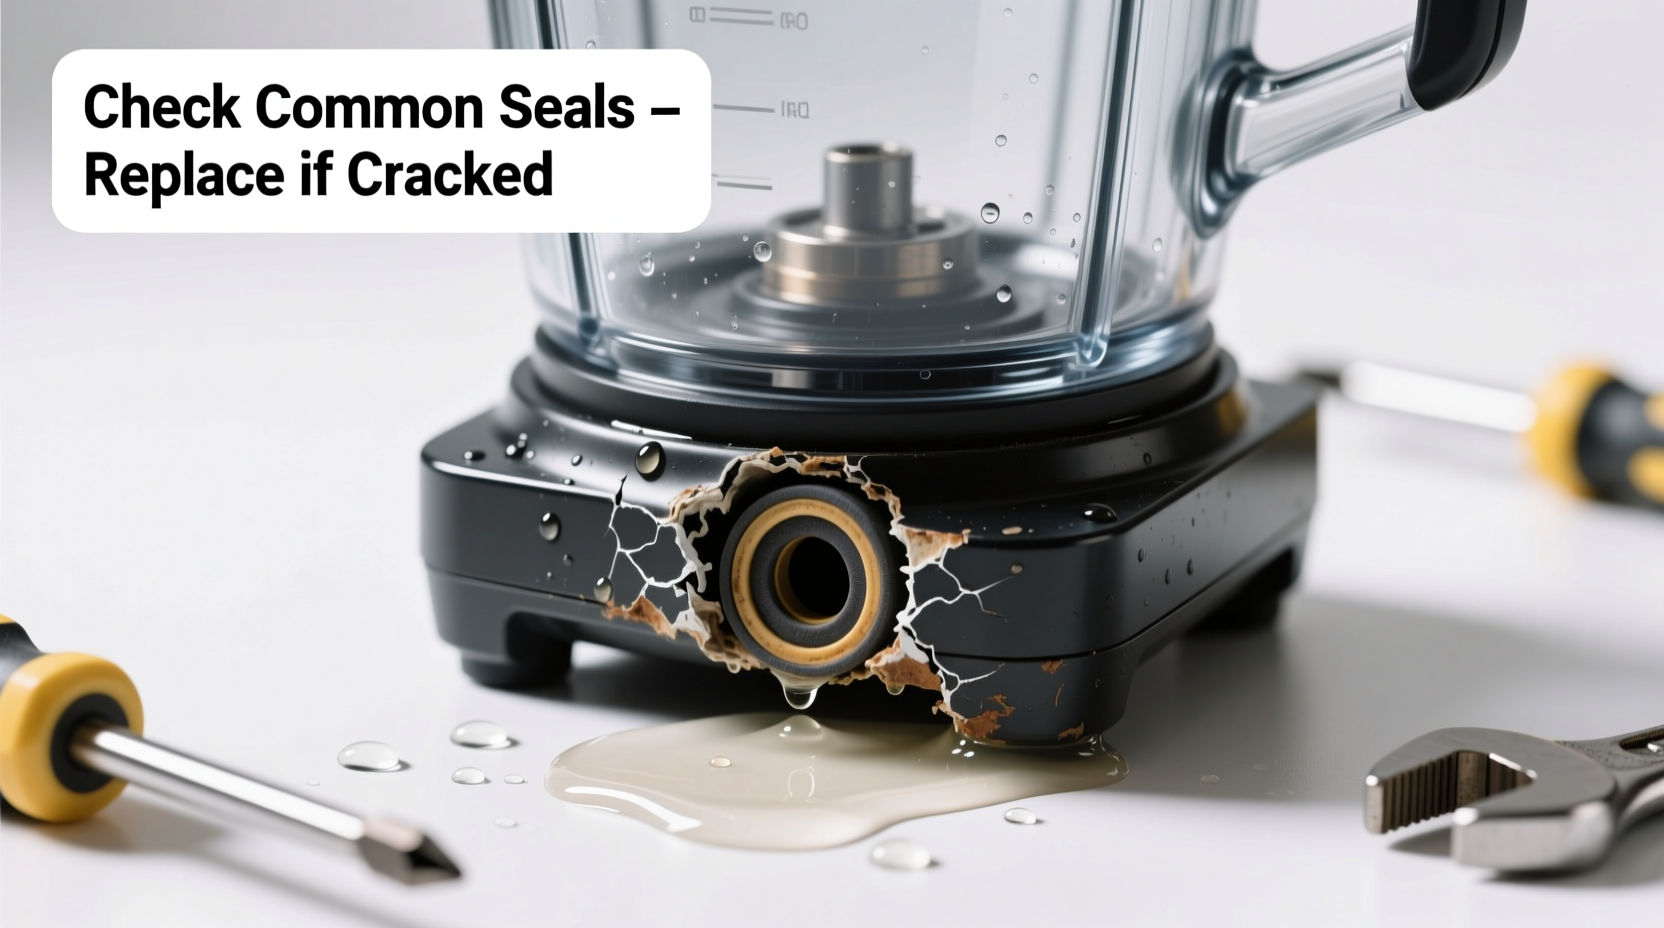
1. Blade Gasket (Primary O-Ring)
This circular rubber or silicone ring sits directly beneath the blade unit and is the first line of defense against leaks. It compresses when the blade is screwed tightly into the jar, forming a tight seal.
Symptoms of failure: Drips from the center of the blade housing, visible cracks or flattening in the ring, or a gasket that no longer sits flush.
2. Secondary Lid Seal (In Some Models)
Higher-end blenders, such as those with thermal-resistant pitchers, may include an additional internal seal between the blade housing and the neck of the jar. This dual-seal design enhances durability, especially when blending hot liquids like soups.
Symptoms of failure: Leaking only when blending hot contents, or fluid emerging from the seam between the blade base and jar wall—not the center.
3. Lid-to-Jar Gasket
While not located on the bottom, this seal can contribute to overflow that appears to be a base leak. If the lid doesn’t seal properly, pressure builds and forces liquid down the inside walls toward the base.
Symptoms of failure: Spillage around the rim, splattering during use, or residue near the handle base after blending.
4. Motor Shaft Seal (Internal to Base Unit)
In rare cases, especially with older or heavily used blenders, the motor shaft that connects to the blade can develop a worn internal seal. This allows liquid to travel up the shaft and pool inside the motor housing.
Symptoms of failure: Moisture or residue inside the motor base, burning smell during operation, or complete electrical malfunction.
Step-by-Step Guide: How to Inspect and Replace Blender Seals
If your blender is leaking, follow this systematic approach to identify and resolve the issue safely and effectively.
- Unplug the blender and remove the pitcher from the motor base.
- Invert the jar and examine the blade assembly. Look for visible cracks, warping, or debris trapped under the blades.
- Remove the blade unit by unscrewing it counterclockwise. On some models, you may need a wrench—but use caution to avoid damaging threads.
- Inspect the gasket located between the blade and the jar. Check for:
- Cuts, tears, or brittleness
- Flattened or compressed areas
- Misalignment or missing sections
- Clean the seal groove thoroughly using a soft brush and mild detergent. Built-up residue can prevent proper sealing even with a new gasket.
- Replace the gasket if damaged. Most manufacturers sell replacement kits by model number. Use only OEM or certified-compatible parts.
- Reassemble carefully. Place the new gasket into the groove, ensuring it sits evenly. Screw the blade unit back on by hand until snug—do not overtighten.
- Test with water. Fill the jar halfway and run it for 30 seconds on low speed. Observe for leaks before returning to regular use.
Do’s and Don’ts of Blender Seal Maintenance
| Do’s | Don’ts |
|---|---|
| Hand-wash the blade assembly instead of placing it in the dishwasher (heat degrades rubber seals) | Use metal scrubbers or abrasive pads on the seal area |
| Inspect the gasket every few months, especially if blending daily | Ignore small drips—they often worsen over time |
| Tighten the blade unit firmly by hand, ensuring even compression | Use pliers or wrenches to over-tighten the blade base |
| Store the blender with the blade facing up to prevent seal deformation | Leave blended contents sitting in the jar for hours—residue promotes mold and seal breakdown |
| Replace gaskets proactively every 1–2 years with regular use | Use generic or non-OEM seals that may not fit properly |
Real Example: A Smoothie Enthusiast’s Fix
Jessica, a health coach from Portland, noticed her high-performance blender started dripping after six months of daily use. She assumed the glass jar was cracked and considered replacing the entire unit—a costly decision. Instead, she followed an online guide to disassemble the blade base and discovered the O-ring was visibly flattened and had a small split on one side. After ordering a $7 replacement gasket compatible with her model, she replaced it in under 10 minutes. The leak stopped immediately, and she resumed her morning routine without interruption. “I didn’t realize such a tiny part could cause so much trouble,” she said. “Now I check it every time I clean the blender.”
When to Replace the Entire Pitcher or Blender
While seal replacement resolves most leaks, some situations require more extensive action:
- Cracked or warped pitcher: Even hairline fractures can cause persistent leaks. Glass and BPA-free plastic pitchers lose structural integrity over time, especially with temperature fluctuations.
- Stripped threads: If the blade assembly won’t tighten securely due to worn threading, the seal cannot compress properly.
- Repeated leaks after seal replacement: This may indicate a manufacturing defect or incompatible replacement part.
- Motor base contamination: If liquid has entered the motor housing, corrosion or electrical hazards may make repair unsafe.
In such cases, consult the manufacturer’s warranty or consider upgrading to a newer model with improved sealing technology. Many premium blenders now feature quick-release blade systems with integrated double seals for enhanced reliability.
Frequently Asked Questions
Can I still use my blender if it’s leaking slightly?
No. Even minor leaks can lead to electrical hazards, especially if liquid reaches the motor base. Continued use may void warranties and increase the risk of fire or shock. Address the leak immediately.
Are all blender gaskets the same size?
No. Gaskets vary by brand, model, and pitcher capacity. Always verify compatibility before purchasing replacements. Universal seals may fit loosely and fail prematurely.
How often should I replace my blender’s seal?
With regular use (daily blending), replace the gasket every 12 to 18 months. For occasional use, inspect annually and replace if signs of wear appear.
Prevent Future Leaks: A Proactive Maintenance Checklist
To keep your blender leak-free and performing optimally, follow this simple checklist:
- ✅ Inspect the blade gasket monthly for cracks or deformation
- ✅ Hand-tighten the blade assembly—never use tools
- ✅ Clean the seal groove after each use to prevent buildup
- ✅ Avoid dishwashing the blade unit to preserve rubber integrity
- ✅ Replace gaskets every 1–2 years as preventive maintenance
- ✅ Store the blender with the pitcher inverted or upright—never on its side
- ✅ Use only manufacturer-recommended pitchers and lids
“The best way to avoid leaks isn’t just fixing them—it’s preventing them. Regular inspection takes two minutes and saves you money in the long run.” — Lisa Tran, Home Appliance Educator
Conclusion: Stop the Drip Before It Damages More Than Your Countertop
A blender leaking from the bottom is a clear signal that attention is needed. Ignoring it risks not only a messy kitchen but also potential damage to the motor, electrical components, or even personal safety. By understanding the role of key seals—especially the blade gasket—and learning how to inspect, maintain, and replace them, you take control of your appliance’s longevity. Most fixes are inexpensive and require no special tools. Whether you’re a daily smoothie maker or an occasional soup blender, a few minutes of proactive care can keep your machine running smoothly for years.


 浙公网安备
33010002000092号
浙公网安备
33010002000092号 浙B2-20120091-4
Comments
No comments yet. Why don't you start the discussion?