
Baking bread is both a science and an art. When your loaf rises beautifully during proofing but then collapses in the oven, it’s not only disappointing—it can be confusing. One of the most common culprits behind this issue is overly rapid fermentation or oven spring that pushes the structure beyond its limits. Understanding why this happens and how to prevent it transforms inconsistent results into reliable, bakery-quality loaves.
The problem often stems from an imbalance in yeast activity, gluten development, hydration, or oven conditions. A loaf that rises too quickly lacks structural integrity, making it vulnerable the moment heat hits it. Instead of expanding evenly, the gas inside expands faster than the dough can support, causing the center to cave in or the sides to split unpredictably.
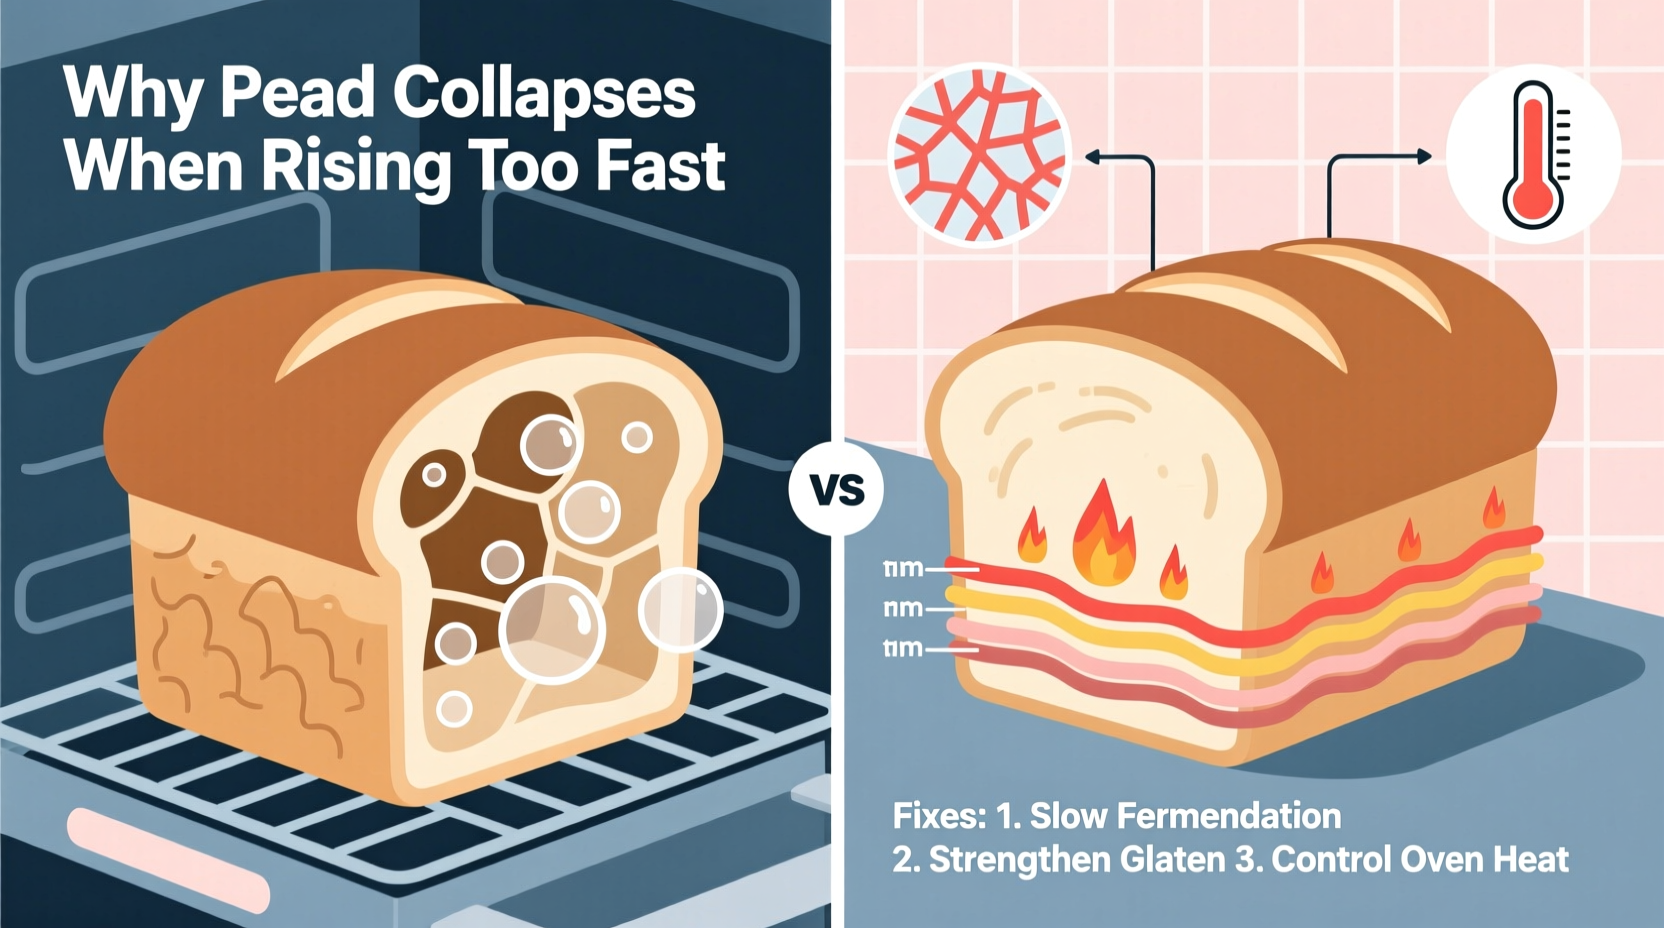
This guide breaks down the root causes of collapsed bread due to fast rising, offers practical solutions, and provides a step-by-step approach to achieving consistent, well-structured loaves.
Understanding Why Bread Collapses During Baking
When bread collapses in the oven, especially after a vigorous rise, it's typically because the internal structure cannot withstand the pressure of expanding gases. The initial burst of expansion—called “oven spring”—is normal and desirable. But if the dough hasn’t developed sufficient strength or has over-fermented, that same spring becomes destructive.
Several interrelated factors contribute to this failure:
- Over-proofing: If the dough ferments too long or in too warm an environment, the gluten network weakens and gas bubbles grow too large.
- Excessive yeast: Too much yeast accelerates fermentation, producing gas faster than the gluten can contain it.
- Poor gluten development: Inadequate kneading or mixing prevents the formation of a strong, elastic web capable of holding shape.
- High hydration without support: Wet doughs are more prone to spreading unless properly shaped and supported (e.g., in a banneton).
- Sudden temperature shock: Placing cold dough directly into a hot oven can cause uneven expansion and structural failure.
These issues are compounded when bakers prioritize speed over control. Rushing fermentation with warm environments or extra yeast might seem efficient, but it sacrifices stability.
“Rushing fermentation is like building a house on sand. The structure may look good at first, but it won’t hold under pressure.” — Dr. Linda Huang, Artisan Bread Scientist, San Francisco Baking Institute
Key Fixes for Bread That Rises Too Fast and Collapses
Fixing collapsing bread starts with slowing things down and strengthening the dough’s foundation. Here are the most effective adjustments you can make:
1. Reduce Yeast Quantity
Using less yeast slows fermentation, allowing time for flavor development and stronger gluten formation. For a standard 750g flour loaf, reduce instant yeast from 2 teaspoons to ¾–1 teaspoon. This extends bulk fermentation to 3–4 hours at room temperature, promoting better structure.
2. Control Fermentation Temperature
Warm kitchens accelerate rising. Keep dough between 73°F and 78°F (23°C–26°C). Avoid placing it near stoves, ovens, or heating vents. In summer, consider refrigerated fermentation for part of the process.
3. Improve Gluten Development
Strong gluten traps gas effectively. Ensure proper kneading—either by hand (10–15 minutes) or mixer (6–8 minutes at medium speed). Alternatively, use stretch-and-fold techniques every 30 minutes during bulk fermentation to build strength gradually.
4. Shape Tightly and Support Properly
A loose shape spreads instead of rising upward. When shaping boules or batards, create surface tension by pulling the dough taut against the work surface. Place in a floured banneton seam-side up to maintain form during final proof.
5. Monitor Proofing Closely
Don’t rely solely on time. Test readiness with the “poke test”: gently press the dough with a fingertip. If it springs back slowly and leaves a slight indentation, it’s ready. If it doesn’t spring back, it’s over-proofed. If it springs back immediately, it needs more time.
Step-by-Step Guide to Prevent Collapse
Follow this controlled baking timeline to minimize risk and maximize success:
- Mix ingredients using measured yeast and lukewarm water (about 85°F/29°C). Target a cohesive, slightly tacky dough.
- Bulk ferment for 3–4 hours at 75°F (24°C), performing 3–4 sets of stretch-and-folds in the first 90 minutes.
- Pre-shape the dough, rest for 20 minutes, then shape tightly into final form.
- Final proof for 1.5–2 hours at room temperature or overnight in the fridge (retarded proofing improves flavor and control).
- Preheat oven to 450°F (230°C) with Dutch oven inside for at least 30 minutes.
- Bake covered for 20 minutes, then uncover and bake 20–25 minutes more until deeply golden.
This method prioritizes slow fermentation and mechanical strength over speed, dramatically reducing collapse risk.
Do’s and Don’ts: Managing Rapid Rise Risks
| Do’s | Don’ts |
|---|---|
| Use precise yeast measurements based on recipe | Double yeast to speed up rising |
| Proof in a cool, draft-free area | Place dough near heater or sunny window |
| Perform stretch-and-folds every 30 min during bulk ferment | Stir or punch down dough repeatedly |
| Use a banneton for round loaves | Bake free-form loaves without support |
| Retard dough in the fridge overnight | Leave dough out for 8+ hours at room temp |
Real Example: From Collapse to Consistency
Sarah, a home baker in Portland, struggled for months with her sourdough collapsing in the middle every time she baked. She followed popular online recipes that called for 8-hour room temperature proofs and generous starter amounts. Her kitchen stayed around 80°F due to radiant floor heating.
After tracking her process, she realized her dough was over-inflated before baking—bubbling excessively and denting easily. She adjusted by cutting her starter amount by 30%, moving the bowl to a cooler pantry, and introducing cold retardation. Within two weeks, her loaves rose evenly and held their shape. The crumb became more open, and the crust crackled perfectly.
Her breakthrough wasn’t a new recipe—it was learning to respect fermentation timelines and environmental influence.
Essential Checklist for Stable Loaves
Before every bake, run through this checklist to avoid collapse:
- ✅ Used correct amount of yeast or starter (not exceeding recommended %)
- ✅ Dough temperature between 75°F–78°F after mixing
- ✅ Performed 3–4 stretch-and-folds during bulk fermentation
- ✅ Final proof passed the poke test (slow rebound with light imprint)
- ✅ Shaped with tight surface tension
- ✅ Baked in preheated oven with steam (Dutch oven or tray method)
- ✅ Avoided opening oven door during first 20 minutes
Frequently Asked Questions
Can I save a collapsed loaf?
If your bread collapses mid-bake, it’s likely already structurally compromised. However, it may still be edible. Check internal temperature—if it reaches 205°F–210°F (96°C–99°C), the crumb will be set. Slice and toast it; the flavor is usually unaffected even if appearance isn’t ideal.
Does high altitude affect rising and collapse?
Yes. At elevations above 3,000 feet (900 meters), lower atmospheric pressure causes gases to expand faster. Reduce yeast by 25%, lower oven temperature by 25°F, and decrease proofing time. These adjustments prevent excessive rise and improve volume control.
Why did my bread rise in the oven but sink as it cooled?
This indicates incomplete baking or over-proofing. Even if the crust looks done, the interior may not have fully set. Always use an instant-read thermometer: the core should reach at least 205°F. Underbaked loaves collapse as steam condenses inside. Over-proofed dough lacks elasticity to retain structure during cooling.
Master Your Bake: Take Control of Fermentation
Bread that collapses in the oven isn’t a lost cause—it’s feedback. Each failed loaf tells you something about timing, temperature, or technique. By addressing rapid rising with intentionality, you shift from unpredictable outcomes to repeatable mastery.
Start small: reduce yeast, slow down fermentation, and focus on shaping. Track one variable at a time. Within a few bakes, you’ll notice tighter crumb, higher rise, and confident oven spring that holds its shape.
Baking great bread isn’t about perfection on the first try. It’s about understanding the balance between energy and restraint—between letting dough rise and knowing when to stop it.


 浙公网安备
33010002000092号
浙公网安备
33010002000092号 浙B2-20120091-4
Comments
No comments yet. Why don't you start the discussion?