
Baking bread at home is a deeply satisfying experience—there’s nothing quite like the aroma of fresh loaves filling your kitchen. But all too often, that joy is followed by disappointment: a loaf with a crust so hard it could double as a doorstop. While a crisp crust can be desirable in certain artisanal styles, many home bakers simply want a tender, sliceable loaf suitable for sandwiches or buttered toast. If your bread consistently emerges from the oven with an overly tough exterior, the issue likely lies in one (or more) aspects of your process. The good news? With a few targeted adjustments to ingredients, technique, and storage, you can achieve reliably softer crusts without sacrificing flavor or structure.
Understanding Why Bread Crusts Harden
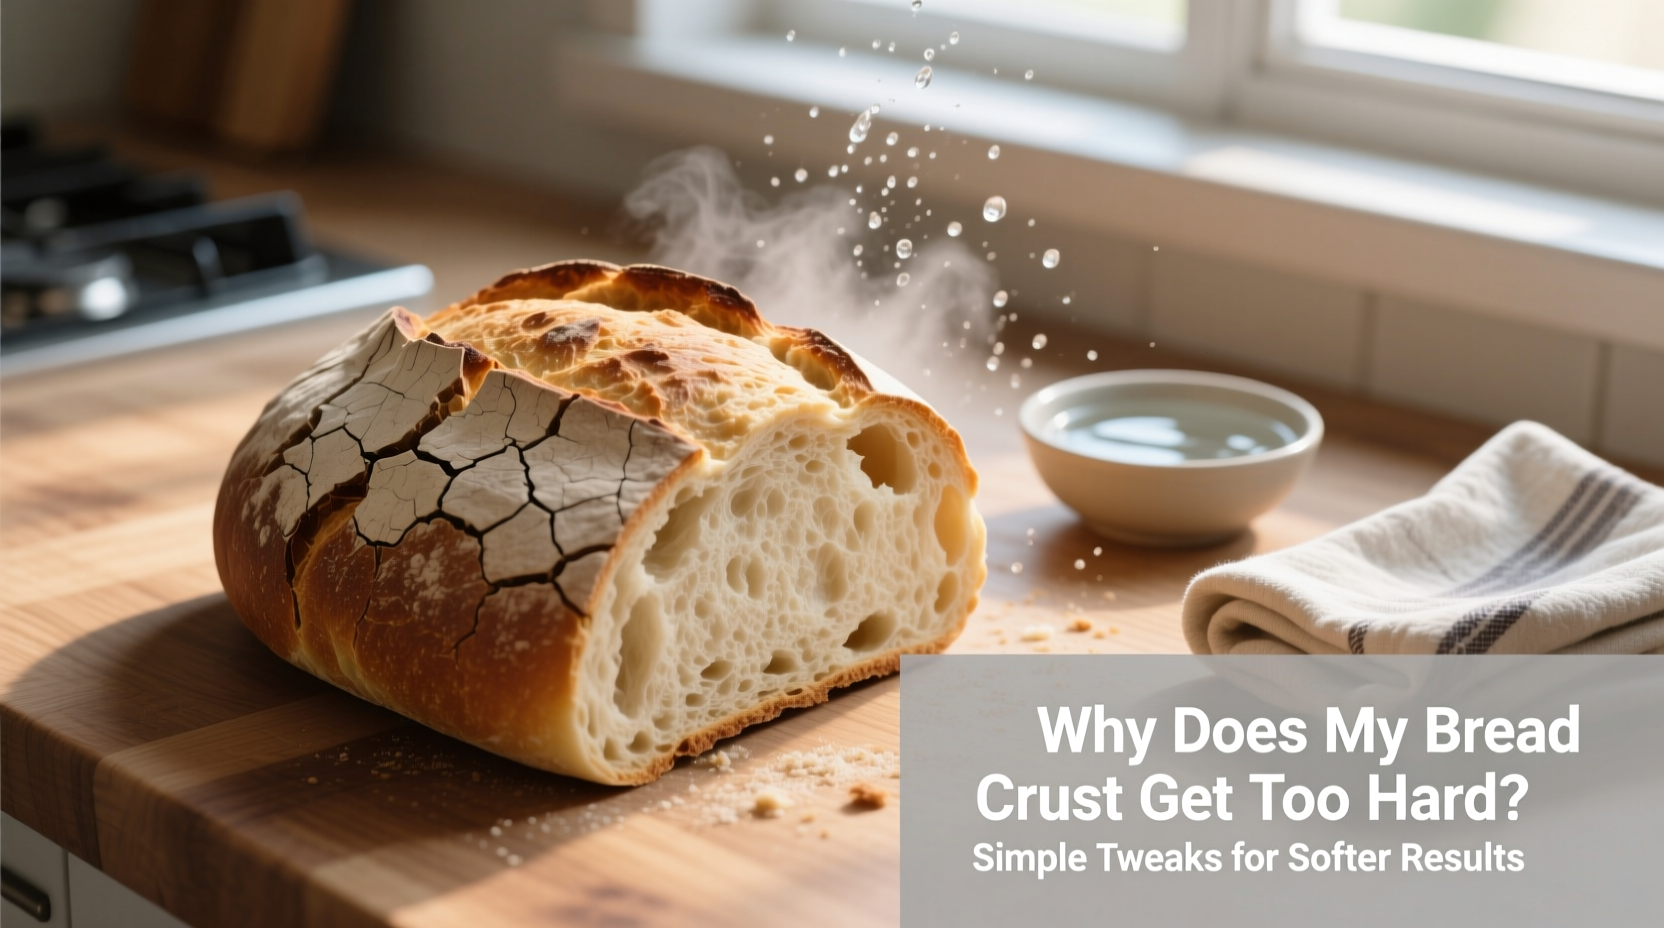
The formation of a crust during baking is a natural chemical process. As bread bakes, moisture on the surface evaporates while heat causes the outer layer of dough to dehydrate and undergo Maillard reactions—those complex browning processes responsible for rich color and deep flavor. However, when this outer layer loses too much moisture or is exposed to excessive heat for too long, the crust becomes thick, dry, and hard.
Several factors contribute to over-hardening:
- Oven temperature too high: Excessive heat accelerates moisture loss, leading to rapid crust formation and hardening.
- Long baking times: Extended exposure to heat dries out the crust further, even if the internal crumb is done.
- Lack of steam in the oven: Steam delays crust formation early in baking, allowing the loaf to expand fully before the surface sets. Without steam, the crust forms too soon and hardens quickly.
- Incorrect flour choice: High-protein flours like bread flour create stronger gluten networks, which can result in a denser, chewier crust.
- Poor cooling practices: Cooling bread directly on a wire rack without covering allows residual steam to escape too rapidly, drying the crust.
- Storage methods: Leaving bread uncovered after cooling invites air exposure, which continues to dry the crust over time.
Each of these variables plays a role. Fixing just one may help; addressing several will transform your results.
Simple Ingredient Adjustments for Softer Crusts
What you put into your dough directly affects how it behaves in the oven. Minor changes to your ingredient list can yield significantly softer crusts.
Increase Fat Content
Fats like butter, oil, or milk act as tenderizers by coating gluten strands and limiting their development. This not only creates a more delicate crumb but also softens the crust. Even small additions—such as 1–2 tablespoons of unsalted butter per loaf—can make a noticeable difference.
Use Milk Instead of Water
Milk contains fats, sugars (lactose), and proteins that enhance browning and retain moisture. Replacing water with scalded milk (heated then cooled) introduces these benefits while also inactivating enzymes that can weaken dough. The lactose promotes gentle browning without excessive drying, resulting in a golden, supple crust.
Add Sugar or Honey
Sugar isn’t just for sweetness—it’s hygroscopic, meaning it attracts and holds moisture. A small amount (1–2 teaspoons per loaf) helps keep both crumb and crust softer for longer. Honey offers the same benefit plus natural enzymes that improve texture.
Choose Lower-Protein Flour
All-purpose flour typically has less protein than bread flour (around 10–11.5% vs. 12–14%), leading to less gluten development and a more tender crust. For sandwich loaves or dinner rolls, switching to all-purpose or even pastry flour (in blends) can dramatically reduce crust hardness.
| Ingredient | Effect on Crust | Recommended Adjustment |
|---|---|---|
| Butter/Oil | Tenderizes, adds moisture | 1–2 tbsp per loaf |
| Milk (replaces water) | Softens crust, improves browning | Replace 50–100% of liquid |
| Sugar/Honey | Retains moisture, enhances softness | 1–2 tsp per loaf |
| All-Purpose Flour | Reduces gluten strength, softens crust | Substitute for bread flour |
“Even experienced bakers overlook how much fat and sugar influence crust texture. These aren’t just for enriched doughs—they’re essential tools for control.” — Daniel Klein, Artisan Baker & Instructor
Technique Tweaks During Baking
How you handle the dough and manage the oven environment matters just as much as ingredients.
Create Steam in the Oven
Professional ovens use steam injection to keep the dough surface moist during the first 10–15 minutes of baking. At home, you can replicate this effect:
- Place a metal pan on the bottom rack before preheating. When you load the bread, carefully pour 1 cup of hot water into the pan to generate steam.
- Alternatively, spritz the oven walls (not glass doors) with water using a spray bottle during the first five minutes of baking.
- For covered baking, use a Dutch oven. It traps steam naturally, delaying crust formation and yielding a thinner, more flexible crust.
Lower the Oven Temperature
Many recipes call for 375°F–425°F, but reducing the temperature by 25°F (to around 350°F–375°F) slows moisture loss and prevents over-browning. You may need to extend baking time slightly, but the crust will remain more pliable.
Avoid Overbaking
Just because the crust looks dark doesn’t mean the bread is done. Always check internal temperature: most standard loaves are ready at 190°F–200°F. Pulling the bread out at this point prevents unnecessary drying. Use an instant-read thermometer for accuracy.
Post-Bake Handling: Cooling and Storage
What happens after the bread leaves the oven is critical. Many bakers ruin a perfectly good loaf by letting it cool improperly.
Cool Covered, Then Uncovered
Immediately after removing bread from the oven, place it on a wire rack and cover loosely with a clean cotton towel for 20–30 minutes. This traps steam escaping from the crumb, which softens the crust. After this period, uncover to prevent sogginess and allow full cooling.
Store in a Bread Box or Paper Bag First
Plastic bags seal in moisture but can make the crust soggy if used too soon. Instead, let the bread cool completely, then store it cut-side down on a cutting board or in a bread box for up to 24 hours. After that, transfer to a partially sealed plastic bag to maintain softness without compromising texture.
Freeze for Long-Term Softness
If you won’t eat the bread within two days, slice and freeze it. Thaw slices as needed—this preserves crust softness better than refrigeration, which accelerates staling.
Revive Stale Bread Gently
If your crust has hardened over time, don’t discard it. Sprinkle the loaf lightly with water, wrap in foil, and reheat at 350°F for 10–15 minutes. The added moisture will rejuvenate the crust.
Mini Case Study: From Brick to Bakery-Soft
Sarah, a home baker in Portland, had been struggling with dense, rock-hard sandwich loaves for months. She followed a basic whole wheat recipe with bread flour, water, yeast, and salt, baking at 400°F for 35 minutes. Her kids refused to eat it unless heavily buttered.
After reading about steam and ingredient effects, she made three changes:
- Replaced half the bread flour with all-purpose flour.
- Added 1 tablespoon of honey and 1.5 tablespoons of melted butter to the dough.
- Used a preheated Dutch oven to bake the loaf, trapping steam naturally.
The result? A loaf with a thin, golden-brown crust that yielded easily to a knife. The interior was airy, and the crust stayed soft for two full days at room temperature. “It finally tastes like the bread from my favorite café,” she said. “I didn’t realize how much technique mattered.”
Checklist for Softer Bread Crusts
Follow this actionable checklist to avoid hard crusts in your next bake:
- ✅ Use all-purpose flour instead of bread flour for softer loaves.
- ✅ Add 1–2 tbsp of butter or oil to the dough.
- ✅ Replace water with milk or add 1–2 tsp of sugar/honey.
- ✅ Preheat oven with a steam pan or use a Dutch oven.
- ✅ Bake at a slightly lower temperature (350°F–375°F).
- ✅ Check internal temperature—remove at 190°F–200°F.
- ✅ Cover with a towel for 20–30 minutes after baking.
- ✅ Store properly: paper bag first, then plastic or bread box.
Frequently Asked Questions
Why does my homemade bread crust get harder overnight?
As bread cools and ages, moisture migrates from the crumb to the crust and then evaporates into the air. This process, called retrogradation, causes starches to recrystallize and the crust to stiffen. Storing bread in a breathable container initially, then sealing it, slows this process.
Can I fix a hard crust after baking?
Yes. Lightly dampen the crust with water, wrap the loaf in aluminum foil, and warm it in a 350°F oven for 10–15 minutes. The steam created inside the foil will soften the crust. Avoid microwaving, as it can make the entire loaf rubbery.
Is a hard crust a sign of under-kneading or over-proofing?
Not directly. Under-kneading leads to poor structure and dense crumb; over-proofing causes collapse. While these affect overall quality, crust hardness is more tied to baking conditions and ingredients. However, poorly developed dough may bake unevenly, contributing to patchy or excessively thick crusts.
Conclusion: Soft Crusts Are Within Reach
A hard bread crust doesn’t have to be inevitable. By understanding the science behind crust formation and making thoughtful adjustments—from tweaking your dough formula to managing steam and cooling—you can consistently produce loaves with tender, pleasant crusts perfect for everyday eating. These changes don’t require special equipment or advanced skills. They’re simple, practical, and grounded in real baking principles. Whether you're making sandwich bread, dinner rolls, or a rustic pullman loaf, softness is achievable. Start with one or two tweaks, observe the results, and refine your method. Soon, you’ll wonder why you ever accepted brick-like bread in the first place.


 浙公网安备
33010002000092号
浙公网安备
33010002000092号 浙B2-20120091-4
Comments
No comments yet. Why don't you start the discussion?